- Joined
- Oct 20, 2014
- Messages
- 1,996
- Points
- 113
- First Name
- Gavin
Hi all, it's been a while since I last built any 1/35 modern armour in my late teen and early twenties.
To re-engage with the subject I thought it would be great to build modern AFV's from the SADF (South African Defence Force) when they had AFV and troop carriers featuring some of the most forward thinking designs. MRAP is now a catch phrase in wheeled troop carriers, the SADF had the buffel in the 1970's. The French Panhard ML90, more commonly known as the the Eland 90, also fondly referred to as the "Noddy Car" due to the nodding action of the vehicle on firing it's 90mm gun, was the mainstay infantry support up to to introduction of the Ratel APC. The Eland could no longer travel as fast as the Ratel off road in the bush warfare environment of north South West Africa (Namibia) and south Angola. It's interim replacement was the Ratel 90, which effectively was the Ratel APC specially fitted out with the Eland 90 turret, these AFV's ran hit and run tactics defeating Soviet T34-85's and T55's during the course of the bush war.

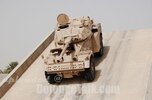
The true replacement for the Eland 90 was to be the Rooikat, but this did not make it in time for the bush war, but embraces all the doctrines of the SADF's mobile warfare in its design. Light, durable, range, speed, firepower.
The version I'm intending to build is the standard 76mm variant, there is a 105mm export variant and technology testbed variant with an automated turret as well a prototype SPAAG variant and most likely an anti tank missile version in the works.

This will be fun, and I intend on using SADF colours for my build and not the camo pattern sported by the SANDF version.
Till next time.
To re-engage with the subject I thought it would be great to build modern AFV's from the SADF (South African Defence Force) when they had AFV and troop carriers featuring some of the most forward thinking designs. MRAP is now a catch phrase in wheeled troop carriers, the SADF had the buffel in the 1970's. The French Panhard ML90, more commonly known as the the Eland 90, also fondly referred to as the "Noddy Car" due to the nodding action of the vehicle on firing it's 90mm gun, was the mainstay infantry support up to to introduction of the Ratel APC. The Eland could no longer travel as fast as the Ratel off road in the bush warfare environment of north South West Africa (Namibia) and south Angola. It's interim replacement was the Ratel 90, which effectively was the Ratel APC specially fitted out with the Eland 90 turret, these AFV's ran hit and run tactics defeating Soviet T34-85's and T55's during the course of the bush war.
The true replacement for the Eland 90 was to be the Rooikat, but this did not make it in time for the bush war, but embraces all the doctrines of the SADF's mobile warfare in its design. Light, durable, range, speed, firepower.
The version I'm intending to build is the standard 76mm variant, there is a 105mm export variant and technology testbed variant with an automated turret as well a prototype SPAAG variant and most likely an anti tank missile version in the works.
This will be fun, and I intend on using SADF colours for my build and not the camo pattern sported by the SANDF version.
Till next time.
Attachments
Last edited:


