You are using an out of date browser. It may not display this or other websites correctly.
You should upgrade or use an alternative browser.
You should upgrade or use an alternative browser.
Humvee Resuscitated to life.
- Thread starter rtfoe
- Start date

rtfoe
SMF Supporter
Hi Greg, I think it's this one...nice picks, I can reference them for stowage attachements, thanks.
 The jerrycan rack looks similar to what I've done and the exhaust pipe sticking out on the left.
Jim, they're quite easy to lathe on a motor tool. Used a sharp chisel for the cuts. Thanks.
Cheers,
Richard
Hi Richard
Great scratching. I do like the little turned aerial base.
Jim
Jim, they're quite easy to lathe on a motor tool. Used a sharp chisel for the cuts. Thanks.
Cheers,
Richard
BigGreg
SMF Supporter
- Joined
- Apr 27, 2018
- Messages
- 2,047
- Points
- 113
- First Name
- Gregory
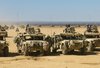
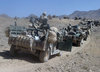
THEN 1ST RECON MARINES (well since you did Peleilu.... it figures...Hi Greg, I think it's this one...nice picks, I can reference them for stowage attachements, thanks.
The jerrycan rack looks similar to what I've done and the exhaust pipe sticking out on the left.
Jim, they're quite easy to lathe on a motor tool. Used a sharp chisel for the cuts. Thanks.
Cheers,
Richard
 ) very good choices.. if you need pics of USMC equipment and stuff let me know...
rtfoe
SMF Supporter
THEN 1ST RECON MARINES (well since you did Peleilu.... it figures...
Hi Greg, Roger Wilco...thanks. It's probably coincidance that it's the same regiment but nice to know.
Steve, thank you kindly, haven't got to that part yet...I've always used foil too but normally added after painting.
John, ah...another one that didn't see this before and I'm not surprised as I may have posted this way before you joined the other forum (the one that shall not be named). I took it for granted that that forum would last beyond my days and didn't keep dates on my builds. Glad you've caught it here.
Cheers,
Richard
rtfoe
SMF Supporter
I'm staying near the Straits of Johor about to cross over the causeway to Singapore to attend a cousins wedding anniversary dinner so there will be a delay to the response. Before the trip to Johor I rummaged the stash to locate the forgotten Humvee. It's looking good having been kept in the box for the last 3 or so years, the sand pigments still untouched since the last application.
Anyway here's the continuation...
At first I found this wire at a hardware store and decided to use it as barbed wire ...


It didn't look right so I substituted it with Verlinden etched barbed wire. Looks a little malnourished and will need an extra one or two wound lengths.


The Humvee is all primed.

Including the accessories here...


There will be pre-shadowing next...
Cheers,
Richard
Anyway here's the continuation...
At first I found this wire at a hardware store and decided to use it as barbed wire ...
It didn't look right so I substituted it with Verlinden etched barbed wire. Looks a little malnourished and will need an extra one or two wound lengths.
The Humvee is all primed.
Including the accessories here...
There will be pre-shadowing next...
Cheers,
Richard
Steve Jones
Steve Jones Scale Modelling Site
Very nice Richard. Very nice indeed. I will pull up a chair with the rest of the rabble and watch you work your magic

rtfoe
SMF Supporter
Thanks Steve and Si, glad you guys like progress so far. My photography and presso were better last time my camera was working...now it's just done with my handphone.
Both of you must have missed the blog in the past forum. I lost steam on building it 3 years ago...can't remember what I switched to...could have been the revival of Harry Tate.
Cheers,
Richard
Both of you must have missed the blog in the past forum. I lost steam on building it 3 years ago...can't remember what I switched to...could have been the revival of Harry Tate.
Cheers,
Richard
rtfoe
SMF Supporter
Let's put on some shades dudes...

Many have asked how I get so straight lines with my pre-shading. It's all about air pressure, dilution of paint and the willingness to go over the same area until the paint appears. Dilute the paint until it is like water or nearly translucent then reduce your air pressure and slowly build it up until paint flows out the tip. I go over the line at least five times before I see any result.

You can add pigmentation with a brush with a stippling action during pre-shading. Here I have just created more stronger shadows on the armour plate. Remainder paint was used to paint the tyres, seats and jerrycans.

Cheers,
Richard
Many have asked how I get so straight lines with my pre-shading. It's all about air pressure, dilution of paint and the willingness to go over the same area until the paint appears. Dilute the paint until it is like water or nearly translucent then reduce your air pressure and slowly build it up until paint flows out the tip. I go over the line at least five times before I see any result.
You can add pigmentation with a brush with a stippling action during pre-shading. Here I have just created more stronger shadows on the armour plate. Remainder paint was used to paint the tyres, seats and jerrycans.
Cheers,
Richard
rtfoe
SMF Supporter
I mentioned that last Saturday I attended a cousins wedding anniversary in Singapore. Well it had a bit or touch of colonialism in it. Firstly it was held at the Command House at Changi Cove...here's just a little history of the place...
"Construction of the CommandHouse by the Royal Engineers commenced in 1928 and was completed in 1935 close to the eve of World War 2. It is steeped in Singapore's history, having functioned as the Officer's Mess and Quarters of the Far East Headquarters of the Royal Air Force [RAF] from 1945 to 1972.
With the reversion of the site to independent Singapore, it was leased and operated by the Singapore Christian Conference Centre between 1977 and 1983, during which time the CommandHouse hosted many significant events including then Prime Minister Lee Kuan Yew historical address to trade unionists."
Here are some picts...I'm somewhere in there amongst my cousins, sister and brother in law...we sure are mixed and multi-racial or what...


 ...now I had to ask my cousin to which part of our ancestry are we part Scottish

Meanwhile back in Malaysia...
While primming I realised that I hadn't scratched the bracket for the jerrycan rack. That was easliy done with pla strip and hexagonal rod for bolts...

In the reference the bonnet was a field addition and retained the olive drab or was it painted dark as an anti-glare. I masked the top grill and sprayed it with Tamiya Olive drab with a drop of black mixed in.

The Pre-shade can be seen through the light sand paint.

The kangaroo bar needed some adjustment to its measurements and I took off about 1mm along the length right in the middle.

Armour plates also were painted with the olive drab mix. Pre-shade is just visible under the paint.

Any comments welcomed.
Cheers,
Richard
"Construction of the CommandHouse by the Royal Engineers commenced in 1928 and was completed in 1935 close to the eve of World War 2. It is steeped in Singapore's history, having functioned as the Officer's Mess and Quarters of the Far East Headquarters of the Royal Air Force [RAF] from 1945 to 1972.
With the reversion of the site to independent Singapore, it was leased and operated by the Singapore Christian Conference Centre between 1977 and 1983, during which time the CommandHouse hosted many significant events including then Prime Minister Lee Kuan Yew historical address to trade unionists."
Here are some picts...I'm somewhere in there amongst my cousins, sister and brother in law...we sure are mixed and multi-racial or what...
...now I had to ask my cousin to which part of our ancestry are we part Scottish Meanwhile back in Malaysia...
While primming I realised that I hadn't scratched the bracket for the jerrycan rack. That was easliy done with pla strip and hexagonal rod for bolts...
In the reference the bonnet was a field addition and retained the olive drab or was it painted dark as an anti-glare. I masked the top grill and sprayed it with Tamiya Olive drab with a drop of black mixed in.
The Pre-shade can be seen through the light sand paint.
The kangaroo bar needed some adjustment to its measurements and I took off about 1mm along the length right in the middle.
Armour plates also were painted with the olive drab mix. Pre-shade is just visible under the paint.
Any comments welcomed.
Cheers,
Richard
They often added pad eyes to the armor doors so that another vehicle could pull off the doors if assistance needed in exfil due to bad day event. Looking really good so far. PaulE
scottie3158
SMF Supporter
great work Richard and a great bit of history.
Steve Jones
Steve Jones Scale Modelling Site
Some very nice detail on the kit. All heading in the right direction
Jim R
SMF Supporter
rtfoe
SMF Supporter
Hi Guys, I've been involved with assisting our first ScaleART18 event in the weekend and only just settled down to check the forum. Thanks for the replies and comments. They are much encouraging. I hope to make a start on the weathering process and finishing this kit for the dio I am planning.
Greg, drab rusted plates are the fun part as you can go to the market with weathering.
Paul, did I add pad eyes...not sure what they are having just followed from an image as I often do without the knowledge of what they're for.
Michael, I'm just stubborn by nature and will persist to the end however bad the kit is...calls for lots of self medication and cussing but very rewarding at the end.
Scottie, thanks, I had to check it out since it was near Changi and the building so well preserved.
Steve, it's always forwards with some stalling in between.
Jim, these trips bring a fresh mind to the bench everytime. I trash my airbrushes...really but it's the application and the familiarity of what the airbrush can do with its strengths and weaknesses like the paint flow and diameter of paint contact to the surface made by how near or far you airbrush from.
Breaking out the Humvee and dusting the cobwebs soon.
Cheers,
Richard
rtfoe
SMF Supporter
Hi. thought I'd restart this again. My mix of fine sand, glue and a bit of Future until becoming a thick slosh.

With an old brush I stippled it along the bottom sides and underneath the chassis...

...in the wheel wells...

...rear making sure the texture is smothered well.

I did some onto the wheels and hubs as well.

Here the front kangaroo bar has been streamlined across...I will need to sand the joint down as it is quite obvious.

Some airbrushed dusting will be added to the sand deposits and weathering will proceed even further. I'm still rethinking the vignette for this.
Cheers,
Richard
With an old brush I stippled it along the bottom sides and underneath the chassis...
...in the wheel wells...
...rear making sure the texture is smothered well.
I did some onto the wheels and hubs as well.
Here the front kangaroo bar has been streamlined across...I will need to sand the joint down as it is quite obvious.
Some airbrushed dusting will be added to the sand deposits and weathering will proceed even further. I'm still rethinking the vignette for this.
Cheers,
Richard