P51 D from Zoukei Mura

J

Judas.1044

Guest
Hi comrades!
It has been a while since my last post. I even found that the whole webpage has changed!
Anyway I have been modelling all this time, don't think I've been lazy, so I will be posting some of the models I've built.
Here you have a superb P51 from a Japanese brand called Zoukei Mura:

FOTO (1).JPG
The best of this model is that it has each and every little detail from the inner structure, engine, machine gun bays... you'll see.
Even the instructions manual is full of detail, as if it was a contemporary document:
FOTO (2).JPG
FOTO (3).JPG
Following the instructions, I started off with the engine. Just check the crazy level of detail... they even moulded the pistons!


FOTO (7).JPG

So step by step, I built the engine block, the first part of the transmission and the intake manifold:
FOTO (8).JPG
FOTO (9).JPG
FOTO (10).JPG
Then I glued the two cylinder blocks and the crankcase:
FOTO (11).JPG
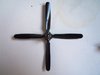
And here you have it alltogether, along with the propeller shaft:
FOTO (13).JPG
On the back of the engine I glue the fuel and oil pipes, as well as other little details:
FOTO (14).JPG
I also build the tuebocharger:
FOTO (15).JPG
And here you have the three main parts already covered with black primer: engine, turbocharger and crankshaft cover:
FOTO (16).JPG
Just some shots of grey primer in order to create a simple light/shadow scheme:
FOTO (17).JPG
And then the main paintjob in a grey/blueish scheme. As you can notice, I highlited the bolts and main lines and left the cylinder cover in black:
FOTO (18).JPG
Next step, I put a decal and applied some washes with a very dilluted mix of brown and black. I also added the water coolant tank and the alternator:
FOTO (19).JPG
Above the engine I added the oil and fuel pipes:
FOTO (20).JPG
Time to put it all together:
FOTO (21).JPG
FOTO (22).JPG
And more pipework (I think these wre for the sparks):
FOTO (23).JPG
And then I added the exhaust cover and ignition cables:
FOTO (24).JPG
 
J

Judas.1044

Guest
Well, it seems I only can add 20 images each time.
Let's continue with the exhaust pipes, painted brown as if they where burnt by the exposure to heat:
FOTO (25).JPG
With that, the main part of the work in the engine is done, so next step, will be the firewall, engine frame and oil tank:
FOTO (26).JPG
I painted them with a tone of yellow, very similar to the imprimation they used in the North American factory:
FOTO 13.jpg
But my dear P51 has seen many combats over the european skies, and has been manipulated by many mechanics so I put some grime to make it look a little bit more real:
FOTO (28).JPG
I painted the oil tank in bright yellow:
FOTO (27).JPG
And, as I'm going to place a pair of mechanic, figures, I decided to imitate an oil leakage for them to fix:
FOTO (29).JPG
Then I glued it all together, firewall, engine and frame:
FOTO (31).JPG
FOTO (32).JPG
FOTO (33).JPG
FOTO (34).JPG
And that's how cool it looks the Packard V-1650, the american version of the superb Rolls-Royce Merlin!

Now, let's aim for the cockpit!

I started with the cockpit floor. As I learned, the cockpit floor was made of wood but it was painted black, so I decided to imitate that. First, I painted the floor in deck tan, and then I gave some brush strokes with dark brown and red brown oil paints:
FOTO (35).JPG
Then I painted with Tamiya orange glaze:
FOTO (36).JPG
Afterwards, I covered it with future, hairspray and matt black:
FOTO (37).JPG
And why the hairspray?? Because with a toothpick, a brush and some water I can imitate the scratches:
FOTO (38).JPG
Then I painted the rest of the floor with interior green and I applied some dust:
FOTO (39).JPG
I followed painting all the rest of elements also in interior green:
FOTO (40).JPG
FOTO (43).JPG
With yellow primer and steel I paint the scrathes and marks left by the parachute hilts in the seat:
FOTO (44).JPG
I completed the seat with dark green for the cushion, black for the upper part and tphotoetched belts:
FOTO (46).JPG
And in the back... I glue the heating system:
FOTO (47).JPG
 
J

Judas.1044

Guest
Next step: I put the fuel tanks and the frame for the battery and the radio with the admission pipe and fuel indicator:
FOTO (48).JPG
For the gauges I used the decals and some paint:
FOTO (49).JPG
Then I painted the central console and I added the pedals:

FOTO (50).JPG
Then I painted the sides and added some decals:
FOTO (51).JPG
Time to bring it all together again:
FOTO (52).JPG
FOTO (53).JPG
FOTO (54).JPG
FOTO (55).JPG
I added the radio and battery:
FOTO (56).JPG
And that's how a mustang looks like without skin:
FOTO (57).JPG

That will be all for today!
 

colin m

Moderator
Staff member
Moderator
SMF Supporter
Joined
Dec 26, 2008
Messages
8,604
Points
113
Location
Stafford, UK
First Name
Colin
You're doing a great job there with that amazing level of detail. But pistons - what was the manufacturer thinking !
 

BarryW

SMF Supporter
Joined
Jul 23, 2011
Messages
5,037
Points
113
Location
Dover
First Name
Barry
You're doing a great job there with that amazing level of detail. But pistons - what was the manufacturer thinking !
It is their little ‘quirk’, almost a trade mark.
 

BarryW

SMF Supporter
Joined
Jul 23, 2011
Messages
5,037
Points
113
Location
Dover
First Name
Barry
you are dong a great job Judas. Be careful fitting the airframe, dry fit and keep dry fitting at least two steps ahead. It is easy to get a small misalignment that has a knock on effect with this engineering. It is a great kit though.
 
J

Judas.1044

Guest
you are dong a great job Judas. Be careful fitting the airframe, dry fit and keep dry fitting at least two steps ahead. It is easy to get a small misalignment that has a knock on effect with this engineering. It is a great kit though.

Hi Barry!
Well, I finished this kit a while ago, but as you've said, I had some fitting problems I could manage at last (Well, you'll see)
Thanks anyway!
 
J

Judas.1044

Guest
Let's continue!

I primed the pipes and elements that conect the engine with the oil and coolant radiators:
FOTO (61).JPG
Then I painted them with Alclad metallics, which I think is the best option for doing metallics.
It has its pros as for example its supersmooth finish, but also has its cons, as it is truly revealing if any mistake during building or sanding was made:

FOTO (62).JPG
Anyway I left this part like that because it has a cover, is going to be placed in the belly of the plane, and it won't be seen. Here I glued everything in place:
FOTO (63).JPG
And then I add the coolant radiator:
FOTO (65).JPG
And the oil radiator:
FOTO (66).JPG
And just below the engine I glued the intake for the supercharger, also painted with alclad laquers and weathered with oils, Here you can also see the final conection of the coolant pipes with the tank just above the transmission and propeller shaft, which was quite tricky as it didn`t want to fit in place:
FOTO (67).JPG
Then I primed the wing structure:
FOTO (69).JPG
I painted the main fuel tanks:
FOTO (77).JPG
At that point I knew I wanted to left open at least one of the machine gun bays and I didn't realize that the tanks couldn't be seen, but anyway it didn't took so long:
FOTO (78).JPG
Then I painted the cal.50 machine guns with black primer:
FOTO (72).JPG
Then steel:
FOTO (73).JPG
Black wash:
FOTO (74).JPG
And graphite from a regular pencil:
FOTO (75).JPG
Then, the loaders and ammo belts. As I heard in a documentary, ground crews used to fit some tracing ammo between regular rounds in order to allow the pilot to track their fire, so I painted red one of each five rounds:
FOTO (79).JPG
Then I fit everything in place:
FOTO (80).JPG
Now, lets put some wings into the main strut!
FOTO (82).JPG

Well, this was mainly for the pictures, as the fuselage and wing panels must be cover the structure before joining them together.
 
J

Judas.1044

Guest
Let's begin with that lovely silver skin of the mustang!
As you can see in this picture, I used three or four different tones of aluminium to have variety in the fuselage:
FOTO (91).JPG
FOTO (97).JPG

FOTO (98).JPG
FOTO (99).JPG
This wouldn't be a mustang if it doesn't have a colorful livery, so I masked part of the cowling:
FOTO (100).JPG
FOTO (101).JPG
And I painted it in brilliant red:

FOTO (103).JPG
FOTO (102).JPG
I made some scratches:
FOTO (104).JPG
FOTO (105).JPG
And then I placed everything over the fuselage strut:
FOTO (106).JPG
On the left side I made the same, but using the parts of the models without the cowling:
FOTO (107).JPG
And this is the big problem Barry warned me about...
The model allows you to build the nose with or without the engine cowling. But this "Frankestein" I decided to make, mixing both options... it just doesn't work because it leaves quite big gaps between the wing and the fuselage as you'll see.
But first, I had to place the windshield, so here you have the windshield process:
Masks:
FOTO (125).JPG
Interior green:
FOTO (126).JPG
And aluminium
FOTO (132).JPG
I also painted the anti-glare band of olive green in the nose.
This olive green paint used to flake and change colour with the exposure to sunlight and rain, so I used the salt technique to imitate that.
First I paint a light tone of olive drab, then I shot some water and just add salt:
FOTO (133).JPG
And then I painted the normal tone of olive drab. Once you remove the salt and paint some chipping, this is the result:
FOTO (141).JPG
I had to replace the mask between colous and that left a small gap I tried to minimize with an oil wash (with poor results).

Well, that's all for today...
Regards!
 
J

Judas.1044

Guest
Let's continue after a long Christmas break!

I made some chipping in the frontal coil:
FOTO (135).JPG

Then I continued with the wings, starting with the main gear wells:

FOTO (143).JPG


FOTO (147).JPG
FOTO (150).JPG
FOTO (151).JPG
Then I painted some layers of aluminium lacqer from Alclad:
FOTO (148).JPG
After that, I glued the outer pannels to the inner structure:
FOTO (149).JPG
I used some masking to imitate the metal stress in the flaps (just as an experiment)
FOTO (153).JPG
FOTO (154).JPG
I also added the red wingtips:
FOTO (157).JPG
I also worked on the main gears:
FOTO (173).JPG
FOTO (175).JPG
I used steel cable to imitate the hydraulic brake system:
FOTO (179).JPG
And then... the marriage, joining the wings to the main fuselage:
FOTO (159).JPG
The right side didn't look so bad, but the left side...
FOTO (162).JPG
It certainly needed make up... this is what BarryW just said some weeks ago about misalignments.
This is what I did: First, masking:
FOTO (163).JPG
After that, I worked with putty and green stuff:
FOTO (166).JPG
Then, sanding and engraving:
FOTO (168).JPG
And finally painting, and this is are the results after the make-up operation:
FOTO (171).JPG
FOTO (172).JPG
In addition, I will use some other tricks to mask this fitting misalignments, but I'll leave that for another day

Cheers!
 

rtfoe

SMF Supporter
Joined
Apr 29, 2018
Messages
7,504
Points
113
Location
Malaysia
First Name
Richard
You sure know how to get into the thick of things Judas. :smiling2: Good come back. :thumb2: With the price and detailing of a Zuokei kit I thought they would at least made the third option viable. I guess all the attention was on the engine.

I went thru all your steps...lovely and interesting using yellow and staining it rather than straight out of the bottle zinc chromate...saves on highlighting. It's looking real good so far. :thumb2:

Cheers,
Richard
 
J

Judas.1044

Guest
Thanks for your kind comments guys!

Let's keep going with this mustang.
I finished the main gear wells, with all the piping and lights:

329074

329075

Then I started with the propeller:
Black Primer:
329077

Marks and stencils:
329078

Yellow tips, scratches and weathering:
329079

Then a beautiful red spinner:
329080

And finally the propeller in place:
329081

I continued with the nice bubble canopy:
329082

329083

As the mustang was used mainly as an escort fighter, I decided to add two external fuel tanks.
Again, black primer:
329084
A nice aluminium layer from ALCLAD:
329085

Some decals:


329086

And fuel stains:
329087

Then I continued the dull work of placing the decals all over the model with Micro Set and Micro Sol:
329088

And here is the result:
329089

Just some minor details left and I'll post it into the finished models thread!

Regards!
 

Attachments

  • FOTO (188).JPG
    FOTO (188).JPG
    71.6 KB · Views: 0

Vaughan

SMF Supporter
Joined
Apr 1, 2011
Messages
2,707
Points
113
First Name
Vaughan
A great build, the quality of workmanship is outstanding.
 
J

Judas.1044

Guest
Thanks for your comments friends!

Let me tell you how I finished the model:
I completed the machine gun wells, keeping one of them open. You can also notice that I marked all the engraved panel lines with a light oil wash, insisting in the fuel intakes:
329659

I used the airbrush for the smoke trail coming out from the exhaust:
329660

In order to give a scale sensation and cover up some misalignment mistakes, I asked these guys for help:
329661

I just painted with the usual olive drab, trying to give a scruffy look, with oil stains, some dust...
329662
329663

And that's it!!!
I'll post some pics here, and the rest in the finished aircraft thread:
329669
329670
329671

I hope you enjoyed it!

Regards!
 
Top