Return to a stalled build

Bigfoot57

SMF Supporter
Joined
Jun 24, 2015
Messages
860
Points
93
First Name
Colin
Lancaster 1/32 Update No 30

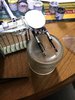
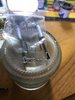
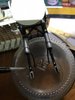
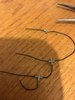
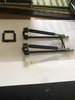
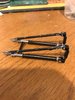
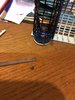
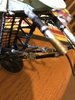
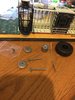
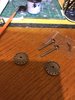
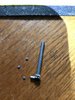
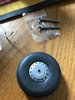
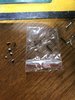
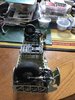
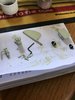
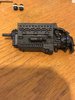
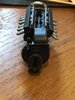
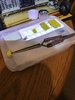
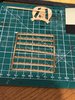
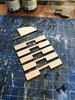
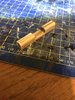
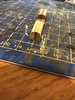
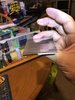
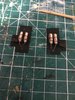
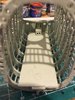
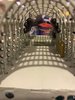
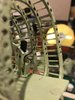
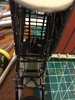
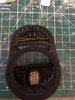
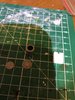
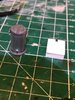
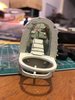
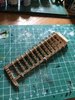
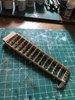
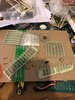
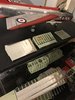
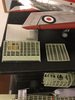
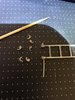
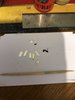
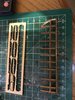
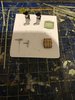
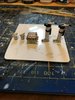
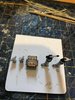
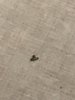
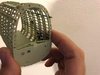
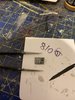
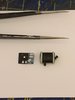
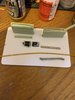
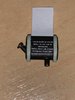
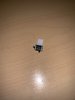
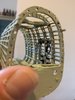
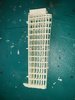
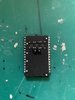
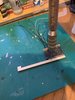
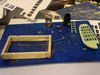
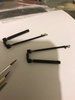
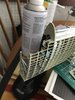
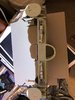
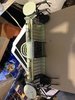
Ok here’s the next instalment in this saga starting to assemble the undercarriage 1st off is adding the tiny bolt heads to the oleos and then bolting the parts together to form the assemblies as shown
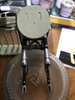
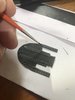
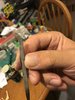
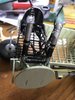
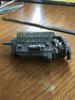
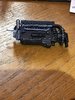
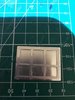
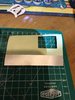
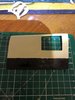
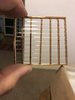
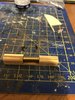
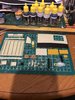
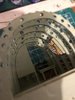
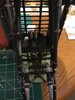
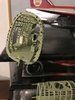
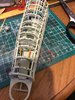
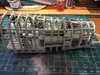
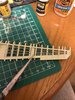
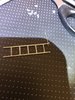
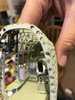
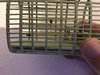
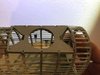
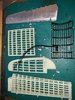
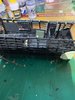
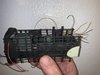
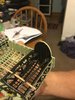
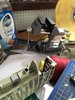
Next you attach the undercarriage to the mid wing box structure only you don't as the slots are in the wrong place the net result of trying to force them into place resulted in the carnage as illustrated
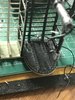
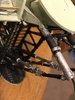
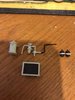
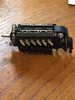
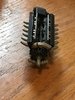
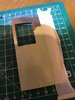
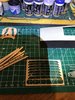
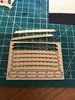
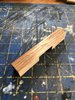
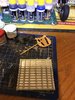
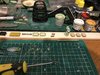
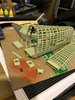
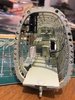
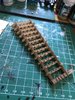
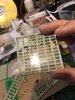
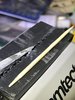
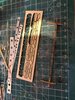
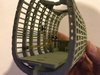
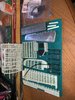
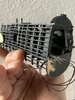
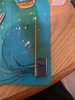
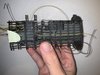
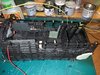
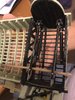
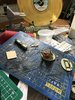
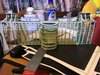
10 hours after that disaster is my repairs to the structure as always as its made of wood you can easily construct the mangled parts for replacements you just need paitence but if they had cut the slots in the correct position then this wouldn’t have happened anyway its all fixed now just a lick of paint and it will be difficult to see the repairs

Regards

Colin
 

Attachments

  • 9D74C22F-516C-46D5-B555-866C77BC6AC9.jpeg
    9D74C22F-516C-46D5-B555-866C77BC6AC9.jpeg
    56.2 KB · Views: 23
  • 9E4D6EA0-33B6-41A5-8AB6-643A7D507C5B.jpeg
    9E4D6EA0-33B6-41A5-8AB6-643A7D507C5B.jpeg
    35.4 KB · Views: 24
  • DF1D84EA-E1CA-41D6-9826-1B184457E282.jpeg
    DF1D84EA-E1CA-41D6-9826-1B184457E282.jpeg
    82.2 KB · Views: 24
  • 07A6A8C2-BCAD-4831-8F40-4F59F47B41A7.jpeg
    07A6A8C2-BCAD-4831-8F40-4F59F47B41A7.jpeg
    83.8 KB · Views: 24
  • A0212F7F-1D91-497B-8A91-4627224129D2.jpeg
    A0212F7F-1D91-497B-8A91-4627224129D2.jpeg
    78.9 KB · Views: 23
  • CBE18D1E-0825-469D-9D32-C50BDD6AA4CE.jpeg
    CBE18D1E-0825-469D-9D32-C50BDD6AA4CE.jpeg
    124.5 KB · Views: 24
  • 63F87314-0D59-4E27-8A97-C34614125550.jpeg
    63F87314-0D59-4E27-8A97-C34614125550.jpeg
    92.3 KB · Views: 24
  • 97270663-DD6E-4A0D-9117-E1CEF3C5D0AE.jpeg
    97270663-DD6E-4A0D-9117-E1CEF3C5D0AE.jpeg
    130 KB · Views: 23
  • D3827E01-E589-4476-B1C1-FDFB97CF1F63.jpeg
    D3827E01-E589-4476-B1C1-FDFB97CF1F63.jpeg
    131.6 KB · Views: 22
  • 7C9D089C-EF19-4B56-AC18-3DC0E04B02A4.jpeg
    7C9D089C-EF19-4B56-AC18-3DC0E04B02A4.jpeg
    81 KB · Views: 23
  • 70D7D443-736B-42AD-BA68-84DE3506CAA5.jpeg
    70D7D443-736B-42AD-BA68-84DE3506CAA5.jpeg
    91.7 KB · Views: 23

Steve Jones

Steve Jones Scale Modelling Site
Joined
Apr 27, 2018
Messages
6,698
Points
113
Location
Plymouth
First Name
Steve
Another great update Colin. Starting to get an idea of where you are at now. Looks like you are having a great time.:thumb2:
 

Bigfoot57

SMF Supporter
Joined
Jun 24, 2015
Messages
860
Points
93
First Name
Colin
Lancaster 1/32 Update No 31

Ok after the last session of disaster and repairs here we go again this time I’m doing it my way ie assembling the undercarriage in full then attach it to the wing box as a single unit
So 1st up I used a glass jar as a support for the undercarriage as it was the correct height to enable me to lay the struts out flat and level to attach the tiny nut heads to the struts
Next I attached the black wire to the cross pieces as per photo as the previous leg was done already with the legs mounted in the wing box and trying to attach the black wiring to them cross pieces was a right pia so this time I have attached before they are mounted into the wing box
Then the undercarriage struts were assembled and painted and left to dry they still need a bit of touching up then the wires will be attached as per the previous set of struts
Finally I added my printed rivets to the bulkhead and then used a 000 brush to paint over the white areas around the rivet strips before cementing the bulkhead into place
Well thats it for now more to follow

Regards

Colin
 

Attachments

  • 0E70451D-6FED-41F6-AC0A-3D5D500E8025.jpeg
    0E70451D-6FED-41F6-AC0A-3D5D500E8025.jpeg
    84.9 KB · Views: 16
  • C550919B-D4D6-4D6D-9397-114AAC4213E0.jpeg
    C550919B-D4D6-4D6D-9397-114AAC4213E0.jpeg
    71.4 KB · Views: 16
  • 6DD8AF79-1CB8-4119-B1E0-E06ECA4174B8.jpeg
    6DD8AF79-1CB8-4119-B1E0-E06ECA4174B8.jpeg
    65.4 KB · Views: 16
  • 69A5E1DD-1779-4530-94ED-4002F83ADEC7.jpeg
    69A5E1DD-1779-4530-94ED-4002F83ADEC7.jpeg
    65.9 KB · Views: 15
  • 4E9781B8-0BEE-4566-B1CC-9D2574E87097.jpeg
    4E9781B8-0BEE-4566-B1CC-9D2574E87097.jpeg
    79.3 KB · Views: 15
  • EB4986B4-F12B-4819-AB26-1D21AAC5FF26.jpeg
    EB4986B4-F12B-4819-AB26-1D21AAC5FF26.jpeg
    144.4 KB · Views: 16
  • A564F841-BB03-4F4D-A761-36DCA66777AE.jpeg
    A564F841-BB03-4F4D-A761-36DCA66777AE.jpeg
    52.2 KB · Views: 14
  • 3B49DCF9-AD93-4A8B-A536-9510B55B2424.jpeg
    3B49DCF9-AD93-4A8B-A536-9510B55B2424.jpeg
    116.6 KB · Views: 15
  • 603A3EA0-F05E-47C4-985D-C66BC265F36B.jpeg
    603A3EA0-F05E-47C4-985D-C66BC265F36B.jpeg
    47.4 KB · Views: 16

Steve Jones

Steve Jones Scale Modelling Site
Joined
Apr 27, 2018
Messages
6,698
Points
113
Location
Plymouth
First Name
Steve
Another intricate update Colin. The rivets have worked out well. Looking forward to the next instalment
 

Bigfoot57

SMF Supporter
Joined
Jun 24, 2015
Messages
860
Points
93
First Name
Colin
Lancaster 1/32 Update No 32

We have wheels at last finally assembled the complicated main wheel construction and it retracts as well
1st off find and attach the undercarriage locks but as you can see they didn’t fit so out with the file to make them fit next scrap off the paint on the tiny bolt heads to make them visible then attach them to the undercarriage
Moving onto the main wheels 1st off I sanded down the moulding seam off the tyres and generally roughed them up to make them more realistic then there is some painting to be done this included the wheel centres in which black paint was applied into the bolt holes and the main axle supports after the paint on the axle supports had dried the bolt heads were stuck on and then a thin strip of aluminium was folded around the base and glued in place then the axles were pushed into the main wheel so it rotates freely
Next the oleos were inserted into the main supports with a spring inserted prior to that and a securing brass pin was glued into place through the outer side of the main legs
Pictures show it better than words so see attached still got to attach hydraulic hoses to wheels but apart from that this section is now finished
 

Attachments

  • C2654BE4-3552-4B7D-AE8B-9C6A079CA235.jpeg
    C2654BE4-3552-4B7D-AE8B-9C6A079CA235.jpeg
    82.1 KB · Views: 13
  • B730BD67-110E-45E1-8A42-CEBB01D44E66.jpeg
    B730BD67-110E-45E1-8A42-CEBB01D44E66.jpeg
    87.7 KB · Views: 13
  • 08BC773C-0170-4AFE-AE05-0FB62237631C.jpeg
    08BC773C-0170-4AFE-AE05-0FB62237631C.jpeg
    67.8 KB · Views: 11
  • 26F864AD-D8F0-4A02-8971-849337388641.jpeg
    26F864AD-D8F0-4A02-8971-849337388641.jpeg
    65 KB · Views: 11
  • 239E4E82-86A8-4003-B94D-90B947219F82.jpeg
    239E4E82-86A8-4003-B94D-90B947219F82.jpeg
    32.5 KB · Views: 11
  • DD13248A-FBF8-4974-9EB3-CE4868BAB4DD.jpeg
    DD13248A-FBF8-4974-9EB3-CE4868BAB4DD.jpeg
    76.6 KB · Views: 11
  • A0E0A204-1D4D-4A7E-BAFD-661778DA753F.jpeg
    A0E0A204-1D4D-4A7E-BAFD-661778DA753F.jpeg
    106.8 KB · Views: 11
  • A22EF20E-47EC-48AD-BF08-4B11DAF268BE.jpeg
    A22EF20E-47EC-48AD-BF08-4B11DAF268BE.jpeg
    86 KB · Views: 12
  • C27086B1-E42E-4230-81C4-7D3DA508C5AD.jpeg
    C27086B1-E42E-4230-81C4-7D3DA508C5AD.jpeg
    60.7 KB · Views: 12
  • E41CC72E-DF40-4602-BBAF-DC3CDE099AA9.jpeg
    E41CC72E-DF40-4602-BBAF-DC3CDE099AA9.jpeg
    77.9 KB · Views: 12
  • 114766C0-DB17-4431-BB14-0C5F8AAB0FC4.jpeg
    114766C0-DB17-4431-BB14-0C5F8AAB0FC4.jpeg
    58.6 KB · Views: 12
  • 2ACC8DAC-AB99-4481-A6E4-F0D2C0571B1D.jpeg
    2ACC8DAC-AB99-4481-A6E4-F0D2C0571B1D.jpeg
    71.7 KB · Views: 12
  • C350A5ED-E47F-45B1-A93D-78E862CE795B.jpeg
    C350A5ED-E47F-45B1-A93D-78E862CE795B.jpeg
    114.3 KB · Views: 12
  • 0A6D1AF3-7D0A-43DF-95ED-FD885889B12B.jpeg
    0A6D1AF3-7D0A-43DF-95ED-FD885889B12B.jpeg
    67.3 KB · Views: 12
  • 93888B4E-D4BB-4C7F-B8D0-00466D131707.jpeg
    93888B4E-D4BB-4C7F-B8D0-00466D131707.jpeg
    82.1 KB · Views: 12
  • 5C1AEBE5-5737-4057-A7C9-380ECF12F370.jpeg
    5C1AEBE5-5737-4057-A7C9-380ECF12F370.jpeg
    110.1 KB · Views: 14
  • 55BF38B1-E9B8-4F1A-8D09-A979BA48DA19.jpeg
    55BF38B1-E9B8-4F1A-8D09-A979BA48DA19.jpeg
    77.3 KB · Views: 15
  • 88863849-D87A-4D50-B31C-A40FD617644F.jpeg
    88863849-D87A-4D50-B31C-A40FD617644F.jpeg
    88.6 KB · Views: 15
  • D0F5162F-F74E-4CE3-9BAA-AB5A495AEE93.jpeg
    D0F5162F-F74E-4CE3-9BAA-AB5A495AEE93.jpeg
    111.5 KB · Views: 15
Last edited:

Bigfoot57

SMF Supporter
Joined
Jun 24, 2015
Messages
860
Points
93
First Name
Colin
Lancaster 1/32 Update 33

Ok with the arrival of the paint from John’s s model shop here is what I got up to
1st off is the hydraulic supply system comprising of various tanks & pipes see pictures of the various bits and final assembly with paint just need to add some lettering to the 3 tanks and pipework which will have to wait for a while
The green rectangle with the black rectangle in it is a bit of a cheat it’s supposed to be a step of some sort the black rectangle wasn’t just painted on as I couldn’t get it right so in the end I cut out a rectangle of paper painted it black then stuck it onto the other piece then matt varnished the complete unit to seal the paper to the step
Next is the 2nd Merlin engine with shots of it in the build process and the final painted and slightly worn look I have not bothered with any sort of rust etc just roughed up the paintwork in various places which I’m pleased with

Regards

Colin
 

Attachments

  • 809B6CBB-361E-45E3-9304-01421B737292.jpeg
    809B6CBB-361E-45E3-9304-01421B737292.jpeg
    69.3 KB · Views: 18
  • 1C424B7A-7341-4EC9-8B36-5D1246C692DD.jpeg
    1C424B7A-7341-4EC9-8B36-5D1246C692DD.jpeg
    122.1 KB · Views: 18
  • 3A3DCFEE-13BE-4167-B349-4CA7408819AD.jpeg
    3A3DCFEE-13BE-4167-B349-4CA7408819AD.jpeg
    85.7 KB · Views: 18
  • 16C06842-C930-4D5B-852B-19AB1241A9CF.jpeg
    16C06842-C930-4D5B-852B-19AB1241A9CF.jpeg
    78.9 KB · Views: 18
  • 206C8664-F498-4D86-A406-ED65F34FD738.jpeg
    206C8664-F498-4D86-A406-ED65F34FD738.jpeg
    84.6 KB · Views: 17
  • 5B159B46-D565-4938-84CE-28B91979A3FB.jpeg
    5B159B46-D565-4938-84CE-28B91979A3FB.jpeg
    112.3 KB · Views: 17
  • 2B07AC47-F2BA-4A37-BEB8-AB5D2BE69C33.jpeg
    2B07AC47-F2BA-4A37-BEB8-AB5D2BE69C33.jpeg
    91 KB · Views: 20
  • 23971635-EAE4-4738-8346-93A551A84843.jpeg
    23971635-EAE4-4738-8346-93A551A84843.jpeg
    91.5 KB · Views: 19
  • 241D0FC8-E5B5-4853-A8AB-2B300012169F.jpeg
    241D0FC8-E5B5-4853-A8AB-2B300012169F.jpeg
    85.8 KB · Views: 19

Bigfoot57

SMF Supporter
Joined
Jun 24, 2015
Messages
860
Points
93
First Name
Colin
Lancaster 1/32 Update 34

Hello again to this long running saga this time I will attempt to get the hydraulic and elevator control system fitted along with the liferaft and 2 parachutes along with their respective holders
1st off I will need to remove the step and extend it’s legs as further research has revealed that’s where the aircraft starting batteries were stored the instructions completely missed that
Next up is the liferaft section which is made from a framework to which an aluminium skin is attached after applying the rivet tool to simulate the rivets with this done the actual liferaft and dingy are located and painted yellow to start with afterwhich various shades will be applied to give it a more 3d substance than flat staybright metal which is what they are made from
Next is the elevator screw housing made from 5 bits of identical parts which are then sanded to a round shape as illustrated to this the screw is attached and the whole thing is then painted the final part being applying a wash over the screw to simulate grease and dirt in the threads
The large outer panel previously made up is then skinned with aluminium to form a lid and lots of small parts are all assembled and painted ready for further detaling which I will cover in the next update

Regards

Colin
 

Attachments

  • 8E681005-91A8-45F8-90DE-D99BD3AB4F57.jpeg
    8E681005-91A8-45F8-90DE-D99BD3AB4F57.jpeg
    68.9 KB · Views: 19
  • 2ABC4B5F-BAE3-4390-9FD4-0AC4CA6E877C.jpeg
    2ABC4B5F-BAE3-4390-9FD4-0AC4CA6E877C.jpeg
    72 KB · Views: 19
  • E4F8EF07-D36E-49DA-9011-0D064AAB437E.jpeg
    E4F8EF07-D36E-49DA-9011-0D064AAB437E.jpeg
    121.1 KB · Views: 17
  • 58E23F6E-66F1-4520-A7D7-BD4D1163D5F1.jpeg
    58E23F6E-66F1-4520-A7D7-BD4D1163D5F1.jpeg
    80.4 KB · Views: 16
  • 4254F0D7-0114-434B-9CD4-038F9271FB94.jpeg
    4254F0D7-0114-434B-9CD4-038F9271FB94.jpeg
    82.6 KB · Views: 16
  • 2EE7803F-006D-4190-9189-BA4EF2CD8B1A.jpeg
    2EE7803F-006D-4190-9189-BA4EF2CD8B1A.jpeg
    80.5 KB · Views: 15
  • 194A62FC-8565-4810-B40E-8FA015555DF2.jpeg
    194A62FC-8565-4810-B40E-8FA015555DF2.jpeg
    89.9 KB · Views: 14
  • 7B779252-9613-4046-A61E-94B8718CA884.jpeg
    7B779252-9613-4046-A61E-94B8718CA884.jpeg
    125.8 KB · Views: 13
  • 84D98C72-2340-4DDA-ACF4-F73D2114A6F8.jpeg
    84D98C72-2340-4DDA-ACF4-F73D2114A6F8.jpeg
    121.7 KB · Views: 13
  • B921BA94-3F78-464D-97E7-FD4748BADA44.jpeg
    B921BA94-3F78-464D-97E7-FD4748BADA44.jpeg
    52.1 KB · Views: 13
  • 7118BD88-A63B-41D4-A1B2-91B559A3FB04.jpeg
    7118BD88-A63B-41D4-A1B2-91B559A3FB04.jpeg
    137.2 KB · Views: 13
  • 010CD24A-BD16-4127-8653-4508898C485C.jpeg
    010CD24A-BD16-4127-8653-4508898C485C.jpeg
    120.3 KB · Views: 14
  • 3ACA6B00-9742-484A-919A-D08DB125903D.jpeg
    3ACA6B00-9742-484A-919A-D08DB125903D.jpeg
    100.4 KB · Views: 14
  • C677CD67-52D1-4239-B741-A63DC2421191.jpeg
    C677CD67-52D1-4239-B741-A63DC2421191.jpeg
    89.3 KB · Views: 15
  • A53A9011-A6AE-40AA-8537-8805BF2629BD.jpeg
    A53A9011-A6AE-40AA-8537-8805BF2629BD.jpeg
    95.4 KB · Views: 14
  • ECC21B3D-20A8-4D08-AA3A-6544A8AB46BB.jpeg
    ECC21B3D-20A8-4D08-AA3A-6544A8AB46BB.jpeg
    120.2 KB · Views: 16
  • 478A081B-87D9-41C4-9725-A3ED6E5E476D.jpeg
    478A081B-87D9-41C4-9725-A3ED6E5E476D.jpeg
    71.5 KB · Views: 17
  • 7D8246CD-1A42-4D14-A269-B16D050576DE.jpeg
    7D8246CD-1A42-4D14-A269-B16D050576DE.jpeg
    125.7 KB · Views: 16

Bigfoot57

SMF Supporter
Joined
Jun 24, 2015
Messages
860
Points
93
First Name
Colin
Lancaster 1/32 Update 35

Hello been a couple of weeks since I have posted any updates due mainly to having to redo my parachutes as I wasn’t happy with the 1st 5 attempts at painting them
Anyway there as good as I can do them now so here’s the latest starting with my scratchbuilt hydraulic cylinders of some kind that were missing from the kit ie like the radio station they haven’t bothered
Next up my cheat at how to do squares with x in them I used excel and a 6 point font to produce the required item as you can see from the next picture of a parachute with the said squares in place all I have to do is matt varnish the chute to seal the paper square in place some of you probably have a steady enough hand to be able to paint a square and then add an x across it I don’t so this is my solution
And finally for this section all those little bits are now in place in various pieces of the fuselage as the photo’s illustrate briefly there’s a weird item at the end of the 1st bit of fuselage next is a life raft in the flare stowage area following on from that we have the flare dispenser and associated control box mounted on the inner wall struts then there’s a view into the main area wing box where the hydraulic system starting batteries and a parachute are in place
The final 2 show the whatever they are called scratchbuilt cylinders in place in the wheel well there’s another set in the other wheel well and last the nose section with the bomb aimers parachute and some sort of tank on the left phew next installment will be a split trailing edge

Regards

Colin
 

Attachments

  • 71A3481D-51A0-42F0-B9A8-988148F0E5C0.jpeg
    71A3481D-51A0-42F0-B9A8-988148F0E5C0.jpeg
    118.4 KB · Views: 12
  • 050F636A-57BD-49BA-8D48-A716784A9FE0.jpeg
    050F636A-57BD-49BA-8D48-A716784A9FE0.jpeg
    93.4 KB · Views: 13
  • C6A9BD3B-EA70-4CD7-8C4E-61C366D58896.jpeg
    C6A9BD3B-EA70-4CD7-8C4E-61C366D58896.jpeg
    93.6 KB · Views: 12
  • 2266F84A-CC11-4380-BA09-83BFD8E6FF41.jpeg
    2266F84A-CC11-4380-BA09-83BFD8E6FF41.jpeg
    41.1 KB · Views: 12
  • D44CB081-4C9F-4D1F-AA24-4C10D2D1CF0C.jpeg
    D44CB081-4C9F-4D1F-AA24-4C10D2D1CF0C.jpeg
    76.7 KB · Views: 11
  • 8A97DC36-9977-4460-92E1-620DCB13C6F7.jpeg
    8A97DC36-9977-4460-92E1-620DCB13C6F7.jpeg
    67.7 KB · Views: 10
  • FFA9F6CB-77FA-4771-AC6D-4E6BEB6761BF.jpeg
    FFA9F6CB-77FA-4771-AC6D-4E6BEB6761BF.jpeg
    70.9 KB · Views: 10
  • EC6572B8-4CB1-4899-BE65-A9A2176CAD12.jpeg
    EC6572B8-4CB1-4899-BE65-A9A2176CAD12.jpeg
    53.4 KB · Views: 10
  • E076BF40-7B6B-4438-AAA5-F063D0D9785E.jpeg
    E076BF40-7B6B-4438-AAA5-F063D0D9785E.jpeg
    83.6 KB · Views: 11
  • 101183EF-C7E4-418A-9A3F-B6250A559D69.jpeg
    101183EF-C7E4-418A-9A3F-B6250A559D69.jpeg
    66.7 KB · Views: 12
  • 53C0A2D0-1A93-413C-85B4-674206410F72.jpeg
    53C0A2D0-1A93-413C-85B4-674206410F72.jpeg
    80.5 KB · Views: 12

Bigfoot57

SMF Supporter
Joined
Jun 24, 2015
Messages
860
Points
93
First Name
Colin
Lancaster 1/32 Update 36

Hello again been a couple of months since my last update so here’s where I am at at present
1st off loads of small and tiny pieces glued together to make larger structures so we have the master compas thats the black caged object high up in the fuselage port side then there are some yellow handrails along with another parachute 2 tool bags a horsa axe presumably they were installed on the horsa gliders to aid disembarking should the need arise then there’s the first aid box and another tool box
Next are the 2 fuselage shutter doors these were a right pain to fit requiring the top section of the fuselage cut away to allow access
In actual fact you can see numerous stringers missing from the fuselage this is due to needing access to the insides to add more pieces even the instructions recommends removing various parts to allow access this is ludicrous whoever designed this got it wrong badly whats the point in building something only to have to hack it to pieces to add further items anyway hope the pictures illustrate what I have done so far and with this update we have now reached halfway into the build 402 pages with another 412 to go
You can also see I have built some wing structures as well nothing to dramatic but a start.

Regards

Colin
 

Attachments

  • AD923B8C-7D87-452C-AE36-45F1B9307C38.jpeg
    AD923B8C-7D87-452C-AE36-45F1B9307C38.jpeg
    92.7 KB · Views: 7
  • 25C3ED75-2647-4CEC-99C1-036D3E41A3A1.jpeg
    25C3ED75-2647-4CEC-99C1-036D3E41A3A1.jpeg
    87.1 KB · Views: 9
  • 956B934B-3145-4654-AE10-7B5BB6652F95.jpeg
    956B934B-3145-4654-AE10-7B5BB6652F95.jpeg
    64.8 KB · Views: 10
  • 1F74173E-EA1C-40E2-98A5-F557BF0322B1.jpeg
    1F74173E-EA1C-40E2-98A5-F557BF0322B1.jpeg
    106.3 KB · Views: 10
  • EC4B2786-CEF4-4FAF-BE64-78C919627F34.jpeg
    EC4B2786-CEF4-4FAF-BE64-78C919627F34.jpeg
    84.5 KB · Views: 10
  • 803FB3AD-5DAB-4476-8101-7944AC1D42FB.jpeg
    803FB3AD-5DAB-4476-8101-7944AC1D42FB.jpeg
    72.7 KB · Views: 9
  • 343496E6-7392-4583-9E6E-0DE0C4F67239.jpeg
    343496E6-7392-4583-9E6E-0DE0C4F67239.jpeg
    85.6 KB · Views: 10
  • 141F3894-B1EC-4600-80F7-DAF08247CDFC.jpeg
    141F3894-B1EC-4600-80F7-DAF08247CDFC.jpeg
    70.6 KB · Views: 10
  • 6EDA4523-BFF2-4B4C-BDDA-C616928FB840.jpeg
    6EDA4523-BFF2-4B4C-BDDA-C616928FB840.jpeg
    110.7 KB · Views: 10
  • A0C1215B-77F2-4799-827D-2BC8D5724135.jpeg
    A0C1215B-77F2-4799-827D-2BC8D5724135.jpeg
    109.2 KB · Views: 9
  • 1D1D8CD7-D2BA-48E7-8D81-D281AB18AA70.jpeg
    1D1D8CD7-D2BA-48E7-8D81-D281AB18AA70.jpeg
    113.6 KB · Views: 9
  • 16D9E953-9381-4346-A80B-877CDCF93ADC.jpeg
    16D9E953-9381-4346-A80B-877CDCF93ADC.jpeg
    121.6 KB · Views: 9
  • B5978E9D-791D-420C-AE95-E793162EEBAF.jpeg
    B5978E9D-791D-420C-AE95-E793162EEBAF.jpeg
    124.3 KB · Views: 9
  • 36D2EBCD-08CC-4154-B2B3-A16D844B3D88.jpeg
    36D2EBCD-08CC-4154-B2B3-A16D844B3D88.jpeg
    118.3 KB · Views: 10
  • 17BEA9E8-17E4-4548-9770-50F48718EF13.jpeg
    17BEA9E8-17E4-4548-9770-50F48718EF13.jpeg
    115.1 KB · Views: 8
  • F07888AF-702F-4FAE-8541-A1796B9B548A.jpeg
    F07888AF-702F-4FAE-8541-A1796B9B548A.jpeg
    82 KB · Views: 9
  • 0A2B0B27-994B-41A2-B771-E124519DF701.jpeg
    0A2B0B27-994B-41A2-B771-E124519DF701.jpeg
    115.3 KB · Views: 11
  • CD9F3854-9FB1-43E3-8B55-09BA2BB44AD8.jpeg
    CD9F3854-9FB1-43E3-8B55-09BA2BB44AD8.jpeg
    84.5 KB · Views: 9
  • 4A320853-CEA2-4E85-8C4A-8FB79BA48955.jpeg
    4A320853-CEA2-4E85-8C4A-8FB79BA48955.jpeg
    72.7 KB · Views: 9
Last edited:

Bigfoot57

SMF Supporter
Joined
Jun 24, 2015
Messages
860
Points
93
First Name
Colin
Lancaster 1/32 Update No 37

For those of you following this build here is the latest stage assembling the crew access ladder and hanging supports the ladder is just hung from these supports no glue as you can see from the photo of the vice the hook wasn’t big enough so I had to file it the make the gap larger a toothpick is included to indicate the size of the hook
Next came another trailing edge flap then the hydraulic pump system comprised of a shelf 2 pumps and all the hoses that connect it together absolute nightmare of a job the magazine recommended cutting the fuselage in half to enable all the hoses to be fitted absolute madness you would loose all the structural integrity of that particular section so 2 hours later after threading various pieces of yellow wire through a maze of bends and curves we have half the pipework installed ready for it all to vanish when its painted interior green to match the rest of the fuselage
With constant problem of pieces falling prey to the carpet monster I have come up with idea of a white sheet laid out under the work area this has been a godsend as I am able to spot almost instantly any pieces I now drop an retrieve them with reletative ease as demonstrated by the valve that fell on the floor which you can see in the pictures
Anyway that’s all for now just waiting for the glue to set and harden before painting begins on this section to finish it off

Regards

Colin
 

Attachments

  • 76DF99C5-C3D8-49C8-A2C8-0840B791DE40.jpeg
    76DF99C5-C3D8-49C8-A2C8-0840B791DE40.jpeg
    74.3 KB · Views: 10
  • 76FADD6D-4CF2-495D-BF6E-1AECA436C40D.jpeg
    76FADD6D-4CF2-495D-BF6E-1AECA436C40D.jpeg
    59.9 KB · Views: 10
  • DA402AAC-9A25-438C-BBF5-9981117E7842.jpeg
    DA402AAC-9A25-438C-BBF5-9981117E7842.jpeg
    88 KB · Views: 12
  • 7BB77D2B-EBEC-4F43-94BE-E95F2E98462E.jpeg
    7BB77D2B-EBEC-4F43-94BE-E95F2E98462E.jpeg
    74.2 KB · Views: 11
  • 8C500E81-AA19-4E21-8B84-CFD90F949CB7.jpeg
    8C500E81-AA19-4E21-8B84-CFD90F949CB7.jpeg
    77.1 KB · Views: 11
  • 1238A046-A4A2-4F25-B5AC-C24168AC1550.jpeg
    1238A046-A4A2-4F25-B5AC-C24168AC1550.jpeg
    49.4 KB · Views: 11
  • BCD821CF-D059-4363-8326-42744F519DB3.jpeg
    BCD821CF-D059-4363-8326-42744F519DB3.jpeg
    122.3 KB · Views: 10
  • 67B016CB-20D9-48E9-B377-8AF51DFC4CD8.jpeg
    67B016CB-20D9-48E9-B377-8AF51DFC4CD8.jpeg
    74 KB · Views: 10
  • FAAE0CAB-8FB1-4A9A-BA48-6A98C542019D.jpeg
    FAAE0CAB-8FB1-4A9A-BA48-6A98C542019D.jpeg
    112.6 KB · Views: 9
  • 50068ABF-4A9B-4A0C-9CF8-16C456954107.jpeg
    50068ABF-4A9B-4A0C-9CF8-16C456954107.jpeg
    64.8 KB · Views: 10
  • DD7D5250-86D8-4ED6-9301-AC4D42C49637.jpeg
    DD7D5250-86D8-4ED6-9301-AC4D42C49637.jpeg
    83.3 KB · Views: 10
  • F0EE23AA-64B1-4A1D-A86D-DDE56CD4A3D5.jpeg
    F0EE23AA-64B1-4A1D-A86D-DDE56CD4A3D5.jpeg
    78 KB · Views: 9
  • 8DA80CF6-6C3B-43EA-BCA8-DF895D20968A.jpeg
    8DA80CF6-6C3B-43EA-BCA8-DF895D20968A.jpeg
    85.3 KB · Views: 9
  • 5EB5BE64-8EBF-488D-B970-801BECA00700.jpeg
    5EB5BE64-8EBF-488D-B970-801BECA00700.jpeg
    80.8 KB · Views: 9
  • 25227328-0945-4EAE-95F1-351C56746031.jpeg
    25227328-0945-4EAE-95F1-351C56746031.jpeg
    43.3 KB · Views: 10
  • 9FEF9609-A323-4F38-99FE-51B820BA2F36.jpeg
    9FEF9609-A323-4F38-99FE-51B820BA2F36.jpeg
    36.8 KB · Views: 11
  • F5FB5EAE-45CE-45B4-8A44-6EFE0F7AA60C.jpeg
    F5FB5EAE-45CE-45B4-8A44-6EFE0F7AA60C.jpeg
    71.5 KB · Views: 12
  • 98AEF8F0-00A7-4349-9C8D-72502F13DAB1.jpeg
    98AEF8F0-00A7-4349-9C8D-72502F13DAB1.jpeg
    65.4 KB · Views: 11
  • 5AA9B302-CF60-4B6D-8BBB-28678726B582.jpeg
    5AA9B302-CF60-4B6D-8BBB-28678726B582.jpeg
    64.6 KB · Views: 10
  • 47AC7106-ABF5-4AB6-AACA-A73D403F99F8.jpeg
    47AC7106-ABF5-4AB6-AACA-A73D403F99F8.jpeg
    57.3 KB · Views: 10

flyjoe180

Joe
SMF Supporter
Joined
Jan 18, 2012
Messages
12,419
Points
113
Location
Earth
First Name
Joe
Enjoying the updates Colin, lots of detail going into this
 

Bigfoot57

SMF Supporter
Joined
Jun 24, 2015
Messages
860
Points
93
First Name
Colin
Lancaster 1/32 Update No38

Hello everybody hope you had a nice Christmas and are looking forward to the new year
Here is the latest update on my build incidentally had anyone purchased the HK Lancaster yet as I would like to see the level of detail they go into compared to this build anyway half my time has been spent on the net researching things like hydraulic fluid tank stencils that sort of thing as I’m not one of those black paint scriggly white line this represents so called writing on the said object in this case the hydraulic fluid tank as you can see from the supplied photos
I have also done a montage of all the stages built in the last 2 months not much but it is very time consuming waiting for paint and glue to dry
We sre now at stage 71 out of 125 so I hope some major components will soon appear and it will start to resemble an aircraft instead of a crash
The next stage which you can see on the right in the plastic bags is the main connection board consisting of about 30 seperste wires to be attached will post photo when done

Regards
Colin
 

Attachments

  • 88E000F2-EE4D-4884-938A-15A472B554E9.jpeg
    88E000F2-EE4D-4884-938A-15A472B554E9.jpeg
    80.7 KB · Views: 10
  • 65E954F5-734C-411A-82D7-1A98539ABDDE.jpeg
    65E954F5-734C-411A-82D7-1A98539ABDDE.jpeg
    46.8 KB · Views: 11
  • 3A23005A-420A-4580-9C1D-3AB5DB26BACA.jpeg
    3A23005A-420A-4580-9C1D-3AB5DB26BACA.jpeg
    81.5 KB · Views: 10
  • F3C42112-E764-4222-8A6B-339B2D19B561.jpeg
    F3C42112-E764-4222-8A6B-339B2D19B561.jpeg
    63.2 KB · Views: 10
  • EBEAC88D-3A39-4AD7-911F-D53ABB68C29E.jpeg
    EBEAC88D-3A39-4AD7-911F-D53ABB68C29E.jpeg
    87.6 KB · Views: 9
  • 27ACCEDA-6470-4791-89DE-9F41AE640345.jpeg
    27ACCEDA-6470-4791-89DE-9F41AE640345.jpeg
    46.2 KB · Views: 13
  • 4EE9B152-A17B-43FB-BE18-C8B688AB96DA.jpeg
    4EE9B152-A17B-43FB-BE18-C8B688AB96DA.jpeg
    65.4 KB · Views: 13
  • 8BABE17C-47FD-4013-96AD-898C24B523FE.jpeg
    8BABE17C-47FD-4013-96AD-898C24B523FE.jpeg
    106.7 KB · Views: 13
  • 10D1C8FC-FB16-49CF-A10B-E5C995AB98D6.jpeg
    10D1C8FC-FB16-49CF-A10B-E5C995AB98D6.jpeg
    138.8 KB · Views: 13
  • 71C543F1-8557-4C10-BC17-423C7A0FC672.jpeg
    71C543F1-8557-4C10-BC17-423C7A0FC672.jpeg
    142.7 KB · Views: 12

Bigfoot57

SMF Supporter
Joined
Jun 24, 2015
Messages
860
Points
93
First Name
Colin
Lancaster 1/32 Update No39

As per previous entry here is the main panel the idea of just gluing on the wires to their terminals failed totally any sort of tension and they snapped off
My solution using the pins as a template redrill all the terminals into a piece of wood then file down the terminals flat stick the pieces of wood over them then glue the wires into the holes
Paint the ends of the wires silver where they join the panel to resemble the terminals result a virtualy unbreakable bond just got to persuade the said panel to fit into place and thread all those wires to their various terminating points oh and one more thing I glossed varnished the dials to resemble glass tops

Regards

Colin
 

Attachments

  • B46CBAAB-EFF1-41DF-85DA-225A8B64A402.jpeg
    B46CBAAB-EFF1-41DF-85DA-225A8B64A402.jpeg
    81.3 KB · Views: 12
  • 071E7D04-3C21-43F3-8A3B-990EE097D077.jpeg
    071E7D04-3C21-43F3-8A3B-990EE097D077.jpeg
    90.3 KB · Views: 14
  • 4E23E27B-99D4-482C-8A72-8DBFF1372EE0.jpeg
    4E23E27B-99D4-482C-8A72-8DBFF1372EE0.jpeg
    83.7 KB · Views: 13
  • 99A889B7-7350-4F8E-8A58-411328DF1B46.jpeg
    99A889B7-7350-4F8E-8A58-411328DF1B46.jpeg
    91.1 KB · Views: 13
  • 4FBDD6F9-31A1-462A-A38F-4662D0A1C3A2.jpeg
    4FBDD6F9-31A1-462A-A38F-4662D0A1C3A2.jpeg
    74.4 KB · Views: 12
  • 7E57F264-4A9C-4770-A227-5A870C8029DC.jpeg
    7E57F264-4A9C-4770-A227-5A870C8029DC.jpeg
    122.5 KB · Views: 12

scottie3158

SMF Supporter
Joined
Apr 27, 2018
Messages
12,670
Points
113
Location
Spalding
First Name
Paul
Colin. Happy New Year it's good to see this on the go again the detail you are adding is excellent.
 

Bigfoot57

SMF Supporter
Joined
Jun 24, 2015
Messages
860
Points
93
First Name
Colin
Lancaster 1/32 Update No 40

Fitted the panel last night no snapped wires this time all wires now with exception of 2 which require the roof to be installed are now attached or threaded through the formers ready to be attached where needed hope the photos show the detail 1st up is the view from the left or portside looking into the fuselage then the second shows the right or starboard side from the outside showing the wires going through the formers towards the front of the section and the attachment of the engineers panel wires and finally 3rd picture shows the wires going to the back of the section again through the formers right old fart and fiddly job was this took about an hour to accomplish

Regards

Colin
 

Attachments

  • A9A31CCD-8F3D-44B2-A9A9-D93D26AE9A90.jpeg
    A9A31CCD-8F3D-44B2-A9A9-D93D26AE9A90.jpeg
    93.7 KB · Views: 11
  • 00215AE1-5765-4368-A7C7-33A5F2C887BF.jpeg
    00215AE1-5765-4368-A7C7-33A5F2C887BF.jpeg
    81.7 KB · Views: 13
  • 6BEFC5BE-A32B-4E34-BB7F-8C7A9005DC77.jpeg
    6BEFC5BE-A32B-4E34-BB7F-8C7A9005DC77.jpeg
    137.9 KB · Views: 12

Bigfoot57

SMF Supporter
Joined
Jun 24, 2015
Messages
860
Points
93
First Name
Colin
Lancaster 1/32 Update 41

After 2 months of trying to find a way of replicating minature aluminium basket weave for the oxygen bottles I believe I have and it can be repeated for the others as well
After trying fine cotton ,pins ,bits of plastic fly weave and a metal tea strainer mesh I came up with the framework shown in the picture using fine copper wire stretched over the framework the wire is the thickness of a human hair and came from the serial cable lead
Next came the R1155 receiver and T1154 transmitter after numerous attempts at creating a minature of these items I gave up as they looked nothing like they should so in the end all I did was use a block of wood painted black and a laminated minaturised photo of the transmitter and receiver not exactly how I envisioned it but it looks ok to me
Finally there is the morse key which is made from a scrap of plastic card bonded together with some cut off pin heads for the contacts and punched card circle with a whittled down toothpick to represent the main button used for transmitting these will all be mounted into the aircraft after I have made up some more bits and pieces namely accumlators / batteries and various leads to connect all the radio gear together

Regards

Colin
 

Attachments

  • 5451D6B5-414D-4170-BFCB-E8181FB8E2EA.jpeg
    5451D6B5-414D-4170-BFCB-E8181FB8E2EA.jpeg
    93.6 KB · Views: 11
Top