Revell 1/32 Arado 196 A

G

Graham D

Guest
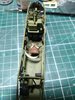
The kit is the 196B, but I am converting it to the A variant. The only difference between the A and B are, the B has one main float and 2 wing floats, whereas the A has 2 main floats. The B does not have a popeller spinner, where the A does. So I bought the HPH replacement floats, a resin propeller with a spinner from Quickboost and Eduard interior and seat belts. So far the fit is excellent. Normally I do ships, so this is a departure for me. This is the first plane I have built for 40 years.

I need to rig the floats, so I need to know what thickness of thread I need, and the thickness of thread for the aerial?

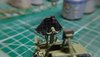
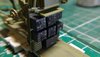
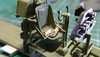
Here is the completed cockpit.
 

Attachments

  • cockpit.jpg
    cockpit.jpg
    90.7 KB · Views: 27
  • cockpit1.jpg
    cockpit1.jpg
    52.1 KB · Views: 27
  • cockpit2.jpg
    cockpit2.jpg
    59.6 KB · Views: 28
  • cockpit3.jpg
    cockpit3.jpg
    63.4 KB · Views: 28
  • cockpit4.jpg
    cockpit4.jpg
    96.4 KB · Views: 27
Last edited by a moderator:

BarryW

SMF Supporter
Joined
Jul 23, 2011
Messages
5,030
Points
113
Location
Dover
First Name
Barry
Excellent work Graham. The AR 196 is one of Revell’s bettter 1/32 kits and in fact is the only Revell kit I have ever actually enjoyed building. I built the previous release with two floats. The only real swear factor I found was the multi part canopy which is badly engineered.

I will watch you conversion with interest.
 
G

Graham D

Guest
Another update, the engine and propeller. This went together really easily. The propeller and spinner are resin replacements, as the one in the kit are too wide and it didn't come with a spinner. I would have alsp had photos of the plane masked ready for spraying, but the guide I was following had the green and grey swapped, so I have had to take off all the masking to do it again.

engine.jpgengine1 - Copy.jpgpropeller.jpgpropeller2 - Copy.jpg
 

flyjoe180

Joe
SMF Supporter
Joined
Jan 18, 2012
Messages
12,419
Points
113
Location
Earth
First Name
Joe
Nice work Graham, looking very nice indeed. Look forward to seeing the overall scheme
 
G

Graham D

Guest
Here is the past weeks work. The main painting is done, the crosses and the registration has been sprayed, and the floats are attached, just need to attach the wings, prop, canopy and some touching up and it will be complete. I had a nightmare with the white for the crosses, as the airbrush kept on getting blocked, so I had to clean the airbrush and thin the paint down some more, but I thinned it too much, so it seeped under the masks.

painting.jpg painting1.jpg painting2.jpg painting3.jpg painting4.jpg painting5.jpg painting7.jpg painting8.jpg painting9.jpg fusalage.jpg fusalage1.jpg fusalage2.jpgfusalage3.jpg fusalage4.jpg
 

Ian M

Administrator
Staff member
Administrator
Moderator
SMF Supporter
Joined
Dec 14, 2008
Messages
19,693
Points
113
Location
Falster, Denmark
First Name
Ian
So you bought the single float version and are converting it to the twin float one.
I took to easy route and bought the twin float version. Liked that so much I bought the single float version when that came out...

A pain with the reversed colour guide. Italeri did it with one of their kits as well. Hurricane I think it was.
I digress.
Great work going into this.
 
G

Graham D

Guest
So you bought the single float version and are converting it to the twin float one.
I took to easy route and bought the twin float version. Liked that so much I bought the single float version when that came out...

A pain with the reversed colour guide. Italeri did it with one of their kits as well. Hurricane I think it was.
I digress.
Great work going into this.

Thanks, luckily the kit is very similar to the A variant of the kit
 

Ian M

Administrator
Staff member
Administrator
Moderator
SMF Supporter
Joined
Dec 14, 2008
Messages
19,693
Points
113
Location
Falster, Denmark
First Name
Ian
Lol I forgot to mention. I recall that I used 0.6 or 0.8 piano wire for the rigging for the floats...
When I was building my one, I guessed that the earlier single float version was on the way. There where 'drill here' dimples on the inside of the lower wing and the centerline of the fuselage.
Anyone know if there was a version with wheels, or maybe snow skis....? :dizzy:
 
G

Graham D

Guest
Lol I forgot to mention. I recall that I used 0.6 or 0.8 piano wire for the rigging for the floats...
When I was building my one, I guessed that the earlier single float version was on the way. There where 'drill here' dimples on the inside of the lower wing and the centerline of the fuselage.
Anyone know if there was a version with wheels, or maybe snow skis....? :dizzy:
Thanks for the info. I used 0.8 plastic rod, as I had some left over from another model.
 

BarryW

SMF Supporter
Joined
Jul 23, 2011
Messages
5,030
Points
113
Location
Dover
First Name
Barry
Another helpful thing: Alleycat make a clear resin canopy which is a lot easier than the kit's multipart job, and it even has a set of masks too.
http://www.alleycatmodels.co.uk/arado-ar-196-replacement-canopy-and-mask-set-revell-132-6123-p.asp
I remember that canopy from my build, the only part of the build that gave me real issues on mine. It was as if I needed three hands, all needing to be perfectly still while the glue set the parts in the right angles. That Alleycat part is a good option and I would recommend it...
 
Top