Revell 1/72 Halifax Mk.II

D

Doug Hughes

Guest
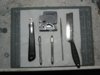
I'm just about to start on this one, and as it's not a purely OOB build, I thought I'd post progress on here from time to time. My plan is to build the Coastal Command version, JP165, with kit decals, but I've also bought the Freightdog resin improvement set to correct some of this kit's well-documented deficiencies (see here and elsewhere). Apart from using the Freightdog parts, I also intend to reshape the HS2 fairing with good old sandpaper and putty, and possibly correct one or two other things as I go along.


I'm making a couple of assumptions up front (I'd welcome your input on these):

  • Visible parts of the interior will be cockpit green (I know RAF bombers often had interior parts of the cockpit and turrets painted black for camouflage purposes, but I'm assuming this would not apply for Coastal Command)
  • Revell specify the four-bladed propellers for this type. I haven't been able to find a photo of this exact aircraft, but other photos of 58 Squadron aircraft seem to show the 3-bladed ones. I intend to use the three-bladed Freightdog ones (I can always switch to the four-bladed ones if I learn something different).

Some photos are attached. I haven't included box art as the kit came in a brown cardboard box as a 'damaged goods' bargain from John. No sprue shots either - there are a lot of parts, but I have shown the Freightdog kit.

P1000471.JPG

P1000472.JPG

P1000470.JPG
 
B

Builder

Guest
Love the Halifax, have never built one, and dont have on in the stash yet, but will definetly build one in the future, so would be really keen to see how this one turns out. Good luck Doug mate. 
 

colin m

Moderator
Staff member
Moderator
SMF Supporter
Joined
Dec 26, 2008
Messages
8,595
Points
113
Location
Stafford, UK
First Name
Colin
A new Halifax, nice choice. I'll look forward to seeing this built.
 
D

Doug Hughes

Guest
I'm making a bit of progress now - some shots of the innards attached. The cockpit green bits have had a dark wash to bring out the (rather nice) rib detail. The rest I've just brushed a very crude coat of dark grey to stop it appearing too light through the windows. Given the scale and the good level of detail in the kit, I've mostly stuck with what's in the box, painting the moulded-on seatbelts as per instructions, and using the three instrument panel decals, plus a bit of dry-brushed silver here and there. But there are a few modifications:

  • I've omitted the foremost of the small seats, and substituted a folded-up double seat on the starboard side of the nose (it's the black oblong in the front fuselage halves photo)
  • I've filled in several of the windows in the nose, as they don't appear to be present in the Coastal Command Mk.IIs - for this I just used the kit windows, and painted over on the inside (may need a bit of filling on the outside)
  • I've also filled in two of the 'porthole' windows on each side for the same reason, using plastic rod sanded smooth on the outside
  • To remedy the problem of the mid upper turret sitting too high, I've removed the little 'shelves' which support it, and replaced them with plastic strip a few millimetres lower. This is just about visible in the rear fuselage halves photo. I worked out the height by dry-fitting the turret (also discovering on the process that the excellently detailed breech blocks for the four guns won't fit into the turret, so I had to butcher them a bit - a shame, but I hope it won't be visible).

Next - closing it all up.

P1000507.JPG

P1000508.JPG

P1000509.JPG

P1000510.JPG

P1000511.JPG

P1000512.JPG

P1000504.JPG
 

colin m

Moderator
Staff member
Moderator
SMF Supporter
Joined
Dec 26, 2008
Messages
8,595
Points
113
Location
Stafford, UK
First Name
Colin
Ah signs of activity, nice one.
 

flyjoe180

Joe
SMF Supporter
Joined
Jan 18, 2012
Messages
12,419
Points
113
Location
Earth
First Name
Joe
The cockpit and seat positions look very good Doug.
 
D

Doug Hughes

Guest
Some more progress - I've got all the major assemblies together now. The fit is extremely good, and for the seams I should be able to get away with a bit of sanding and some Mr Surfacer. The only major gap is around the resin 'blank' for the non-retractable tailwheel, which forces the fuselage halves apart a little and will need filling. I've also included some shots of the cockpit so you can see how little is visible now - and that's before the canopy is fitted. Also a shot of the rather nicely detailed wheel wells.


I had a minor panic when I dry-fitted the wings to the fuselage, and it looked as if, despite the substantial spars, they weren't straight when viewed head on. However, when viewed from the rear they were OK - it's just the asymmetrical cockpit that makes things look wrong from in front.


Next stage is to get the individual assemblies filled and sanded. There is some surgery around the engines to accommodate the resin parts - filling holes and sanding off and/or replacing some intakes.

P1000529.JPG

P1000528.JPG

P1000526.JPG

P1000531.JPG

P1000530.JPG
 

colin m

Moderator
Staff member
Moderator
SMF Supporter
Joined
Dec 26, 2008
Messages
8,595
Points
113
Location
Stafford, UK
First Name
Colin
Looks good Doug. Nice to hear the fit is good.
 
D

Doug Hughes

Guest
Having said the fit is good, there was no way I was going to be able to attach all the resin stuff without getting on very familiar terms with Miss Millie Putt. The pictures show some hole filing in the nacelles prior to fitting eight new resin intakes, new top intakes for the inboard motors, and the resin radiators fitted. There was lots of filling and I've spent around five hours surrounded by a cloud of dust. Now to give it a coat of Mr Surfacer, followed by a bit more sanding and polishing, and some panel re-scribing. The final picture shows my somewhat agricultural approach to correcting the profile of the HS2 faring - some plastic card and lots of putty attached. I'm now getting myself psyched up for another sanding orgy.

1-P1000533.JPG

2-P1000534.JPG

3-P1000535.JPG

4-P1000536.JPG
 

colin m

Moderator
Staff member
Moderator
SMF Supporter
Joined
Dec 26, 2008
Messages
8,595
Points
113
Location
Stafford, UK
First Name
Colin
Sand - fill - sand. A process many are familiar with ! Have fun.
 

tr1ckey66

SMF Supporter
Joined
Mar 6, 2009
Messages
3,686
Points
113
First Name
Paul
Excellent work Doug. A really fine job with the filling and sanding.


Cheers


P
 
D

Doug Hughes

Guest
Just about finished the sanding now, and I've given the affected bits a coat of Mr Surfacer 500 which I've then sanded back and smoothed off with a cotton bud soaked in IPA. I've also re-scribed the panel lines and rivets around the engine cowlings. Not much to look at as the re-scribing won't show up on the photos (especially as my good camera is in for repair). Pictures show the completed HS2 fairing (colours show the amount of plastic card and Milliput), then the same fitted to the fuselage, then finally my scribing kit. I mostly used the Tamiya tool for the panel lines, with Dymo tape to give a straight edge. The scriber and drill were used to restore the lost rivet detail, while the saw and (edge of) half-round file are useful for restoring panel lines at the top and bottom of the fuselage, using the existing lines as a guide.
Next I'll clean up and do a coat of primer to show any blemishes. I'm sure there will be some, so I'll spray the primer onto the wings and fuselage separately to make fixing any problems a bit easier.
 

Attachments

  • 3-IMG_3632.JPG
    3-IMG_3632.JPG
    79.1 KB · Views: 15
  • 1-IMG_3639.JPG
    1-IMG_3639.JPG
    65.3 KB · Views: 16
  • 1-IMG_3640.JPG
    1-IMG_3640.JPG
    97.2 KB · Views: 15

colin m

Moderator
Staff member
Moderator
SMF Supporter
Joined
Dec 26, 2008
Messages
8,595
Points
113
Location
Stafford, UK
First Name
Colin
Image 3460 suggest you might be a dentist in the real world....
 
D

Doug Hughes

Guest
Progress - it now looks like an aeroplane! I've primed all the heavily sanded/scribed areas and fixed any defects, and now the wings and tailplane are on (minimal filling required - Mr Surfacer is enough).
The first photo shows the HS2 fairing under a coat of primer - I'm pretty pleased with that. The second photo shows the canopies etc. masked - thanks to Mr Eduard for saving my sanity there. The third photo shows the breakdown of parts I'll be painting separately and attaching after the main painting's over. There's what I believe is a 0.5" gun for the nose included in the kit (in two parts), though it isn't mentioned in the instructions.
Finally there's a picture of the transparencies with the interior colour painted on to the frames. Foam earplugs are good for masking the inside of the turrets.
The lovely resin cowlings are a bit of a nightmare to paint, with the deeply recessed grills moulded as one piece with the rest of the cowlings. I'm dealing with it by painting the grills and surrounds first, then 'cutting' in around them with a brush in the main white colour. I should then be able to mask them roughly and blend in when I airbrush the undersurface colour. We'll see how that works out!
Just need to finish the masking (wheel wells etc. now) then the main paint job starts.
1-IMG_3643.JPG 2-P1000545.JPG 3-P1000547.JPG 4-P1000548.JPG
 

colin m

Moderator
Staff member
Moderator
SMF Supporter
Joined
Dec 26, 2008
Messages
8,595
Points
113
Location
Stafford, UK
First Name
Colin
Looking great Doug. Eduard masks - brilliant things.....
 
D

Doug Hughes

Guest
Things moved a bit slowly on this over the Christmas period, due to the usual family things and my wife's totally unreasonable belief that guest bedrooms are for guests to sleep in rather than for me to make models in. Normality has now been restored, and I've made progress with the painting.

After a coat of white primer, the stages have been:
1) Preshade all over in dark grey (no photo)
2) Spray the lower surfaces white (I used Vallejo white with a drop of dark grey to tone things down a bit). This took three coats, as the preshading was much too dark for the white to cover easily. Photos 1 and 2 show the end result, though the preshading hardly shows in the photo.
3) Mask lower surfaces and spray the upper surfaces Dark Slate Grey (I used Tamiya XF-13 - might be a bit too green?) (no photo)
4) Use White Tak and masking tape to mask off the Dark Slate Grey camouflage pattern (photos 3 and 4)
5) Re-spray some white over the unmasked bits and re-spray the preshading (photos 5 and 6).

Next job - spray the Extra Dark Sea Grey (Tamiya XF-24) and spend several weeks removing all the masking!

1-P1000568.JPG 2-P1000569.JPG 3-P1000574.JPG 4-P1000575.JPG 5-P1000576.JPG 6-P1000577.JPG
 
Top