Roberts 1/35 Tamiya Russian SU 122 Winter warrior ( test bed)

Robert1968

SMF Supporter
Joined
Mar 2, 2015
Messages
3,410
Points
113
First Name
Robert
Hi guys and gals
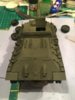
This is a quick one for me ( hoping ) I'm more practicing before I start my two bigger in depth kits for the GB in August.
It's an older kit but seemed to go together with no issues except the tracks are a bit tight ( rubber band type of old Tamiya kits.
Although this is more a test bed for my upcoming builds I still want to make it look good and it will go with the Russian sector of tanks
I've got a little help from advice from over the pond in the guise of Monica.
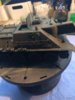
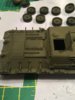
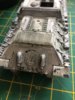
Once complete the main build I sprayed the model with XF69 NATO black then once dry used Xf61 light passes to give me shadows and help the weathering
She will have a coat of hairspray once painting stages complete so I can winter wash the whole model white then start on the weathering. I made my own tow rope stowed on the vehicle and once painted up should be acceptable
Comments welcome
image.jpeg image.jpeg image.jpeg image.jpeg image.jpeg image.jpeg image.jpeg image.jpeg image.jpeg image.jpeg image.jpeg image.jpeg
 

Attachments

  • image.jpeg
    image.jpeg
    69.2 KB · Views: 2
  • image.jpeg
    image.jpeg
    83 KB · Views: 2
  • image.jpeg
    image.jpeg
    78.2 KB · Views: 2
  • image.jpeg
    image.jpeg
    69.1 KB · Views: 2
  • image.jpeg
    image.jpeg
    68.9 KB · Views: 2

Robert1968

SMF Supporter
Joined
Mar 2, 2015
Messages
3,410
Points
113
First Name
Robert
Postie bought me a lovely welcome gift this morning but maybe it's a nightmare???
As the Su122 tracks from Tamiya are a little neat ( band type ) I ordered some T34 wafer type workable tracks by Miniart.
Now most T-34 and simular based tracks like su85/Su100 it seems they have 36 horns and 36 flat pieces ( 72 each side total
I've decided to take it to 40 each ( 80 total and see if I need less to produce a wee sag
Now mini art say they a workable but after trimming off a few pieces they do lock together but will need a touch of glue in the centre otherwise they will fall to pieces.
Lots of cleaning ahead
image.jpeg image.jpeg image.jpeg image.jpeg image.jpeg image.jpeg
 

bazers

SMF Supporter
Joined
Oct 21, 2013
Messages
1,145
Points
113
First Name
barry
Looking good Robert, be interesting to see how the winter camo works out .
 

Robert1968

SMF Supporter
Joined
Mar 2, 2015
Messages
3,410
Points
113
First Name
Robert
Oh for Fxxxxxxx I just finished the 80 + 80 put in two plastic beakers and I just dropped one
Now to pick up aghhhhhhhhh
 

Robert1968

SMF Supporter
Joined
Mar 2, 2015
Messages
3,410
Points
113
First Name
Robert
Next stage was the hairspray tech
I gave the model a complete clear coat and once dry inhairsprayed the complete model including wheels etc
I thin once dry gave the model a light coat of off white XF2 and started the winter wash using water and coton tips
Still some way to go but here's progress pics
image.jpeg image.jpeg image.jpeg image.jpeg image.jpegimage.jpeg
 

Attachments

  • image.jpeg
    image.jpeg
    96.6 KB · Views: 1

monica

“When there's no more room in hell, the dead will
SMF Supporter
Joined
Oct 30, 2013
Messages
15,111
Points
113
Location
Melbourne
First Name
monica
this is looking good,Robert,nice work with your weathering,
will like to see the tracks,once you get a good start into them,and you should,be able
to get the right sag in them as well,;)
 

Robert1968

SMF Supporter
Joined
Mar 2, 2015
Messages
3,410
Points
113
First Name
Robert
this is looking good,Robert,nice work with your weathering,
will like to see the tracks,once you get a good start into them,and you should,be able
to get the right sag in them as well,;)

Thanks Monica
I have still yet to do more weathering and rusting effects around the bolts and exhausts and wheel bolts
Some mud and dirt
I should get the tracks sorted in the next few days.
 
Joined
Oct 12, 2015
Messages
185
Points
43
Location
Antwerp
First Name
Michaël
Hey Robert,(edit text here)
And i like the way you try this one...it's special
I saw somewhere (i never try).First the white and then the green with a worn effect(like a HairSpray kind of way)
I wanna see the end of this...
(edit this also)

Why not with a brush very wide and flat in some water?
And the way you spray the last layer is to tick to remove it for the first time..
i mean : You can repeat the it with white again
and did you spray the whole tank in one shot?
 
Top