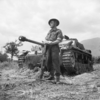
Stug III Ausf G in Italy 1944

TIM FORSTER

SMF Supporter
Joined
Apr 28, 2018
Messages
227
Points
93
Location
London, UK
First Name
Tim
1529697852827.png
The well-known photo above shows Fusilier F Jefferson of C Company, 2nd Lancashire Fusiliers in front of the Stug III which he knocked out with a Piat in Italy, 16 May 1944 near Monte Cassino. As a result of his action he won the Victoria Cross.

This vehicle is destined to be part of my WWII diorama 'Liberation, Italy 1944'.

See the blog at: http://www.scale-models.co.uk/threads/liberation-italy-1944.30350/

One of the focal points of my diorama is going to be a KO'ed Stug in front of the church.

There were three reasons why I chose a Stug:

Firstly, the last time I built a Stug in 1/35 I was about 13. That one, a modified Tamiya Stug (which I still have, albeit in a somewhat distressed state) won me a Junior Bronze Medal at the Model Engineering Exhibition at Wembley in about 1982! So this build is pretty nostalgic for me...

Secondly, from what I have seen in books and on-line, the Stug III was practically the mainstay of Axis armour in Italy (as it was on other fronts) and was, of course, ideally suited for the role of defence as the Germans retreated up the peninsula, line-by-line. But inevitably they all succumbed to the Allies in the end.

Thirdly, that distinctive low profile (that made it such an excellent weapon of defence) also meant that it would not get in the way of all of my lovely buildings!

Stug complete on dio 5.jpg
Spring 2018 restart 5.jpg

The basis for my build is the Dragon (Smart Kit) D6365 StuG.III Ausf.G early production with Schurtzen.

1529698202705.png

Of course, the Dragon kit is a world away from the venerable old Tamiya kit which I built back then. But, as we all know, with greater detail comes greater effort - and frustration!

On the face of it the Dragon Stug certainly fits my brief. My diorama is set in the latter half of 1944, following the liberation of Rome in June. By then the Ausf G was already deployed on that front in large numbers and most, if not all, had the square 'box style' mantlet (as opposed to the saukopf 'pig's head' variety). They also had the loader's folding MG shield and lacked the distinctive triangular shot deflector in front of the commander's cupola.

Because my Stug is going to be abandoned with a spilled track and slipping off the road most of the hatches will be open and much of the interior will be visible from the front of the diorama. This certainly adds drama - but it has also added a lot of work!

Now let me make one thing clear from the outset: I firmly believe that what you cannot see should not be modelled. It breaks my heart to see modellers expend hours of effort on vehicle interiors only for them to seal them up like Toutankhamon's tomb!

With this in mind, I thought the Dragon kit would give me a good start. However, I soon discovered that, despite providing a detailed gun assembly, crew radios and torsion bars, there's an awful lot of empty space to be filled - even allowing for my 'less is more' approach. As we shall see...
 
Last edited:

TIM FORSTER

SMF Supporter
Joined
Apr 28, 2018
Messages
227
Points
93
Location
London, UK
First Name
Tim
Into the belly of the Stug...

For my first adventure I decided to add detail to the transmission and driver's area.

The transmission hatches on the front of abandoned Stugs are often seen open. This may be because the escape route for the driver backwards into the fighting compartment was not exactly easy: he had to fold back his seat and then wait for the commander and driver to get out first...

The Dragon kit has nicely detailed hatches with all of the bolt detail in place. Plus the torsion bars within. Unfortunately that's it - and this is a very 'busy' place. It also happens to be right at the forefront of my diorama...

Over the years there have been a number of detailing kits for the Stug on the market, but from what I have seen the best by a long way are those made by CMK ('Czech Masters Kits').

The one I chose was:

http://www.cmkkits.com/en/detail-sets-accessories/stug-iii-ausf-g-driver-s-set-for-dragon/

It certainly includes some beautifully cast resin pieces - and even a very nice looking pre-coloured driver's instrument panel - but there are some strange gaps.

The biggest let-down involves the sprung rods that sit either side of the transmission and are connected by another horizontal rod with a small lever. (Forgive me if the technical terms escape me!) Unfortunately these just happen to be one of the most visible parts when viewed through the open front hatches...

Making your own spring (from fuse wire) is hard enough, but wrapping this around a fragile resin part without breaking it is well-nigh impossible! One of mine broke, but since I was only building what could be seen through the driver's-side hatch I was able to use the second. Even then, the instructions are vague in the extreme. Where do you attach the spring at the top? Only after exhaustive internet searches did I discover the answer.

The horizontal bar is missing altogether - the instructions just say 'wire' (not supplied). I used brass rod (which is over-scale, I know) - but at least this gave me a surface on which to attach the tiny lever.

Looking at the CMK website I wish I had bought this one instead:

Stug III driver's set 129-3052 (1/35) Drivers set for TAM

http://www.cmkkits.com/en/detail-sets-accessories/stug-iii/

Although it's for the Tamiya Stug - and thus has some parts you won't need - it does at least have the horizontal bar included (although the home-made wire springs are still required).

Apart from the above, the rest is fairly straight-forward. A bit of sanding may be required (depending on your Dragon kit) to get the front upper panel to sit in place. Ditto the fighting compartment floor (I had to enlarge the front aperture). Despite the small hatch, there is actually quite a bit to be seen.

1529702815090.png
1529702830982.png

In the shots above the transmission itself is not quite in place because its a tight fit and I am keeping it detached for ease of painting...
 

JR

Member of the Rabble and Pyromania Consultant
SMF Supporter
Joined
May 26, 2015
Messages
17,275
Points
113
Location
lincs
First Name
John
Tim .
Don't you just love vague instructions, it's like they went to lunch in the middle of writing , came back and started something else .
Nice introduction into why the StuG is being used, can see why it means a lot.
See the second kit is out of stock anyway, but still thing it will look the part .
John.
 

TIM FORSTER

SMF Supporter
Joined
Apr 28, 2018
Messages
227
Points
93
Location
London, UK
First Name
Tim
As always, John, Tamiya becomes the gold standard when it comes to simplicity and clarity - and everyone else fails to match up...

Fighting compartment

Work on the interior then moved to the fighting compartment.

Once again CMK do a very nice set for this. Although it does include a great deal that you don't need (e.g. the entire gun assembly, radios, etc), with hindsight I think I should have bought it because it would have saved me some time and effort.

https://www.cmkkits.com/en/detail-sets-accessories/stug-iii-interior-set/

Having said that, I enjoyed rooting around in my spares box for the right bits in order to give an impression of the interior through the gloom.

I also learnt a lot about the interior from looking on websites. In the end I found the best to be this one which has a link to walkarounds including the late Jacques Littlefield's immaculately restored Stug.

http://svsm.org/gallery/StuGIII-family

Of course, one always has to take restoration jobs with a pinch of salt, but from I have seen elsewhere this looks to be pretty accurate.

A lot of the improvements can be easily made from plastic strip, card and wire - and the odd Meng bolt head.

One of the most obvious omissions from the kit (since it can be clearly seen through the open roof hatches) is the cable trunking along the rear wall.

1529745088822.png

1529745104173.png

1529745118210.png

1529745170322.png

The ammo stowage is pretty ingenious, because there are actually two racks of 15 rounds on the floor, one behind the other. Once the first block of rounds were used up the front racks were swung back and the perforated 'door' in front of it opened as well to reveal the next block of rounds behind them. Above were stored another eight rounds in a rack reaching into the front of the sponson. Having said that, when it was fully loaded, the loader would not have had much room (but at least he's not in a Hetzer!)

Anyway, as you can see, much of this was kept pretty simple because you will not be able to see much more than the shapes through the open hatches.
 

JR

Member of the Rabble and Pyromania Consultant
SMF Supporter
Joined
May 26, 2015
Messages
17,275
Points
113
Location
lincs
First Name
John
Tim .
Pity it won't be seen in detail, but it does look good .
I love the svsm site, very helpful .
John .
 

TIM FORSTER

SMF Supporter
Joined
Apr 28, 2018
Messages
227
Points
93
Location
London, UK
First Name
Tim
Well John, despite what I have said about Egyptian tombs - at least I know it is all there...

Painting the fighting compartment

Once the work on the interior was done I then carefully masked off the parts to start the paint job. It certainly makes sense to finish as much of the inside as possible before building the rest if the kit, otherwise you risk knocking things off during the work.

At this stage I just used spray cans. For the primer Mr Surfacer 1000 Red Oxide is absolutely fantastic. It covers beautifully and dries fast. It also magically smooths out any minor blemishes and glue marks. For the transmission I sued a first coat of Nato black and then a highlight of Field Grey.

1529880033311.png

1529880048668.png

After masking off the areas that I wanted to remain in the red primer colour (e.g. the floor panels and driver's compartment) I used the old-school chipping technique: a coat of hairspray, left the dry, followed by the lighter interior paint. The latter consisted of successive coats of Vallejo Sand (Ivory) and Aged White applied with my trusty Neo for Iwata airbrush.

1529880114910.png

1529880130942.png

1529880163564.png

1529880198212.png

After leaving the paint to dry for an hour or so then I got stuck in with a little warm water (applied with a cotton bud) and a cocktail stick... obviously it looks a little stark at the moment, but I'm expecting washes to tone everything down a bit - and besides it has to show up in the gloom of the interior!

1529880253492.png

1529880269698.png

More weathering on the interior

After the chipping I picked out the seat covers in dark brown / black and the radio racks and cables in field grey. The gun breach was given a touch of gun metal and polished steel.

At last I was also able to install the transmission.

Everything was then given a spray of matt varnish before getting stuck in with Vallejo washes. Again, it's not my most subtle work - but then it doesn't need to be! At least that's what I'm telling myself...

1529880461631.png

1529880489126.png

1529880514688.png

1529880530638.png

The tide marks will be hidden behind the radio racks, which is why I didn't bother to remove them.

Still, I'm quite pleased with my first AFV interior in over 35 years!
 

JR

Member of the Rabble and Pyromania Consultant
SMF Supporter
Joined
May 26, 2015
Messages
17,275
Points
113
Location
lincs
First Name
John
Tim very true in reference to an Egyptian Tomb .

I like the choice of ". Whites " as you rightly said it looked stark at first, but after the chipping and the washes it brought the interior to life.
So many details to pick out, but the stain on the seat and the tide mark on the back wall above the ammo lockers were two of many that had the right touch.
I think it's very easy to over do the chipping,. you have managed to this , and the washes in a subtle manor and the out come is most realistic.
No wonder you are pleased if that's the result of a 35 year break from interiors !

John .
 

TIM FORSTER

SMF Supporter
Joined
Apr 28, 2018
Messages
227
Points
93
Location
London, UK
First Name
Tim
Installing the wireless sets

The open loader's hatch on the Stug leaves the wireless sets on his side very exposed - so I took a little extra trouble to ensure the rearmost one looked 'busy' with wires.

These were made using E Z Line, which is type of stretchable nylon cable used for rigging planes and ships. I'm not going to swear that I have wired it up correctly, but from what I could find on the net this looks about right. In due course I will have a pair of headphones trailing out of the hatch, as if the loader abandoned them in haste. I don't bother to give the sets on the commander's side the same treatment because these will be almost invisible once the roof is installed.

The sets themselves were sprayed with field grey, then given a dark wash before a few of the dials and knobs were picked out.

Elsewhere you can see a little more 'stowage' in the form of a pair of MG ammo boxes (from Dragon) and a spent shell case from brass. I will probably add a bit more stowage - but only where it can be seen. The mounts on the back wall are for the MP40, but they need clips adding. Obviously the gun would not still be there because any crewman making an escape would have grabbed it on his way out (and if he couldn't, it would be the first thing to be 'liberated' by any Allied soldier peering into the vehicle).

At last I could finally get the top of the fighting compartment fixed in place - any other detail can be put in through the detachable roof - and get on with finishing the exterior.

1530052361323.png

1530052396889.png

1530052418163.png
 

Peter Gillson

SMF Supporter
Joined
Apr 27, 2018
Messages
2,149
Points
113
First Name
Peter
Tim

This may be a bit late but here is a wireing diagram for the Stug radios, provided by Eduard with one of their sets.

Peter

3E6AF6B0-A014-4EDE-9E60-3F71C009C2D8.png
 

TIM FORSTER

SMF Supporter
Joined
Apr 28, 2018
Messages
227
Points
93
Location
London, UK
First Name
Tim
Excellent! Thanks Peter. Mine is only an approximation but it confirms what I already believed to be the case: nothing is plugged directly into the sets - it all goes via a junction box...
 

TIM FORSTER

SMF Supporter
Joined
Apr 28, 2018
Messages
227
Points
93
Location
London, UK
First Name
Tim
So, after all my work on the interior I was finally able to seal her up...

In typical Dragon fashion (unlike Tamiya) this is actually rather complicated. You have to have the gun assembly inserted through the front aperture before you lower the upper hull into place and secure the gun on its pedestal. Plus you need the mantlet to be mated to the rear gun assembly at the same time - otherwise you will never get the former in place.

However, I later worked out that it is possible to avoid all this hassle by leaving separate the 'cross bar' which sits at the front of the fighting compartment roof just behind the mantlet.

One very important thing which took me a while to spot and correct: the lower hull tub comes with three rectangular pegs sticking up along each side. These do not look like sprue attachment points - they are perfectly formed - and so I assumed that they should be left in place. However, if you do so, then the upper hull will never fit properly into place. It was only when I looked at the pictures in the instructions and realised that they were not shown at all, that I realised they should be removed. Once they go the hull fits perfectly...

In the images below the metal gun barrel (from JB Models) has just been roughly slid into place. In order to fit it I had to ream out the Dragon mantlet a little... Before I installed the main armament I had already primed the mantlet and the area behind it with red Mr Surfacer - otherwise it would be almost impossible to reach with an airbrush.

1530565298750.png

1530565311492.png

Finally I could turn my attention to building the rest of the vehicle.

Making the suspension workable

1530566036375.png

Nothing makes a small plastic model look HEAVY like the real thing quite like how it sits - or rather sinks - into the landscape. This was something Shep Paine taught me when I were a lad...

My Stug is going to be slewed off an Italian road with the rear end still on it and the front nose down into a field. So how to make this look right?

Well torsion bar suspension works in a certain way... but I wasn't quite sure how. Luckily I have a very heavy (about 10 kg!) 1/16 Tiger (still work in progress) to use as a test bed. It doesn't actually have working torsion bars and the interleaved wheels are hardly a match for the Stug, but by placing it on some wooden blocks in roughly the way I wanted my 1/35 Stug to be I was able to work it out...

1530566147483.png

At this angle, I needed my suspension to work in this way: on the right (starboard) side my wheel needed to be down at the back and up at the front - and exactly the opposite on the other side.

The Dragon Stug actually does have working torsion bars and, if you are sparing with the glue, these enable all axle arms to pivot just like the real thing. At least, that's the theory! Unfortunately, on the Stug the front and rear wheels are also controlled by vertical springs and these are not in 'working' condition. So what to do?

Well... first of all I cut each vertical spring assembly and removed the portion which slides up and down on the real vehicle. Then, using plastic tubing of suitable diameter, I added a longer length to the front spring of one side and the rear of the other. For the other two I simply left this bit off all together. I then glued the spring assemblies back together. Tip: it's much easier to do this while they are still on the sprue!

1530566214257.png

Above you can see one of the original parts on the left, then the lengthened version and finally the shortened one.

They were then glued in place.

1530566355324.png

And the swing axles glued to meet them...

1530566383343.png

The last thing was to remove the small 'pip' of plastic which Dragon has put in place on each of the hull guide plates (the crescent shaped piece) to ensure that each swing arm sits at the normal height for a Stug settled on flat ground. These pips are not on the real thing. You can see them in the first image - but they have gone in the one below it.

This now leaves all of the other axles to swing free so that, when placed on my base, the wheels should all conform to the slope of the terrain.

1530566418462.png

20180603_155624.jpg

Now here I really have to commend Dragon for their attention to detail in making these parts as workable as possible... and don't you just love the maker's name on the tyres? [Here there is some controversy as to whether it really should read 'ContinentaU' or 'ContinentaL' - but I really do not care...]

By the way, the prominent seams on the swing arms are not 'mould lines' - they really should be there!
 

JR

Member of the Rabble and Pyromania Consultant
SMF Supporter
Joined
May 26, 2015
Messages
17,275
Points
113
Location
lincs
First Name
John
Tim .
Taking note of that idea, thank you for showing it.
John
 

TIM FORSTER

SMF Supporter
Joined
Apr 28, 2018
Messages
227
Points
93
Location
London, UK
First Name
Tim
The Dragon kit certainly builds into an exquisite representation of this classic, low-slung vehicle and, for the most part, the detail is superb.

The metal side skirts come with the kit and look just right. Note that they were not sheet metal but (thin) armour - so any stress (except for a direct shot) would not be likely to bend them, just tear them off.

I used the plastic rails rather than attempting any photo etch replacements because, believe me, I know my limitations! I thinned them a little with a knife and sanding stick - although not too much because I didn't want to weaken them. Whilst not strictly to scale, I think they will look fine once the paint is on. Actually fitting them was something of a challenge and it's a good idea to have the schurzen handy to make sure that they will fit when the glue is dry!

However, as you can see there were a few more improvements that I made to the kit.

The wire tow ropes supplied are just too thin and, frankly, unrealistic. I replaced them with some thicker copper wire which I had in an assortment from a Polish company called Karaya. What impressed me about Dragon's accuracy was that this wire actually squeezed into the rear tow rope brackets without any glue!

The kit also comes with some very tiny butterfly nuts to be applied to the front brackets and other areas. However, since these have no actual 'thread' it's hard to see how these would ever stay in place. I replaced them with some from the Grandt Line Wing Nut Assortment set. This says that it's 1:48 scale, but it actually has nuts of various sizes, including several perfect for 1:35. Because they do have a short thread a hole can be drilled before they are glued in place.

Another nice touch by Dragon is the provision of empty and full smoke tubes - so I decided to have two empty and one full on each side. However, the smoke canisters need a distinctive 'pip' added to their centre.

I added metal grab handles to the rear of the loader's shield and the open periscope flap in the commander's hatch. For some reason, despite the accuracy of most of the rest of the kit, the original handle was just a moulded ridge.

Stug complete 3.jpg

Notice the very fine weld detail which I saw no need to improve upon. The gap between the sloping superstructure and the fender, by the way, is entirely accurate: it marked the bottom of the sides of the fighting compartment and the fenders tended to sag a little over time. So gaps are not always your enemy!

The damaged front port fender was made using part of the Aber set. Because this corner of the Stug is right at the front of the diorama I wanted something quite dramatic: there's nothing quite like torn and twisted metal to look like, well, torn and twisted metal!

I found even this piece hard enough to work with - so goodness knows how I would have managed to replace the whole fender had I wanted to! Luckily, because the real thing was made up in sections, it was relatively easy to saw away the front portion and substitute the Aber piece before adding the battle damage.

Stug complete 7.jpg

The dislodged tow rope was just another way of showing the impact of the shot which shattered the fender and sent this Stug rolling off the road right in front of a church... I still intend to have this track severed and I may add some damage to the sprocket.
 

Tim Marlow

Little blokes aficionado
SMF Supporter
Joined
Apr 27, 2018
Messages
16,731
Points
113
Location
Somerset
First Name
Tim
Great work all round on this one. It’s more than worthy of the front of house spot on your dio!
 
Top