- Home
- Forums
- Group Builds
- The New Group Builds (2017 on)
- The User Created Group Builds
- 2023 Builds
- Karl & Andrew Soviet wingy thing GB: Oct - Dec '23
You are using an out of date browser. It may not display this or other websites correctly.
You should upgrade or use an alternative browser.
You should upgrade or use an alternative browser.
The Smythemeister's 1/48 Eduard I-16 Type 18.
- Thread starter The Smythe Meister
- Start date
Cheers Joe,Great start Andy. I saw a gaggle of these in NZ many years ago, they were very noisy and looked difficult to handle on the ground.
Would like to see one "up close" myself,I was surprised to read that, despite being obsolete by then,they were still used right up to 1945!

- Joined
- Sep 4, 2019
- Messages
- 9,521
- Points
- 113
- First Name
- Andrew
They most definitely are.... the detail is awesome,and they're SO easy to attach... it almost feels like it's cheating!!
I understand PVA is all that's needed Andy?
Yes, just a small amount of PVA applied with a cocktail stick does the job perfectlyI understand PVA is all that's needed Andy?
 .
.- Joined
- Sep 4, 2019
- Messages
- 9,521
- Points
- 113
- First Name
- Andrew
It is diddy isn't Andy!!!
I find it amazing how single engined 'fighter' plane sizes varied during the war.
I was having a look at the Skyraider when it arrived and was thinking it had a big wingspan - I know it didn't enter service during the war but it was designed during the was and took its first flight in March 1945 - so I put it up against the Raiden I have just finished and it was almost the same width as the Raiden's. The Raiden as you know was 1/48....the Skyraider was 1/72.....and I reckon is about 3cm wider than this 1/48 I-16!!
Raiden Wingspan = 10.8 m (35 ft 5 in) ; Skyraider = 50 ft 0.25 in (15.2464 m) ; I-16 = 9 m (29 ft 6 in).............yep it's diddy!
Keep up the good work!
Andrew
Andy T
SMF Supporter
For parts like seat belts that come in some of their kits, super glue works well tooI understand PVA is all that's needed Andy?
Andy T
SMF Supporter
There wasn't a lot of info around when I first used them on my SU-57 a couple of years ago so I had to wing it 

 www.scale-models.co.uk


Zvezda 1/48 Su-57
I waited a while for this kit to be released, then waited for the Quinta cockpit set, and then the camouflage masks, but eventually I got all the elements together and could crack on. It's my first time doing a modern jet so there was a surprising amount to learn, but I'm happy for a first...
 www.scale-models.co.uk
Don't know about "winging it" Andy...There wasn't a lot of info around when I first used them on my SU-57 a couple of years ago so I had to wing it

Zvezda 1/48 Su-57
I waited a while for this kit to be released, then waited for the Quinta cockpit set, and then the camouflage masks, but eventually I got all the elements together and could crack on. It's my first time doing a modern jet so there was a surprising amount to learn, but I'm happy for a first...www.scale-models.co.uk
.... Looks like you cracked it first time to me!

..... Just one thing though,why does it say " deleated member"??

Jim R
SMF Supporter
Thanks Jim... much appreciatedNice to see some excellent progress. The engine is good and despite not much being seen it's definitely worth the effort. Those Quinta decals are very good. I've used them a couple of times recently. The cockpit is like the engine - little seen but so worth doing.

- Joined
- Sep 4, 2019
- Messages
- 9,521
- Points
- 113
- First Name
- Andrew
There's a great review of them on YouTube Andrew,if you put in "How to apply Quinta Studio 3D decals",and scroll down to the short video by " Stregas Plastic Cartel", it'll show you all you need to know.... I think that particular one is the clearest and best of the lot.
Cheers mate!
So then,my current progress..
I must admit if I'd realised what you'll see inside the cockpit with those Studio decals,I wouldn't have bothered, they're certainly amazing,but for this kit,basically a complete waste of money!! .....
.....
... However,I bought them...so I fitted them!!...
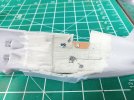
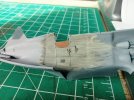
Don't worry about the shocking paintwork,I'd already realised that you wouldn't see anything!!..
Unusually for a model I've made,this cockpit goes in AFTER the two fuselage halves have been fitted...
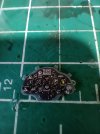
..that's the 3D decal for the dash,a completely wasted effort really,NO WAY will you be able to even remotely glimpse it , but I bought it,so fitted it!! Next...
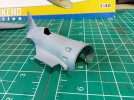
...... Weird way to go about it IMHO, anyway,now I've fitted various externals,and persuaded them to stay together ..
..
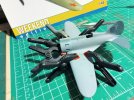
Can't have too many clamps eh!!

I must admit if I'd realised what you'll see inside the cockpit with those Studio decals,I wouldn't have bothered, they're certainly amazing,but for this kit,basically a complete waste of money!!
 .....
........ However,I bought them...so I fitted them!!...


Don't worry about the shocking paintwork,I'd already realised that you wouldn't see anything!!..
Unusually for a model I've made,this cockpit goes in AFTER the two fuselage halves have been fitted...

..that's the 3D decal for the dash,a completely wasted effort really,NO WAY will you be able to even remotely glimpse it
 , but I bought it,so fitted it!! Next...
...... Weird way to go about it IMHO, anyway,now I've fitted various externals,and persuaded them to stay together

Can't have too many clamps eh!!


Last edited:
Great progress andy , it is a tiny cockpit opening but even just having the belts and instrument panel is worth the effort . Got one of these on the go at the moment too , but its 1/144 , no need to worry about cockpit detail on that one ! Cheers tony
Thanks Tony, can't imagine even attempting one of these in that scale!!Great progress andy , it is a tiny cockpit opening but even just having the belts and instrument panel is worth the effort . Got one of these on the go at the moment too , but its 1/144 , no need to worry about cockpit detail on that one ! Cheers tony

So then, after removing the clamps, some gaps appeared that needed filling..
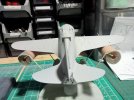
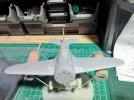
... and then it was rubbed down and primered...
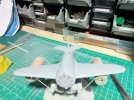
... also,as you can see,I've bunged up some orrifaces that I didn't want the spray getting in
Workwise this week, I'm gonna be well stretched,so not sure how much I'll be able to get done ,
,
Anyway , for now I'm fairly happy, hopefully I'll cram in some time!
Cheers for now,
Andy


... and then it was rubbed down and primered...

... also,as you can see,I've bunged up some orrifaces that I didn't want the spray getting in

Workwise this week, I'm gonna be well stretched,so not sure how much I'll be able to get done
 ,
,Anyway , for now I'm fairly happy, hopefully I'll cram in some time!
Cheers for now,
Andy
Just seen this one Andy, a cracking little aircraft and a cracking start. Pity about the cockpit area not being seen, but you know it’s there.
