- Home
- Forums
- Group Builds
- The New Group Builds (2017 on)
- The User Created Group Builds
- 2023 Builds
- Dave's Emergency services GB: Jan '23 - March '23
You are using an out of date browser. It may not display this or other websites correctly.
You should upgrade or use an alternative browser.
You should upgrade or use an alternative browser.
Tim’s Airfix 1/35 Austin K2/Y Ambulance .
- Thread starter Tim Marlow
- Start date
Cheers John, I’m quietly pleased with it. It’s a winner from Airfix as far as I am concerned.Top notch Tim.
Thanks AndrewTim,
That's really coming on very nicely indeed. Very well done.
Andrew
Cheers John…..kind of you.Looking very nice indeed, Tim.
John.
Valeron
SMF Supporter
As a matter of interest as a relative newbies, what are the differences between pastel chalks and pigments? I used Vallejo pigments brushed dry onto a recent model for the first time to try and add a dusty effect.Thanks Andy. It’s actually quite simple using pastel chalks on a matt surface. Only thing is it can rub off if you handle it too much…..usually enough stays behind though, and another dust is quite easy and quick to do….l
Yours does look good Tim by the way.
Pigments come pre ground in a pot. They are quite coarse in structure but are good for building up accretions.As a matter of interest as a relative newbies, what are the differences between pastel chalks and pigments? I used Vallejo pigments brushed dry onto a recent model for the first time to try and add a dusty effect.
Yours does look good Tim by the way.
Pastels are artists chalks, are very much cheaper, come in a vast range of colours, and come as solid sticks….
Vallejo's are pretty fine. I have airbrushed with them a few times. Not with the 0,2 but a 0,4 manages. And if you dont shut the paint off and just close the air, When you start up again you get some rather nice splatters. I digress. Sorry.They are quite coarse in structure but are good for building up accretions.
I have, in the past, used a Buff Vallejo model color sprayed from about 18" that gives a nice dusty look.
I’ve used Tamiya buff for that Ian, but that was the colour I used for the body so it wouldn’t do much in this case…..Vallejo's are pretty fine. I have airbrushed with them a few times. Not with the 0,2 but a 0,4 manages. And if you dont shut the paint off and just close the air, When you start up again you get some rather nice splatters. I digress. Sorry.
I have, in the past, used a Buff Vallejo model color sprayed from about 18" that gives a nice dusty look.
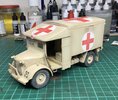
Almost there now. Wheels and canvas side screens fitted…..just wing mirrors, rear doors, and rear steps to go…..and the sand mats and rope, which I’m still thinking about…..

All the wheels touch, which is great….
No more here though, I’ll save the finished pictures for the completed section…..
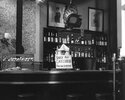
If you are still thirsty, sorry guys….bars closed…


All the wheels touch, which is great….
No more here though, I’ll save the finished pictures for the completed section…..
If you are still thirsty, sorry guys….bars closed…

Jim R
SMF Supporter
That is looking very nice indeed Tim. As usual when people like Jakko and yourself get "chatting" I learn a lot about such things as Bridge Classification - a by product of your builds 


scottie3158
SMF Supporter
Looking superb mate. Just a suggestion for your sandmats I made some for my LRDG chevy by cutting some strips of foil the width you need then then crinkle them then roll them up.
Cheers Jim. I learn a lot as well…….That is looking very nice indeed Tim. As usual when people like Jakko and yourself get "chatting" I learn a lot about such things as Bridge Classification - a by product of your builds

I think the ones on Katy look a bit smoother than that Scottie….Looking superb mate. Just a suggestion for your sandmats I made some for my LRDG chevy by cutting some strips of foil the width you need then then crinkle them then roll them up.

I was thinking of Tamiya tape cut to width, and sticks (made from plastic rod) stuck on the sticky side and the whole rolled up…..
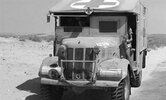
I’m not sure I can fit them though, so they might get left off. The one on the left has been shoved behind the weight indicator, but that means it’s been pushed through where the support strut (that I’ve already fitted and painted) lives. No idea what holds the one on the right on either……
I need to find some cord I can use as rope as well……I had some waxed thread that would be about right, but I can’t find it anywhere.
- Joined
- Apr 28, 2018
- Messages
- 10,918
- Points
- 113
- First Name
- Jakko
Those mats look like sticks sewn to canvas, so not that easy to make convincingly, I would think … I think the method you suggest should work well enough, but you'll probably need to construct (or find) something to space the sticks out with correctly, else it will be very hard to get them to look right.
I was going to use a piece of brass of the correct thickness and dip it into water to stop it sticking while I place the next stick…..not sure if they will look “refined” enough though…..Those mats look like sticks sewn to canvas, so not that easy to make convincingly, I would think … I think the method you suggest should work well enough, but you'll probably need to construct (or find) something to space the sticks out with correctly, else it will be very hard to get them to look right.
Finished model here….

 www.scale-models.co.uk
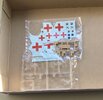
Just as a last picture……this was all that was left in the box when I completed it……

I can only think that the extra transparencies are for other versions. As it should be I think. If it was Dragon I’d need another box to store the spares that I would probably never use…..

Tim’s completed Airfix Austin K2 ambulance, 1/35, (Dave’s Emergency build)
Hi all. Finally dragged this over the line. Had a serious mojo drop (RA affecting motor skills) so struggled to complete. More fairly cold in Alexandria than Ice cold in Alex, but you get the idea. Anyway, here be pictures….. I hope she passes muster. I would certainly recommend the...
 www.scale-models.co.uk
Just as a last picture……this was all that was left in the box when I completed it……

I can only think that the extra transparencies are for other versions. As it should be I think. If it was Dragon I’d need another box to store the spares that I would probably never use…..

 The outside bits are the most important to get right, I think.