1/35 Scale Rope

malvern_man

SMF Supporter
Joined
Sep 10, 2023
Messages
60
Points
33
Location
East Midlands
First Name
Chris
Hi all,

I'm getting some bits together for the future build of my Tamiya Sherman Jumbo tank.

Can any of the great forumites on here put me onto some 1/35 scale rope please, I want to use it for, hopefully, stowage/tarp tie downs and for hanging helmets and equipment etc from.

Regards, Chris.
 

Jakko

Way past the mad part
SMF Supporter
Joined
Apr 28, 2018
Messages
10,844
Points
113
First Name
Jakko
Sewing thread — anything else is far too thick for crews to have tied stuff down with.

Helmets were usually either laid on the turret roof, or hung from convenient brackets, lifting eyes, antennas, etc. from their chin strap. American tanks tended to not have that many helmets on the outside — British and German tanks frequently had them for each crewman, but they’re not that common in photos of American tanks.
 

malvern_man

SMF Supporter
Joined
Sep 10, 2023
Messages
60
Points
33
Location
East Midlands
First Name
Chris
Sewing thread — anything else is far too thick for crews to have tied stuff down with.

Helmets were usually either laid on the turret roof, or hung from convenient brackets, lifting eyes, antennas, etc. from their chin strap. American tanks tended to not have that many helmets on the outside — British and German tanks frequently had them for each crewman, but they’re not that common in photos of American tanks.

Thanks for the info Jakko.

I think my wife has some button thread in her sewing box.

Regards, Chris.
 

Jakko

Way past the mad part
SMF Supporter
Joined
Apr 28, 2018
Messages
10,844
Points
113
First Name
Jakko
With this kind of thing, it works best to think about what would have been used in the real world (looking at photos helps a lot with that :smiling3: ) so you can estimate the thickness, then multiply by your model’s scale and find something that will look good. Thin string is, what, maybe a few millimetres thick? So in 1:35 you quickly end up at a tenth of a millimetre or thereabouts, which you’re not going to find in scale (even fine fishing line is more like 0.2 mm already, and you can’t tie that down very well anyway) but sewing thread will easily look thin enough.

Same for things like tow cables: if you know the real thing was ⅞ inches (which, off the top of my head, Sherman tow cables were), that’s about 22 mm in the real world, so in 1:35 you get about 0.65 mm. Just find some nylon cord of about that thickness and it will look good.
 
  • Like
Reactions: JR

malvern_man

SMF Supporter
Joined
Sep 10, 2023
Messages
60
Points
33
Location
East Midlands
First Name
Chris
With this kind of thing, it works best to think about what would have been used in the real world (looking at photos helps a lot with that :smiling3: ) so you can estimate the thickness, then multiply by your model’s scale and find something that will look good. Thin string is, what, maybe a few millimetres thick? So in 1:35 you quickly end up at a tenth of a millimetre or thereabouts, which you’re not going to find in scale (even fine fishing line is more like 0.2 mm already, and you can’t tie that down very well anyway) but sewing thread will easily look thin enough.

Same for things like tow cables: if you know the real thing was ⅞ inches (which, off the top of my head, Sherman tow cables were), that’s about 22 mm in the real world, so in 1:35 you get about 0.65 mm. Just find some nylon cord of about that thickness and it will look good.

Thanks for the above info Jakko, this will come in very handy when I build my Tamiya Sherman Jumbo and my Asuka U.S Medium Tank ( from SMC of course )

Regards, Chris.
 

Jakko

Way past the mad part
SMF Supporter
Joined
Apr 28, 2018
Messages
10,844
Points
113
First Name
Jakko
Then, if I were you, I’d build the Tamiya kit first and the Asuka one second :smiling3: Asuka kits are great, but far finer in detail than Tamiya, so it’s probably best to get a feel for Shermans with the simpler Tamiya one first.
 
  • Like
Reactions: JR

malvern_man

SMF Supporter
Joined
Sep 10, 2023
Messages
60
Points
33
Location
East Midlands
First Name
Chris
Then, if I were you, I’d build the Tamiya kit first and the Asuka one second :smiling3: Asuka kits are great, but far finer in detail than Tamiya, so it’s probably best to get a feel for Shermans with the simpler Tamiya one first.

Thanks again Jakko :thumb2:

I was going to build the Tamiya kit first then progress onto the Asuka.

Regards, Chris.
 

Jakko

Way past the mad part
SMF Supporter
Joined
Apr 28, 2018
Messages
10,844
Points
113
First Name
Jakko
I’ve built a couple of Asuka Shermans on here, if you’re looking for tips :smiling3: Number one is to not use the sponge for the suspension, IMHO.
 

Jakko

Way past the mad part
SMF Supporter
Joined
Apr 28, 2018
Messages
10,844
Points
113
First Name
Jakko
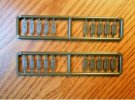
Check your kit if it has the spacer sprues — all Asuka Sherman kits I’ve built had two of these:

Asuka suspension spacer sprues.jpg

The instructions likely won’t tell you what these are for, but the side of the box might, but they’re there to replace the sponge to create a non-workable, but more stable, suspension. A is 1.5 mm, B is 1.0 mm and C is 0.5 mm, off the top of my head: for a regular Sherman to sit normally, you need B (the middle thickness) in each of the bogies. For a lightly loaded (empty) tank, use A (the thickest), and for one that’s heavily loaded, has worn suspension, or is an M4A3E2, use C (thinnest).

Of course, if your kit doesn’t have these sprues, you can easily make up something from plastic card of the right thickness.
 

malvern_man

SMF Supporter
Joined
Sep 10, 2023
Messages
60
Points
33
Location
East Midlands
First Name
Chris
Check your kit if it has the spacer sprues — all Asuka Sherman kits I’ve built had two of these:

View attachment 495388

The instructions likely won’t tell you what these are for, but the side of the box might, but they’re there to replace the sponge to create a non-workable, but more stable, suspension. A is 1.5 mm, B is 1.0 mm and C is 0.5 mm, off the top of my head: for a regular Sherman to sit normally, you need B (the middle thickness) in each of the bogies. For a lightly loaded (empty) tank, use A (the thickest), and for one that’s heavily loaded, has worn suspension, or is an M4A3E2, use C (thinnest).

Of course, if your kit doesn’t have these sprues, you can easily make up something from plastic card of the right thickness.


Thanks for even more info Jakko, my kit arrived today and it does indeed have a bag with the spacer sprues inside. There is no info on the side of the box though, it might be in the instruction booklet but I've not had time to look through it yet.
 

Jakko

Way past the mad part
SMF Supporter
Joined
Apr 28, 2018
Messages
10,844
Points
113
First Name
Jakko
When you do, you’ll probably see why I suggest you start with the Tamiya one :smiling3:
 

malvern_man

SMF Supporter
Joined
Sep 10, 2023
Messages
60
Points
33
Location
East Midlands
First Name
Chris
When you do, you’ll probably see why I suggest you start with the Tamiya one :smiling3:

I see what you mean now, and I've got to make the hatch handles too, I think my son has some 28 gauge wire ( which equates to around 0.3mm according to Google ) But as you suggested it'll be the Tamiya first :thumb2:
 

Jakko

Way past the mad part
SMF Supporter
Joined
Apr 28, 2018
Messages
10,844
Points
113
First Name
Jakko
I like the Asuka Sherman kits a lot, BTW, and would not hesitate to build more (and, in fact, have a couple in the stash :smiling3: ) but they’re another brand I would not recommend to people as My First Not-Tamiya Kit :smiling3:
 
Top