AEC Armoured Regal Bus - 1/72 - Fylde Armouries

vizenz

SMF Supporter
Joined
Apr 19, 2024
Messages
121
Points
63
Location
Bavaria
First Name
Andreas
Hello,
This is at the moment the second project that made it to my workbench. Another Brit... It seems like I'm having something of a "British phase" :smiling5:
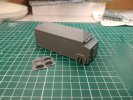
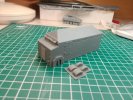
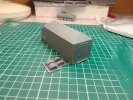
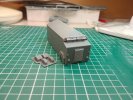
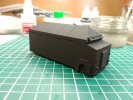
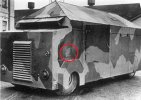
The model is self printed with a 3D printer. The files come from "Fylde Armories" and are actually in 1/56.
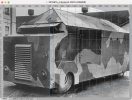
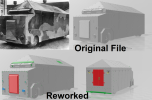
I adjusted the scale to 1/72 and added some details. As far as I know, there are only two photos of this bus, which is why everything can only be adjusted by eye. The entire actual model building and converting took place on the computer (adjusting the radiator grille, adding some details and many rivets).
The printing itself worked. There are still a few parts that I don't like that much. The next few days will show whether I can use the first print or whether I have to do it again. Either way, I won't spare you with progress. ;)
AEC 01.pngIMG_20240419_174238.jpgIMG_20240419_174303.jpgIMG_20240419_174310.jpgIMG_20240419_174317.jpg
Best regards,
Andi
 
Last edited by a moderator:

Scratchbuilder

SMF Supporter
Joined
Jul 2, 2022
Messages
2,046
Points
113
Location
Luton
First Name
Mike
I have seen this built up and it makes up into a good representation of the vehicle.
 

vizenz

SMF Supporter
Joined
Apr 19, 2024
Messages
121
Points
63
Location
Bavaria
First Name
Andreas
I have seen this built up and it makes up into a good representation of the vehicle.
I hope so! :smiling5:
I had already worked on the few parts that I didn't like so much (like the radiator grille that was too wide) in advance.

Unfortunately, this radiator grill in particular was printed poorly (my mistake, incorrectly placed supports).
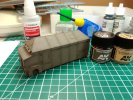
Since it's not exactly fun to cut and sand resin, I put off this work for quite a while. But today I finally had the courage to put this misshapen bus back on the workbench. I sanded down every possible spot, replaced the radiator grille, installed the tires and filled, sanded and cleaned everything. Now the fun part can finally begin!
I hope I find the time to pour some paint on it tomorrow.

regal1.jpg
 

Jakko

Way past the mad part
SMF Supporter
Joined
Apr 28, 2018
Messages
10,951
Points
113
First Name
Jakko
That is very much an improvement, you certainly didn’t waste the effort to correct it.
 

vizenz

SMF Supporter
Joined
Apr 19, 2024
Messages
121
Points
63
Location
Bavaria
First Name
Andreas
Hello,
Yesterday I actually had some time to start painting.
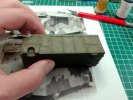
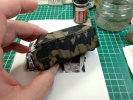
After priming with Black AK Primer, a coat of Khaki Green No.3 from AK Real Colors followed. To make all the large areas a little more interesting, I lightened the base color with a few drops of ivory and tried a color modulation.
One can certainly argue about what colors these improvised vehicles actually were. Certainly not only military colors were used. After some consideration, I still went with G3/Dark Tarmac, simply because that's how I interpreted it from the photos and because there's some probability that it was used.
IMG_20240506_124949.jpg
IMG_20240506_143208.jpg

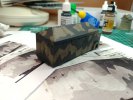
What you can't tell from the photos is that I then tried to paint the camouflage stripes like in the original photos of the bus. Unfortunately, the angle from which the vehicle was photographed makes the whole thing really difficult. Now it was also clear that some of the reference points in the photos did not correspond to the positions on the model... In short, I completely failed! After a few tries, I completely decolorized one side of the model with isopropanol and am starting again today!
 

vizenz

SMF Supporter
Joined
Apr 19, 2024
Messages
121
Points
63
Location
Bavaria
First Name
Andreas
OK done!
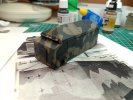
Although it may not look like it, this was by far the most difficult camouflage paint job I have ever done on a vehicle. The slanted perspective of the photos is incredibly difficult to transfer to the model.

IMG_20240507_135130.jpg

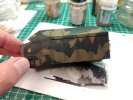
I printed out the photos at 1:72 scale and greatly enlarged another set. I then divided the areas into grid squares and tried to transfer the camouflage pattern onto the model with a pencil. That worked somewhat. It looks very confusing and "psychodelic", but it's pretty close to the camouflage pattern in the photos.

IMG_20240507_154918.jpg
IMG_20240507_154941.jpg
 

Jakko

Way past the mad part
SMF Supporter
Joined
Apr 28, 2018
Messages
10,951
Points
113
First Name
Jakko
The slanted perspective of the photos is incredibly difficult to transfer to the model.
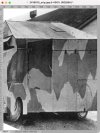
I think what I would have tried is to remove the perspective from the photos, and then size them so the sides are the same dimensions as the model. I can only find one picture online on a quick search, and it’s very small, but basically like this:

Perspective crop.jpeg

That’s Photoshop’s perspective crop tool in use. After cropping, that results in:

After crop.jpeg

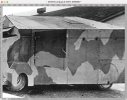
This is, of course, far too short, but just making the image wider solves that:

Stretched.jpeg

Note that this isn’t accurate, because I don’t know how long the real vehicle is, but it gives a good impression of how you could do this with a bit more care and better photos :smiling3:
 

spanner570

SALAD DODGER
SMF Supporter
Joined
May 26, 2009
Messages
13,050
Points
113
First Name
Ron
...a bit more care or not, your paintwork is looking great. Clever stuff!

Well done Andreas. :thumb2:
 

vizenz

SMF Supporter
Joined
Apr 19, 2024
Messages
121
Points
63
Location
Bavaria
First Name
Andreas
That looks superb mate.
Thank you for the menthal support Paul!

I think what I would have tried is to remove the perspective from the photos, and then size them so the sides are the same dimensions as the model. I can only find one picture online on a quick search, and it’s very small, but basically like this...
Jakko, I just wanted to try this out to prove to you that it doesn't work anyway. ;)
I digitally painted a few things onto the 3D model, took a screenshot in a completely crooked perspective and - the program did a great conversion! In the end it looked 98% as it should. Next test - same result! Wow! Learned something again. I could have saved myself all the work and a lot of frustration with just a minute of perspective calculation from a drawing program!
I can only recommend it to anyone reading here who has similar problems.
Very good tip, thank you very much! :thumb2:
To safe my honour, I have to say that my approach was a bit old-school, but it worked quite well. Here too, the agreement with the pattern calculated by the program is quite high. Mainly my "tips" are a little sharper, the calculated transitions are a little softer. But out of sheer laziness and/or stubbornness, I'll leave it like that now! :tears-of-joy:

...a bit more care or not, your paintwork is looking great. Clever stuff!

Well done Andreas. :thumb2:
Thank you Ron.

It's funny that this is the ugly, improvised, cousin to the 0853 ACV 'Dorchester'

More Brit improv and stop gap armour, please, Andreas!
That was exactly my first thought! Looks like a "Dorchester" painted by a three year old child! :smiling5:

And your wish is my command. More British Oddities are already being planned. ;)
 

JR

Member of the Rabble and Pyromania Consultant
SMF Supporter
Joined
May 26, 2015
Messages
17,375
Points
113
Location
lincs
First Name
John
The Committee headed by Matron took one look and with an unanimous vote have given you
download THE DOGS.jpg
Congratulations Andreas:thumb2:
 

Lee Drennen

Box Stock Builder with a Twist/ Rabble Member
SMF Supporter
Joined
Apr 29, 2018
Messages
5,808
Points
113
Location
Wortham Mo
First Name
Lee
The Committee headed by Matron took one look and with an unanimous vote have given you
View attachment 508258
Congratulations Andreas:thumb2:
Wow another one. This is getting out of hand. The Committee must be very impressed with your builds Andrea which says a lot only the few get these award’s. Great work and hard work is paying off.
 
  • Like
Reactions: JR

Jakko

Way past the mad part
SMF Supporter
Joined
Apr 28, 2018
Messages
10,951
Points
113
First Name
Jakko
Jakko, I just wanted to try this out to prove to you that it doesn't work anyway. ;)
To be honest, I was wondering myself if it would work over as large an area as this. My fear was that things like the panel lines would end up ever closer together when they were spaced evenly on the real thing. That is fixable by using more complex perspective warp, but it looks like the simpler perspective crop works well enough without that after all :smiling3:

Very good tip, thank you very much! :thumb2:
Thanks :smiling3:
 

rtfoe

SMF Supporter
Joined
Apr 29, 2018
Messages
7,539
Points
113
Location
Malaysia
First Name
Richard
I love old school methods Andreas. Really good paint job and additions to the 3D print.

Cheers,
Wabble
 

vizenz

SMF Supporter
Joined
Apr 19, 2024
Messages
121
Points
63
Location
Bavaria
First Name
Andreas
The Committee headed by Matron took one look and with an unanimous vote have given you
View attachment 508258
Congratulations Andreas:thumb2:
John, thank you very much again.
However, the award comes too soon - I'm not finished yet and I can still screw it up! :smiling5:
Wow another one. This is getting out of hand. The Committee must be very impressed with your builds Andrea which says a lot only the few get these award’s. Great work and hard work is paying off.
Thank you very much Lee.
Excellent work on that paint job
Thank you very much!
I love old school methods Andreas. Really good paint job and additions to the 3D print.

Cheers,
Wabble
And again, thank you so much.

I think this is my last post here, hopefully next time I will have the “box” finished.
What I noticed were a few paint defects on the left side of the original. I'm not entirely sure what this means, but I decided that my model should have a few brush strokes of gas detector paint on it. I also painted an area like this on the nose of the bus in front of the driver.
2416615_orig - Kopie.jpg
The AEC has now been coated with a glossy varnish and I have tried to weather it a bit. The problem is making the huge straight surfaces look somehow interesting.
I started with a dark brown pin & panel wash and then I tried to show some dust deposits around the chassis.
IMG_20240511_092616.jpgSince the vehicle was used in London, I had to limit myself to a minimum. And last but not least, I tried to add a few streaks across all surfaces. Traces of rain, possibly a few rusty spots from the many rivets. Since everything is supposed to be very discreet, I'm curious to see what will still be visible after a layer of matt varnish.
IMG_20240513_200603.jpg
 

Lee Drennen

Box Stock Builder with a Twist/ Rabble Member
SMF Supporter
Joined
Apr 29, 2018
Messages
5,808
Points
113
Location
Wortham Mo
First Name
Lee
John, thank you very much again.
However, the award comes too soon - I'm not finished yet and I can still screw it up! :smiling5:

Thank you very much Lee.

Thank you very much!

And again, thank you so much.

I think this is my last post here, hopefully next time I will have the “box” finished.
What I noticed were a few paint defects on the left side of the original. I'm not entirely sure what this means, but I decided that my model should have a few brush strokes of gas detector paint on it. I also painted an area like this on the nose of the bus in front of the driver.
View attachment 508670
The AEC has now been coated with a glossy varnish and I have tried to weather it a bit. The problem is making the huge straight surfaces look somehow interesting.
I started with a dark brown pin & panel wash and then I tried to show some dust deposits around the chassis.
View attachment 508671Since the vehicle was used in London, I had to limit myself to a minimum. And last but not least, I tried to add a few streaks across all surfaces. Traces of rain, possibly a few rusty spots from the many rivets. Since everything is supposed to be very discreet, I'm curious to see what will still be visible after a layer of matt varnish.
View attachment 508672
Very nice I like the rivet details
 

HAWKERHUNTER

SMF Supporter
Joined
Feb 29, 2012
Messages
699
Points
93
First Name
Steve
Just caught up with this build Andreas. This whole project from the 3D printing to where you are at now shows some very talented modeling skills. Excellent work.
 
Top