- Home
- Forums
- Group Builds
- The New Group Builds (2017 on)
- The User Created Group Builds
- 2024 Builds
- Papa 695's Build a Bi-plane GB: Jan - April 2024
You are using an out of date browser. It may not display this or other websites correctly.
You should upgrade or use an alternative browser.
You should upgrade or use an alternative browser.
Allen's 1/32 WnW Hansa-Brandenburg W.12 (early)
- Thread starter Allen Dewire
- Start date
Neil Merryweather
SMF Supporter
Great to see you back in harness bro!
Scratchbuilder
SMF Supporter
Tag Youngerthanme,
Just caught up with your 'new' build, and pleased at the outcome of all the work you are putting into it.
Sorry to hear you are a bit krank, you with your noggin and me with my knee, but let's hope the pair of us are on the mend. The medicine man has filled me up with inflamatories, so the head has shrunk and the knee is bigger, pity they did not stop a bit higher up....
Anyway keep up the good work, will have a beer for you (Polish - good stuff, free from neighbour)...
Prost
Olderthanyou.
Just caught up with your 'new' build, and pleased at the outcome of all the work you are putting into it.
Sorry to hear you are a bit krank, you with your noggin and me with my knee, but let's hope the pair of us are on the mend. The medicine man has filled me up with inflamatories, so the head has shrunk and the knee is bigger, pity they did not stop a bit higher up....

Anyway keep up the good work, will have a beer for you (Polish - good stuff, free from neighbour)...
Prost
Olderthanyou.
Afternoon world,
Some progress has happened and I did take a few pics too. I wanted to finish up the pit so I could finally close up the fusillier and mask it up for the paint. That meant I had to get the seatbelts done and installed. Also add a bit or two and test fit the Benz again,
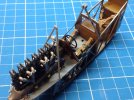
I added the steering wheel and weathered up the belts with an AV European Dust wash to tone them down. I really like the HGW seatbelt kits and I have used them a few times before. They are finicky and patience trying, but worth it in the end. It has been a while, so when I nipped them off the sheet, I found the they were difficult to thread through the etch buckles. Ok, it was also funny that there are no instructions in the set, other than a picture that shows the parts and how they go together. When I came to gluing them, I wondered how this would work, them being so thick. DOH!!!!!!.....I had forgotten that you have to peel the backing off of them as they are a laser cut textile material. Getting old sucks!!! Looking at the Benz in place, it looked like the exhaust pipe outlet closest to the pilot was blocked by the strut frame. Test fit time,
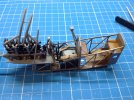
Alright!!! It fits around the strut frame. No worries there anymore. The two supports in the middle will be removed when they get painted. Back to the wings and the bridge,
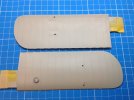
Seeing as I wasn't around back in 1917, this was the closest I could get to a doped linen color (formula in my last post). The round thing in the wing is for the compass decal. It'll get touched up when I apply it. Then, it will be the naval lozenge decals. The upper wing bridge plate,
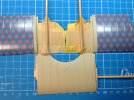
If you closely, you can see the decals don't go to the inside edge of the wing. The bridge plate decal is wider than the plate and will cover the gaps in the join and overlap the other decals a bit. A pretty good idea, but I hope the overlap portion will snuggle down onto the under decal. I can't screw this up as it is most visible being the top wing. The 2 sets of 4 tiny circles in the middle are the cable mounting points with one cable. This allowed the crane to hook on the cable to raise/lower the plane in/out of the water. There were two types of these. The other one has 4 single eyelets and used 2 cables. Here's the idea,
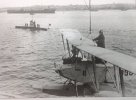
This is a Friedrichshafen F.33E, but the principle was the same for all Naval wing thingy's...Next up was the observer's LMG 14. Again WnW'S gives you a choice of plastic cast or an etch barrel sleeve,
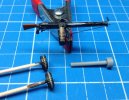
They also give you spare ammo drums and this cute little etch bending rod for the sleeve. One must always remember to gently roll the etch on a soft surface to form it using a dowel or the like first!!! I didn't (another brain fart) and went about trying to form the etch around the plastic rod. No go at this station, as the etch was wonky, even after I rolled it in my rolling plate from RPToolz. Another dumb move on my part. I unrolled the etch, flattened it out as best I could and went at it again. It's round but off-canted if you look closely. Oh, and the etch from WnW's doesn't need to be heated either. Cuss jar half filled now!!!...
As an aside, WnW's did/does put a lot of effort into the making of this (and other) kits idiot proof. Me excluded!!! Let's look at the floats here,
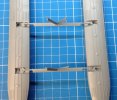
Notice the attachment points on the cross struts. No way in hell could you put these in the wrong way. Once they are in, you add the upright struts to the fusi,
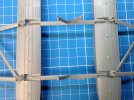
Again, no way you could screw these up without noticing your error. With those installed, you just need to add the outward struts to the bottom wing undersides,
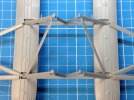
And again, they are pretty damn idiot proof. If you try to put the left strut in the holes on the right side, the strut faces down, away from the wing bottom. I found that to be pretty ingenious on the part of the kit designers. Just think of a person sitting at a computer, sipping some of New Zealand's finest, designing this excellent assembly method for the kit and hoping China won't screw up when they mold it. Must have been a pretty cool job back then!!!
That's it for today folks. If I haven't caught up on your build yet, please give me a little more time to do so. There are so many great builds/projects going on right now. Thanks for looking in and the wonderful comments. They keep me going when the going gets tough...
Prost
Allen
Thanks Dude 2! Be gentle and the lead wire works fine. Just don't squeeze it with the tweezers when handling it. There is something about Lozenge decals you gotta love!!!Dude 1, nice work all round, that lead wire from Plus Model looks evil stuff to handle at that size. Loving the lozenge decal work.
Much too Kind Chris! In 1/32, it's a lot easier to do than in your scale. At 1/72, I can't even see half the parts, let alone detail them. Decals in 1/72 could be easier though. I surprised myself that mine went on so smooth. 2 1/2 biggies to go Sir!!!What to praise most?
Engine? Brilliant
Guns? Fantastic
Getting the huge lozenge transfers to set so well? Top marks, sir!
Thank you Boss! Come on now, one kit isn't going to break the bank. It's only a bread and water diet for a week or two. You know you really want one Ian...
Thanks so much Paul! You and the fine folks here with your great builds is what keeps me going. Of course my love for these WnW kitsets makes it even more fun...Beautiful work as ever Allen. I love following your builds!
Keep up the great work
ATB
Paul
No need to apologize 'Admiral' Bob. You have enough happening right now with your Mum and I know it's been keeping you busy my friend. I love these WWI wing thingy's, especially the sea planes. I guess that makes them a floaty thing too...Thanks for checking in and best wishes to Julie too...Very, very late Allen my apologies!
Superb build as usual, love the look of these WW1 planes
I'm trying my best Jim! The Mojo is flying, but I ain't getting any younger. I have 7 brushes, hanging bristles down, in clips on the side of my table. 5 are in use almost every day. Thanks Sir, and I have my fingers crossed for the last 3 wing decals...Everything looking really good Allen. Glad you're feeling better. All the detail painting is really paying off. Those wing decals look to have gone on well.
Thank you John! It's more like 1/4 built with all the little stuff for it. Once I get the Fusi thing closed up, masked and painted, it should be a lot further and hopefully down hill to the finish...Looking superb already, Allen, and only half built !
John.
Thank you so much Fred! It's really fun and I think I am getting somewhere. How's the Fuselages going? I gotta check in on them. Oh, and say Hi to Ginger for me too Buddy...Great to see you back in harness bro!
Great to have you Olderthanme! I do hope your are getting better and the meds are helping. About the higher up.....Remember, "what can't get up, can't get out"...Are you making any progress on the wing thingy or are you just doing the 'Dough' thing now? Free beer is always a good thing too!!!Tag Youngerthanme,
Just caught up with your 'new' build, and pleased at the outcome of all the work you are putting into it.
Sorry to hear you are a bit krank, you with your noggin and me with my knee, but let's hope the pair of us are on the mend. The medicine man has filled me up with inflamatories, so the head has shrunk and the knee is bigger, pity they did not stop a bit higher up....
Anyway keep up the good work, will have a beer for you (Polish - good stuff, free from neighbour)...
Prost
Olderthanyou.
Some progress has happened and I did take a few pics too. I wanted to finish up the pit so I could finally close up the fusillier and mask it up for the paint. That meant I had to get the seatbelts done and installed. Also add a bit or two and test fit the Benz again,

I added the steering wheel and weathered up the belts with an AV European Dust wash to tone them down. I really like the HGW seatbelt kits and I have used them a few times before. They are finicky and patience trying, but worth it in the end. It has been a while, so when I nipped them off the sheet, I found the they were difficult to thread through the etch buckles. Ok, it was also funny that there are no instructions in the set, other than a picture that shows the parts and how they go together. When I came to gluing them, I wondered how this would work, them being so thick. DOH!!!!!!.....I had forgotten that you have to peel the backing off of them as they are a laser cut textile material. Getting old sucks!!! Looking at the Benz in place, it looked like the exhaust pipe outlet closest to the pilot was blocked by the strut frame. Test fit time,

Alright!!! It fits around the strut frame. No worries there anymore. The two supports in the middle will be removed when they get painted. Back to the wings and the bridge,

Seeing as I wasn't around back in 1917, this was the closest I could get to a doped linen color (formula in my last post). The round thing in the wing is for the compass decal. It'll get touched up when I apply it. Then, it will be the naval lozenge decals. The upper wing bridge plate,

If you closely, you can see the decals don't go to the inside edge of the wing. The bridge plate decal is wider than the plate and will cover the gaps in the join and overlap the other decals a bit. A pretty good idea, but I hope the overlap portion will snuggle down onto the under decal. I can't screw this up as it is most visible being the top wing. The 2 sets of 4 tiny circles in the middle are the cable mounting points with one cable. This allowed the crane to hook on the cable to raise/lower the plane in/out of the water. There were two types of these. The other one has 4 single eyelets and used 2 cables. Here's the idea,

This is a Friedrichshafen F.33E, but the principle was the same for all Naval wing thingy's...Next up was the observer's LMG 14. Again WnW'S gives you a choice of plastic cast or an etch barrel sleeve,

They also give you spare ammo drums and this cute little etch bending rod for the sleeve. One must always remember to gently roll the etch on a soft surface to form it using a dowel or the like first!!! I didn't (another brain fart) and went about trying to form the etch around the plastic rod. No go at this station, as the etch was wonky, even after I rolled it in my rolling plate from RPToolz. Another dumb move on my part. I unrolled the etch, flattened it out as best I could and went at it again. It's round but off-canted if you look closely. Oh, and the etch from WnW's doesn't need to be heated either. Cuss jar half filled now!!!...
As an aside, WnW's did/does put a lot of effort into the making of this (and other) kits idiot proof. Me excluded!!! Let's look at the floats here,

Notice the attachment points on the cross struts. No way in hell could you put these in the wrong way. Once they are in, you add the upright struts to the fusi,

Again, no way you could screw these up without noticing your error. With those installed, you just need to add the outward struts to the bottom wing undersides,

And again, they are pretty damn idiot proof. If you try to put the left strut in the holes on the right side, the strut faces down, away from the wing bottom. I found that to be pretty ingenious on the part of the kit designers. Just think of a person sitting at a computer, sipping some of New Zealand's finest, designing this excellent assembly method for the kit and hoping China won't screw up when they mold it. Must have been a pretty cool job back then!!!
That's it for today folks. If I haven't caught up on your build yet, please give me a little more time to do so. There are so many great builds/projects going on right now. Thanks for looking in and the wonderful comments. They keep me going when the going gets tough...
Prost
Allen
Andy the Sheep
SMF Supporter
I'm pretty sure the person sipping his New Zealand finest at the computer was a modeller before being a kit designer; if not, I'll try to sip that NZ finest too... .
.
Wonderful progresses, Allen.
Wonderful progresses, Allen.
Mark1
SMF Supporter
All taking shape very nicely.
Neil Merryweather
SMF Supporter
That's all looking VERY sexy Mr Dewire !
Looking very nice indeed.
I can afford one or thee, the biggest issue is where the hell to put them once built. I already have a serious shortage of room. I fear that a donation to the recycled plastic container is on the cards.
I can afford one or thee, the biggest issue is where the hell to put them once built. I already have a serious shortage of room. I fear that a donation to the recycled plastic container is on the cards.
Afternoon Folks,
Please don't ask as I will explain my absence below. Andrea, Mark, Neil, Ian, and Tony, Thank you so much for the kind words and support and sorry for the late reply. Table time has been NULL, but can only get better each day.
I don't know why 2024 is such a crappy year and I surely don't know who I PO'd either. There are 2 possibilities...
1. The 'Modelling Mafia' has it in for me and put out another "hit" contract on my butt, and got lucky......Or,
2. Someone generously gave me a free years subscription to the 'Illness of the Month Club', and it's working....
After the January nonsense with the sinus infection, February started with the 'Flu from Hell' and a touch of pneumonia thrown in too!!! It has knocked me flat for the past 16 days and yesterday was the first day I could actually sit at the table and play. My Mojo was in the toilet and I couldn't even hold a part in my fingers without it falling out of them. I at least tried to ketchup on here, but to no avail. I'd log on, read a few posts , and when I went to comment, I passed out at the table for 3 hours. For a week, I was sleeping 16 or more hours a day and couldn't hardly eat anything. It was really a great time, to say the least. It's over now and time to get cracking on with the Hansa W.12...
The last thing I accomplished, before the gorilla flu was adding the decals to the underside of the bottom wing. 2 black crosses and they proved to be fun,
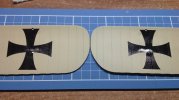
As you can see, there is virtually no carrier film on the Cartograph decals, so when I went to apply them, they weren't that easy. I slobbered Micro Set on the area, soaked them in water and then tried to slide them in place. They wanted fold/go in all directions while trying to do so. You need 3 to 4 hands to do it. Eventually, with lots of water, I got them to line up, lay flat, and snuggle down. I let them dry and one coat of Micro Sol did the rest. They came out better than I thought they would...
So yesterday, I got the wild hair up my butt to add the naval lozenge to the topside of these. I set everything up and went to it. Slobbered the Micro stuff on the wing and went to place the first one on. It gave me a bit of a prob and while moving it into place it tore a piece off. More water and a bit more playing around, I finally got it on the wing,
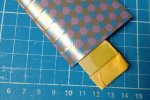
If you look real close, you can see the tear of the decal on the front wing root, out to the second rib. I put it aside to let it dry and moved onto the other wing decal. I had the same prob getting this one in place too. It fit around the compass mount okay. but did tear a bit too. In the end, I got them both done and put away to dry,
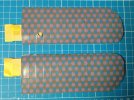
The decal around the compass mount needs a little tweaking into place, but for the most part, they're on the wings. When dry, I wanted to hit them with a coat of Micro Sol to get them to snuggle down on the ribbing and front curve of the wing. I reached for the bottle and came up with the Micro Set bottle in my hand. WTF!!!.........You guessed it!!! Dumb bunny had smeared Micro Sol on the wings instead of the Micro Set to apply them, DOH.......I guess I got away real lucky on this endeavor and that the decals didn't tear up even more from the Sol. I just put these away for overnight and went on to filling the fusi seams with dabs of Mr Dissolved Putty,
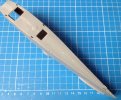
The seams weren't too bad, but in a few places they needed some love. The other side,
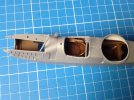
Again, the join isn't too bad and very little putty was used. The seam behind the observer's station is fine and with a quick sand down, it will be covered with a naval lozenge decal after the base coat is sprayed on...
I does feel good to be able to play at the table again, with the Mojo rising back up. I did lose about 4 weeks of table time though and this project is way behind. My ketchup here is also way behind and I apologize for that too. Thanks for looking in and please stay healthy everyone...
Prost
Allen
PS, I can't wait to see what March has for me...........................................
Please don't ask as I will explain my absence below. Andrea, Mark, Neil, Ian, and Tony, Thank you so much for the kind words and support and sorry for the late reply. Table time has been NULL, but can only get better each day.
I don't know why 2024 is such a crappy year and I surely don't know who I PO'd either. There are 2 possibilities...
1. The 'Modelling Mafia' has it in for me and put out another "hit" contract on my butt, and got lucky......Or,
2. Someone generously gave me a free years subscription to the 'Illness of the Month Club', and it's working....
After the January nonsense with the sinus infection, February started with the 'Flu from Hell' and a touch of pneumonia thrown in too!!! It has knocked me flat for the past 16 days and yesterday was the first day I could actually sit at the table and play. My Mojo was in the toilet and I couldn't even hold a part in my fingers without it falling out of them. I at least tried to ketchup on here, but to no avail. I'd log on, read a few posts , and when I went to comment, I passed out at the table for 3 hours. For a week, I was sleeping 16 or more hours a day and couldn't hardly eat anything. It was really a great time, to say the least. It's over now and time to get cracking on with the Hansa W.12...
The last thing I accomplished, before the gorilla flu was adding the decals to the underside of the bottom wing. 2 black crosses and they proved to be fun,

As you can see, there is virtually no carrier film on the Cartograph decals, so when I went to apply them, they weren't that easy. I slobbered Micro Set on the area, soaked them in water and then tried to slide them in place. They wanted fold/go in all directions while trying to do so. You need 3 to 4 hands to do it. Eventually, with lots of water, I got them to line up, lay flat, and snuggle down. I let them dry and one coat of Micro Sol did the rest. They came out better than I thought they would...
So yesterday, I got the wild hair up my butt to add the naval lozenge to the topside of these. I set everything up and went to it. Slobbered the Micro stuff on the wing and went to place the first one on. It gave me a bit of a prob and while moving it into place it tore a piece off. More water and a bit more playing around, I finally got it on the wing,

If you look real close, you can see the tear of the decal on the front wing root, out to the second rib. I put it aside to let it dry and moved onto the other wing decal. I had the same prob getting this one in place too. It fit around the compass mount okay. but did tear a bit too. In the end, I got them both done and put away to dry,

The decal around the compass mount needs a little tweaking into place, but for the most part, they're on the wings. When dry, I wanted to hit them with a coat of Micro Sol to get them to snuggle down on the ribbing and front curve of the wing. I reached for the bottle and came up with the Micro Set bottle in my hand. WTF!!!.........You guessed it!!! Dumb bunny had smeared Micro Sol on the wings instead of the Micro Set to apply them, DOH.......I guess I got away real lucky on this endeavor and that the decals didn't tear up even more from the Sol. I just put these away for overnight and went on to filling the fusi seams with dabs of Mr Dissolved Putty,

The seams weren't too bad, but in a few places they needed some love. The other side,

Again, the join isn't too bad and very little putty was used. The seam behind the observer's station is fine and with a quick sand down, it will be covered with a naval lozenge decal after the base coat is sprayed on...
I does feel good to be able to play at the table again, with the Mojo rising back up. I did lose about 4 weeks of table time though and this project is way behind. My ketchup here is also way behind and I apologize for that too. Thanks for looking in and please stay healthy everyone...
Prost
Allen
PS, I can't wait to see what March has for me...........................................
scottie3158
SMF Supporter
Steve-the-Duck
SMF Supporter
As long as things are moving forward, however slowly and whatever circumstance throws up, it's really all good
And what you have here is ALL good!
And what you have here is ALL good!
Mark1
SMF Supporter
Glad to see the mojos coming back and your feeling up to it 

Neil Merryweather
SMF Supporter
It's all looking good Allen and looks like you've had some good karma at last from the micro sol/set gods!
All power to your elbow and looking forward to seeing this puppy on the finishing line
All power to your elbow and looking forward to seeing this puppy on the finishing line
Looks great Allen. Hope you’ve kicked the bugs into touch as well.
Afternoon Everyone,
Life goes on in the big city and some work is getting done. I've also been out walking a whole bunch trying to get the old bones back into shape too. First,
I don't have any pics, so this isn't really an update. Yesterday, I started playing the masking game on the fusi. Foam squares, blu tack, tape and it's a real PITA. Luckily, I can install the motor afterwards, but it really makes masking/filling the front of the fusi even harder. I also masked up the floats and all the strut work for them too. I am going to need a pretty big batch of color to shoot it all with the hissy stick. Then there are all the other tidbits that need a shot too. Isn't life grand!!!...
Thanks again for all the support and hopefully the next update will have pics and paint in it. Stay healthy...
Prost
Allen
Life goes on in the big city and some work is getting done. I've also been out walking a whole bunch trying to get the old bones back into shape too. First,
Thanks Bro! I got real lucky with them. If I had messed them up, I would be up the creek without a paddle as replacements are non-existent Paul. It could take weeks to try and make/match a new base coat paint on the wings so I might be able to use my Lukgraph naval lozenge spares...Hello mate really sorry to hear you have been under the weather. Hope your on the mend. Despite the issues with the decals you have made a great job of them.
Thank you so much Chris! Lately, pond water is moving faster than I am I'm afraid. I can't believe how quickly you are knocking out your kits of late. I can't keep up with you...As long as things are moving forward, however slowly and whatever circumstance throws up, it's really all good
And what you have here is ALL good!
Thank you Tony! I truly hope I have better luck in the coming months too. So much I want to build and yeah, I defo got lucky with the decals...Good to see you back at the bench allen and hopefully the illnesses are behind you now , decals are looking great btw , cheers tony
Much appreciated Mark and the Mojo is flying high again!!! It's just the brain farts that keep slowing me down Sir...Glad to see the mojos coming back and your feeling up to it
Thanks Neil! Funny thing is, I didn't even look at the bottle after I was ready to go. I was more worried about the water temp being too warm for the decals. Unscrewed the top, dipped the brush in and slobbered it all over the wing. After I got it on, I just went ahead and did the second one. A really royal brain fart from hell...It's all looking good Allen and looks like you've had some good karma at last from the micro sol/set gods!
All power to your elbow and looking forward to seeing this puppy on the finishing line
You and me both Andy! I'm sick and tired of being sick and tired my friend. I hope you are feeling better too. It's looking up though and thanks for your support...Cracking work Allen.
Let's hope you have had this year's quota of illness all in one go and it's well & truly behind you.
Thank you Tim and I've had enough from bugs kicking my butt for at least a year or two...Looks great Allen. Hope you’ve kicked the bugs into touch as well.
I don't have any pics, so this isn't really an update. Yesterday, I started playing the masking game on the fusi. Foam squares, blu tack, tape and it's a real PITA. Luckily, I can install the motor afterwards, but it really makes masking/filling the front of the fusi even harder. I also masked up the floats and all the strut work for them too. I am going to need a pretty big batch of color to shoot it all with the hissy stick. Then there are all the other tidbits that need a shot too. Isn't life grand!!!...
Thanks again for all the support and hopefully the next update will have pics and paint in it. Stay healthy...
Prost
Allen
Evening Ladies, Germs and Children of all ages,
No, I'm not sick again. Actually, I feel really great and the Mojo is soaring. You can't imagine how good it feels to be back at the table and playing with plastic again. After masking up all the thangs over the past 2 days, I figured I had better get some paint on them before the tape and the rest got wonky. It was around 4 PM today and I said it's now or never to get it done as I've lost enough time of late. Clipped all the tidbits in clamps on skewers and stuck them in my big foam block. The fusi was a pain, but I used a piece of the wood from my crane model to hold it. I mixed up a batch of Tamiya using 45% X-22 clear with 55% XF-83 gray/blue, and thinned it with 40% X-20A thinner. It was kind of dark all day as the sun still doesn't want to shine here, but what the heck. Threw the hose out the window and yeah, the wind was blowing in, as usual. fired up the compressor and had a go with the hissy stick...
I was totally amazed at the results. The paint went down like butter and the wind kept most of the fuzzy's off my work too. Enough blabber and here are some pics,
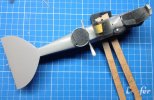
I'm not 100% happy with my fusi gap work on the 2 places between the observer's station and the motor, but it will be hard to see with the top wing and the windshield in place. The spine to the tail wing will be covered with a naval lozenge decal, as will the rear wing top. The bottom of her,
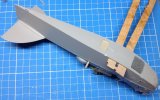
The same with my gap work between the window and the round inspection cover. Time to go to Fielmann's for some glasses I think. With the fusi and a few tidbits done, I looked in the cup and saw it still had paint in it as well as my syringe which was still 1/2 full. Snagged up the floats and all the struts, quickly clipped them up on skewers and shot them too. Here's everything all hissy sticked up,
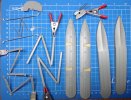
There are a couple of edges that need some touch up, but for the most part, everything came out great. The MG is still steel color, but looks like it got sprayed. It's just my poor pic taking and the lighting. Of course, when you are done and have cleaned the AB, you come across that one piece you forgot to paint,
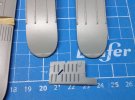
The right forward engine cover. it's okay, as a quick stroke with the hairy stick full of paint will fix that. I'll let all this dry overnight and tomorrow I can drive on with the decals on the floats, fusi, rear wing and the tail fin. Not too shabby for an hours work earlier!!! We are finally getting somewhere on this baby...
Thanks again for your support and I'll be playing this arena all week boys and girls!!!...
Prost
Allen
No, I'm not sick again. Actually, I feel really great and the Mojo is soaring. You can't imagine how good it feels to be back at the table and playing with plastic again. After masking up all the thangs over the past 2 days, I figured I had better get some paint on them before the tape and the rest got wonky. It was around 4 PM today and I said it's now or never to get it done as I've lost enough time of late. Clipped all the tidbits in clamps on skewers and stuck them in my big foam block. The fusi was a pain, but I used a piece of the wood from my crane model to hold it. I mixed up a batch of Tamiya using 45% X-22 clear with 55% XF-83 gray/blue, and thinned it with 40% X-20A thinner. It was kind of dark all day as the sun still doesn't want to shine here, but what the heck. Threw the hose out the window and yeah, the wind was blowing in, as usual. fired up the compressor and had a go with the hissy stick...
I was totally amazed at the results. The paint went down like butter and the wind kept most of the fuzzy's off my work too. Enough blabber and here are some pics,

I'm not 100% happy with my fusi gap work on the 2 places between the observer's station and the motor, but it will be hard to see with the top wing and the windshield in place. The spine to the tail wing will be covered with a naval lozenge decal, as will the rear wing top. The bottom of her,

The same with my gap work between the window and the round inspection cover. Time to go to Fielmann's for some glasses I think. With the fusi and a few tidbits done, I looked in the cup and saw it still had paint in it as well as my syringe which was still 1/2 full. Snagged up the floats and all the struts, quickly clipped them up on skewers and shot them too. Here's everything all hissy sticked up,

There are a couple of edges that need some touch up, but for the most part, everything came out great. The MG is still steel color, but looks like it got sprayed. It's just my poor pic taking and the lighting. Of course, when you are done and have cleaned the AB, you come across that one piece you forgot to paint,

The right forward engine cover. it's okay, as a quick stroke with the hairy stick full of paint will fix that. I'll let all this dry overnight and tomorrow I can drive on with the decals on the floats, fusi, rear wing and the tail fin. Not too shabby for an hours work earlier!!! We are finally getting somewhere on this baby...
Thanks again for your support and I'll be playing this arena all week boys and girls!!!...
Prost
Allen
