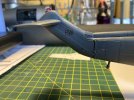
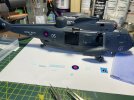
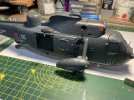
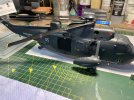
Doug's 1/48 Airfix Sea King

Waspie

SMF Supporter
Joined
Mar 13, 2023
Messages
2,497
Points
113
Location
Portland - Dorset
First Name
Doug
Good question nicely phrased! Can’t recall seeing red!! ;)
I’ll have shufty at some colour pics in my albums.
The only spinning red bits I recall were the droop stops!!
First pic of a mk2 - red roots.
Now to check for a mk5.

Yup, mk5 - red roots.
Another tomorrow job to add to SWMBO’s ever increasing list!!
Thanks Rick :thumb2:
 

rickoshea52

SMF Supporter
Joined
Dec 20, 2011
Messages
3,976
Points
113
Location
North West
First Name
Rick
Good question nicely phrased! Can’t recall seeing red!! ;)
I’ll have shufty at some colour pics in my albums.
The only spinning red bits I recall were the droop stops!!
Droop stops on HAR3’s were dayglo orange but I don’t think they are featured on the Airfix Sea King.
 

Waspie

SMF Supporter
Joined
Mar 13, 2023
Messages
2,497
Points
113
Location
Portland - Dorset
First Name
Doug
Droop stops on HAR3’s were dayglo orange but I don’t think they are featured on the Airfix Sea King.
To be honest whenever I did marshalling I was always told to look for the actual shape rather than the colour, which I never noticed due to the abundance of grease up there!!!
 

Waspie

SMF Supporter
Joined
Mar 13, 2023
Messages
2,497
Points
113
Location
Portland - Dorset
First Name
Doug
Aghhhh. Going back to the drawing board with the decal business!! Tried very unsuccessfully to use my home printed set of black decals. Only partial success and that is coming off tomorrow.:poop: The clear film the lettering sits on appears so flimsy it just dissolves when you touch it.:poop: I have a delicate hand and no matter what I used it just disintegrates. I used my tweezers, finger, sable paint brush and paper to tease it off the clear backing!!

Pic1 and only one!!
Not at all happy with it. And that's my best one.:poop: The others were removed after they partially self destructed. The PW is coming off as I said.
IMG_1369 copy.JPG

Just walked away after the 5th attempt. No point flogging a dead horse.

I'll have a check of Hannants and sea if they have any 1/48 compatible decals.
Well I tried - failed - but tried.
This modelling lark isn't as easy as it was when I were a lad!!! Eeee, it were reet easy then!!! ;)
An unmitigated pile of poo today.
My Unhappy of Dorset!!!:unamused:
 

Stefee

SMF Supporter
Joined
Feb 12, 2023
Messages
207
Points
93
Location
HemelHempstead
First Name
Stefan
Do not despair mon ami, when I started printing my own decals I had exactly the same problem as you. I then went to clear decal paper of a higher price and better quality which seems to work - not as good as professional ones but good enough for me.
 

boatman

SMF Supporter
Joined
Nov 8, 2018
Messages
12,926
Points
113
Location
NORFOLK UK
First Name
christopher
HI Doug keep the faith in modelin mate as you are not the only one in the :poop: as your probs cant be any worst than my tomcat Aaaarrrrggg but im gonna keep on battlein till its built lol
 

Waspie

SMF Supporter
Joined
Mar 13, 2023
Messages
2,497
Points
113
Location
Portland - Dorset
First Name
Doug
HI Doug keep the faith in modelin mate as you are not the only one in the :poop: as your probs cant be any worst than my tomcat Aaaarrrrggg but im gonna keep on battlein till its built lol
Hi Chris, thanks buddy. Yeah, I'm keeping the faith it's just thinking you've cracked a problem, (of my own doing - I decided to change the colour scheme to my old squadron but not expecting to have a simple thing like a few decals mess up my master plan).
Been following your 'cat' thread and have total respect for what you are doing. I'm just starting out and also a bit of a realist but I never thought a bit of paper would mess me about. I couldn't handle electrics as well!! I take my hat off to you for even attempting it!!
Taking a few days out, (only to paint the kitchen), then I'll re-attack the 'King', having had time to think of my next move!! I find painting 1:1 therapeutic so it'll help.
No piece of plastic is going to win me!! (yet)
 

boatman

SMF Supporter
Joined
Nov 8, 2018
Messages
12,926
Points
113
Location
NORFOLK UK
First Name
christopher
Hi Chris, thanks buddy. Yeah, I'm keeping the faith it's just thinking you've cracked a problem, (of my own doing - I decided to change the colour scheme to my old squadron but not expecting to have a simple thing like a few decals mess up my master plan).
Been following your 'cat' thread and have total respect for what you are doing. I'm just starting out and also a bit of a realist but I never thought a bit of paper would mess me about. I couldn't handle electrics as well!! I take my hat off to you for even attempting it!!
Taking a few days out, (only to paint the kitchen), then I'll re-attack the 'King', having had time to think of my next move!! I find painting 1:1 therapeutic so it'll help.
No piece of plastic is going to win me!! (yet)
COR Cheers Doug yes do a bit of paintin an calm down matey an yes i love eletrics but somtimes come unstuck lol but it should all go ok just a matter of patience an time
 

Waspie

SMF Supporter
Joined
Mar 13, 2023
Messages
2,497
Points
113
Location
Portland - Dorset
First Name
Doug
OK, I was back to the bench today. Real slow and a mug of nice tea at hand.
Decals!! Well I bit the bullet, made the decision to mix a few decals up to achieve a hybrid 819 Sea King. I used the white decals in place of the black but needs must. (I'm sure I'll make another Sea King one day. Then it'll be a Mk2 with the correct white decals OR I'll use the lead up time to source a set of correct size black decals).

I managed to get 98% of all the starboard decals fitted. I also managed to attach the rotor blades to the main rotor head.

Pic Time.

Pic 1
The white decade Royal Navy, 05 and serial numbers plus PW the airfield identifier added! The cabin door yellow jettison markings were a nightmare!! But done - just.
IMG_1378.JPG

Pic 2
I even managed to attach the squadron name and badge - where 819 bore them. Other squadron usually omitted the name and wore their Sqdn badge in other places. A couple of tiny decals added.
IMG_1379.JPG

Pic 3
Rotor head and blades fitted. I seem to remember the blades being closer to the airframe and ground but their position the kit is dictated to by the kit itself. If I do this again I'll modify the rotor head to reflect their true position.
IMG_1380.JPG

Slowly getting there. Any comments/criticisms welcomed. I reckon a week more and it'll be completed. Not looking forward to the port cabin door fitting. Then there is the usual dirtying before a matt gloss and 'Finè'.
 
Last edited:

rickoshea52

SMF Supporter
Joined
Dec 20, 2011
Messages
3,976
Points
113
Location
North West
First Name
Rick
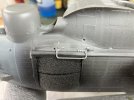
It looks like you may have missed the crewmans grab rail above the cabin door, Doug. The instructions don’t show it but it’s in the kit. I think it’s an omission from the instructions because every cab I’ve seen has it fitted.
IMG_2139.jpeg
 

Waspie

SMF Supporter
Joined
Mar 13, 2023
Messages
2,497
Points
113
Location
Portland - Dorset
First Name
Doug
It looks like you may have missed the crewmans grab rail above the cabin door, Doug. The instructions don’t show it but it’s in the kit. I think it’s an omission from the instructions because every cab I’ve seen has it fitted.
View attachment 507665
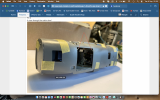
Didn't have it on the Mk2/5/6. ASW Kings Rick. We had handles in the top left and right corners of the cabin door. As per my screen shot below.
The handles you show were fitted to the HAR versions. Probably 771 cabs. Never flew in them so can't swear!!

Screenshot 2024-04-30 at 22.29.31.png

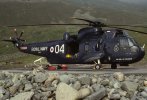
XV664 St Kilda 2nd August 1982 no 2_edited-1.jpg
 
Top