French R35 - My first ever armour model

Joined
Aug 6, 2022
Messages
10
Points
13
First Name
Arthur
Hello everyone!
New to this forum, I feel it would be a good idea to jump in by presenting what I'm currently working on.
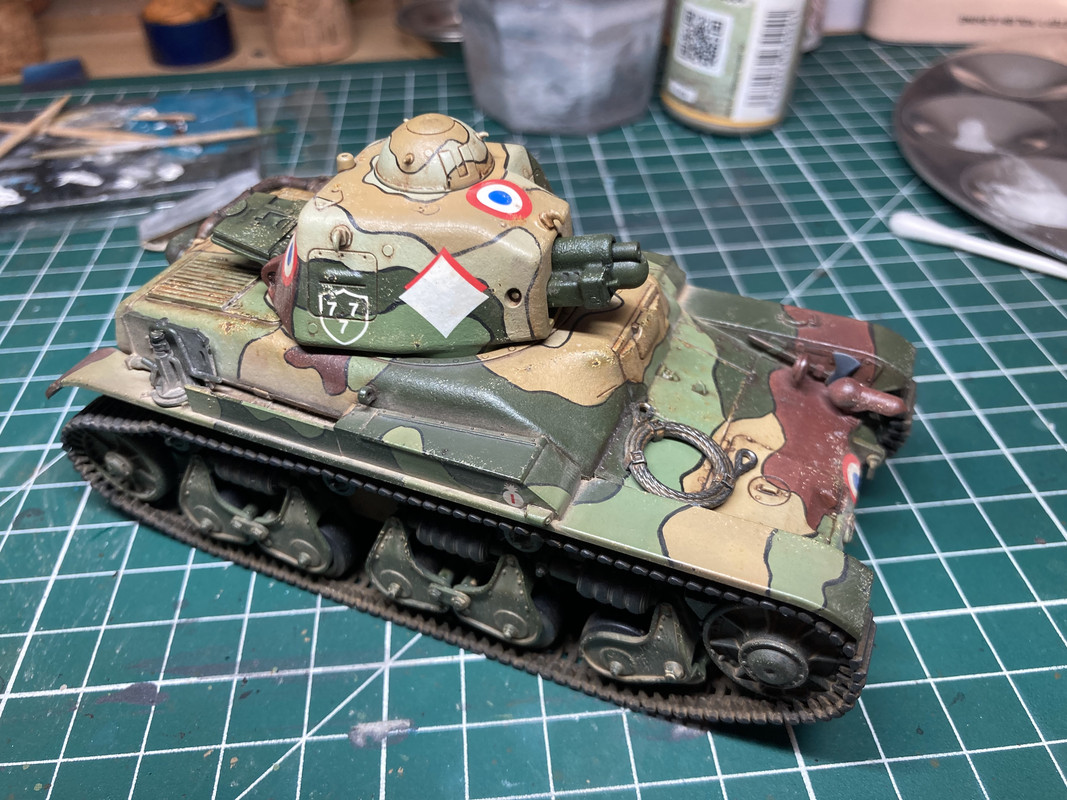
The French R35 from Tamiya.

Coming from Miniatures and figure painting, I've wanted to try something new. I've always wanted to try scale model.
I'm more use to work with acrylics from GW or Vallejo. So working on an armour model, everything is new to me. The paint, the enamels, the weathering technics, pigments...
I haven't tried to be historically or realistically accurate. I'm just trying to understand the process and to finish it.

The plan is to finish the tank, and then to build a small diorama to put it on.

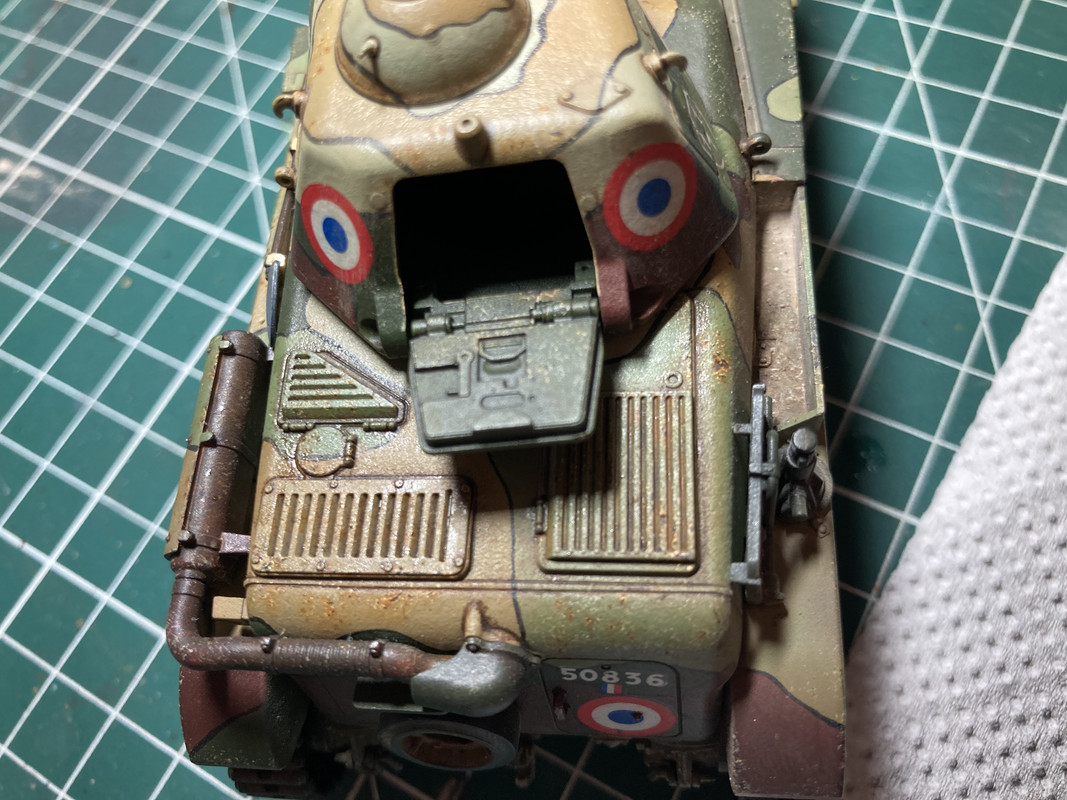
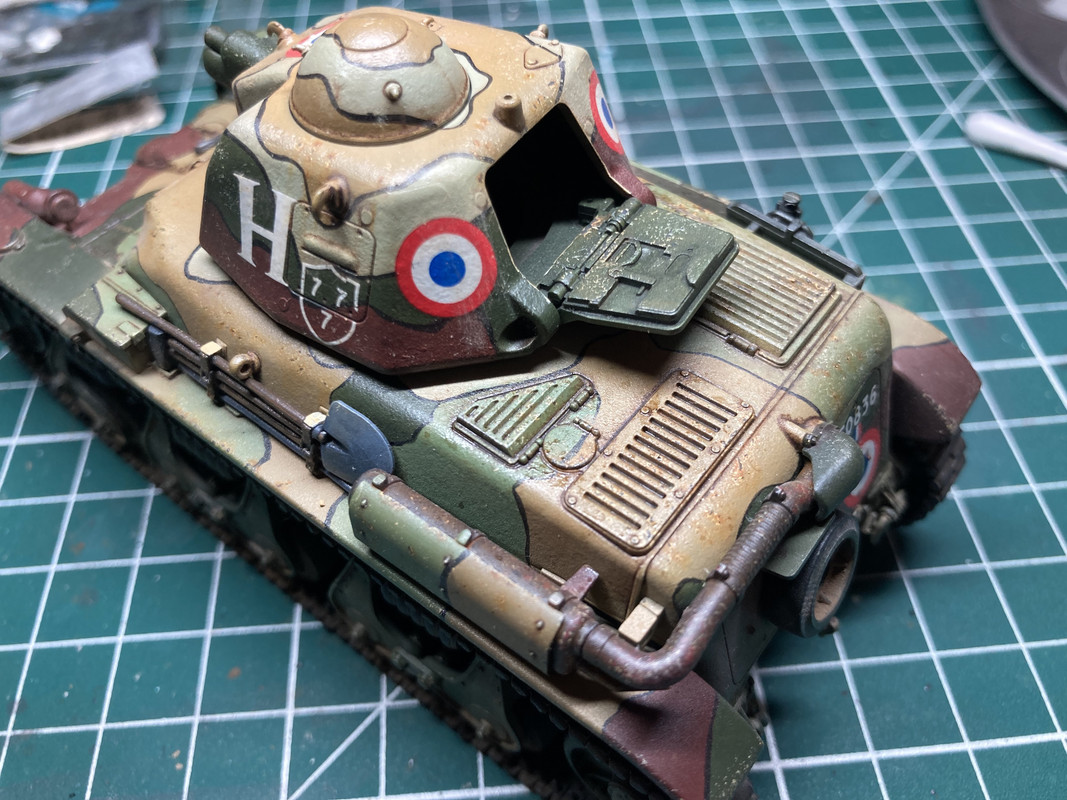
I tried to use pigment to dust it. In my story, it's suppose to be Summer 1940, so i didn't want the tank to be too dirty.
spacer.png


spacer.png


I've also tried to simulate oil and fuel stain. But once again, maybe I'm not using the right colore as the product I used is brownish and the engin part is sandish. The contrast isn't obvious.
spacer.png


spacer.png


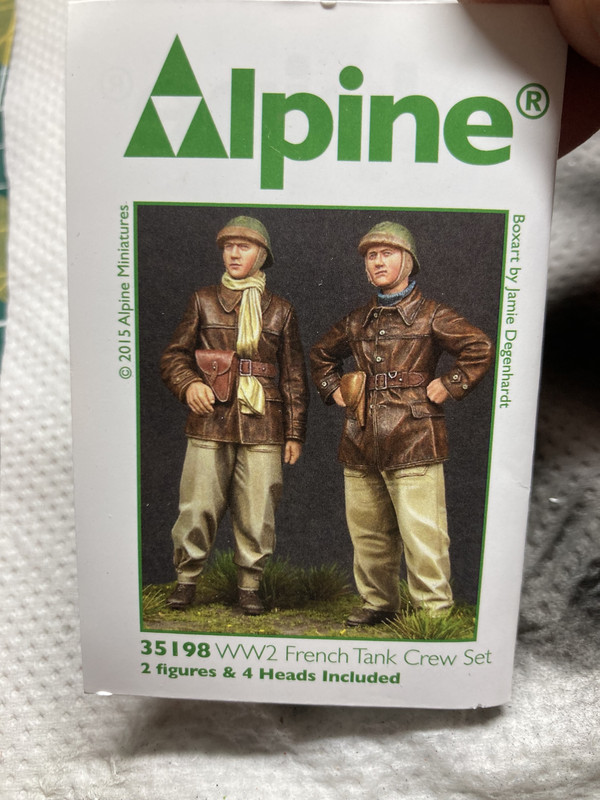
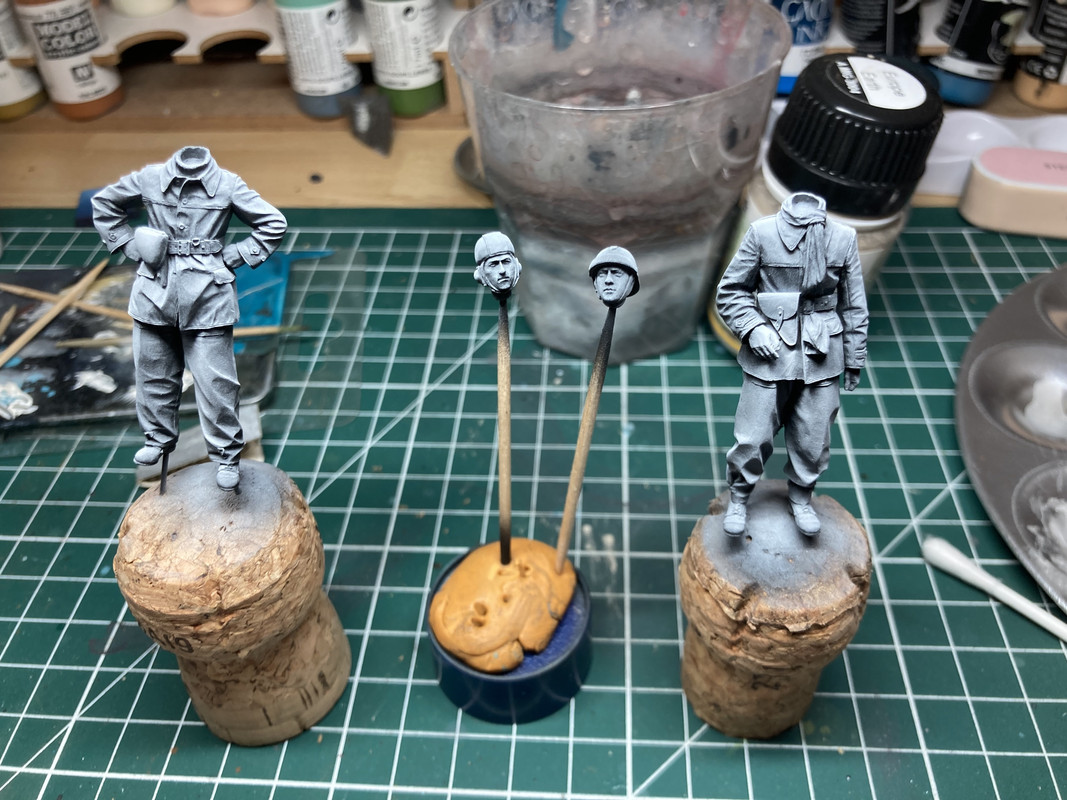
Next step : Those two bad boys

spacer.png


I've already primed them and did a quick zenithal to make the painting easier
spacer.png
 

rtfoe

SMF Supporter
Joined
Apr 29, 2018
Messages
7,518
Points
113
Location
Malaysia
First Name
Richard
Hi Arthur, your build is really good and the weathering scalewise is just enough. Weathering on camouflage is not easy because of the different tones but I think you pulled it off. Not overly done. :thumb2:

Anxious to see your figure painting.

Cheers,
Richard
 

The Smythe Meister

Born to be WILD....... until about 9pm
SMF Supporter
Joined
Jan 30, 2019
Messages
5,740
Points
113
Location
Devon
First Name
Andy
Very nice indeed :smiling3:
I'm an armour builder myself normally... But have strayed into the dark realms of wingy things recently ;)
Your R35 is a cracking build :smiling3:
 

Andy the Sheep

SMF Supporter
Joined
Apr 7, 2019
Messages
1,546
Points
113
Location
North Eastern Italy
First Name
Andrea
Welcome, Arthur.
The tank is spot on: french armoured units didn't operate for a long period, so, as you correctly supposed, they were in good conditions with just some dust and a few stains and scratches.
Looking forward for the crew.
Andrea
 

Tim Marlow

Little blokes aficionado
SMF Supporter
Joined
Apr 27, 2018
Messages
16,797
Points
113
Location
Somerset
First Name
Tim
That looks excellent. Not an easy Camouflage pattern by any means. Look forward to seeing the figures evolve….
 

Dave Ward

Still Trying New Things
SMF Supporter
Joined
Apr 27, 2018
Messages
8,664
Points
113
Location
South Gloucestershire
First Name
David
Arthur,
that's looking very good & with a base and figures will look even better - did you have any problems with the tracks? they're often a problem area!
Dave
 
Joined
Aug 6, 2022
Messages
10
Points
13
First Name
Arthur
Thank you guys !!! :smiling3:

Arthur,
that's looking very good & with a base and figures will look even better - did you have any problems with the tracks? they're often a problem area!
Dave
Yes. The tracks weren't easy to put on after I painted them. Because several segments are one rigide piece of plastic, they weren't very flexible broke and several time. I had to use super glue to make sure they stayed in one piece.
Next time I'll try to guet workable tracks. I imagine they are easier to work with.
 

Jakko

Way past the mad part
SMF Supporter
Joined
Apr 28, 2018
Messages
10,834
Points
113
First Name
Jakko
Yes. The tracks weren't easy to put on after I painted them. Because several segments are one rigide piece of plastic, they weren't very flexible broke and several time. I had to use super glue to make sure they stayed in one piece.
It’ll get easier with experience :smiling3: The main trick with the tracks like on this model, is to put them on the model before the glue dries. This is a problem because the tracks will be easier to paint off the model, but then you can’t glue them anymore … There are a few ways around this: one is to do what you did, paint them off the model and then attach them with superglue or something. Another is to glue them on before painting, and then paint them on the model — in which case you may not be able to get a paintbrush everywhere you need to; to avoid that, you can coat the whole lower part of the model in dust or mud, because then the tracks will have the same colour as the rest of the suspension and you can just spray it as a whole :smiling3: If you don’t want to do either of those, you can assemble the tracks onto the model, but in a number of sections (top and bottom, usually) that you can take off again. This requires that you take care to not glue the track to the wheels yet, though it does mean you can paint them off the model and only attach them after that has been painted too.

Next time I'll try to guet workable tracks. I imagine they are easier to work with.
Keep hoping ;)

The whole suspension is the bane of the armour modeller. It’s always a ton of parts that are a lot of work to clean up and will need to line up correctly once you’ve assembled them. Working track links sound nice, but all it means is even more parts, and most of them will be very small.
 

Dave Ward

Still Trying New Things
SMF Supporter
Joined
Apr 27, 2018
Messages
8,664
Points
113
Location
South Gloucestershire
First Name
David
Arthur,
tracks are a reason why some modellers won't make tanks! Individual links can look better, but are very tedious to assemble. The ones you have to be wary of are those that have multiple parts to one link. They account for the very high parts counts of some models. Depending on the engineering, these can be just tedious, or an absolute nightmare - I've bad memories of fighting tank tracks - one of the worst being the HobbyBoss 1/35 St. Chamond WWI tank - a nice model, until you got to the tracks!!
Dave
 

Jakko

Way past the mad part
SMF Supporter
Joined
Apr 28, 2018
Messages
10,834
Points
113
First Name
Jakko
The ones you have to be wary of are those that have multiple parts to one link.
Or the ones that just don’t fit at all. A good example, though he hasn’t gotten to them yet on here, is the SKP A30 Challenger that Artyom (@Neo) is building. It comes with separate-link tracks and a bag of track pins that are about 0.5 mm diameter and 1.5 mm long, at a rough guess and the instructions tell you to drill holes in the links for those pins … So that’s four 0.5 mm holes per link, for something like a hundred links per side, and worst of all, those links don’t even fit together correctly! (Needless to say, I decided to purchase a set of replacement tracks for when/if I get round to building the SKP kit I have in the stash.)
 

Scratchbuilder

SMF Supporter
Joined
Jul 2, 2022
Messages
1,946
Points
113
First Name
Mike
Hello Arthur,
Welcome to the change in your diet... For a first effort there is nothing wrong that cannot be altered and that really is just with the finishing. Pigments - for a start you can mix pigments to your own shade, so if a sand colour is too bright you can tone it down with some brown or even grey pigment. I have a jar of mixed pigment I use for desert base and for the life of me cannot tell you what is in it - but it works. Oil and fuel stains - you have the solution in your own paints from figures. Thin down a little Burnt Umber and let that flow into the cracks and crevices. Then for oil the same except with Lamp Black - put a little in place and then blend it in untill you are satisfied. As for the figures, I think you might struggle there a bit LOL.
Mike.
 
Joined
Aug 6, 2022
Messages
10
Points
13
First Name
Arthur
Hello Arthur,
Welcome to the change in your diet... For a first effort there is nothing wrong that cannot be altered and that really is just with the finishing. Pigments - for a start you can mix pigments to your own shade, so if a sand colour is too bright you can tone it down with some brown or even grey pigment. I have a jar of mixed pigment I use for desert base and for the life of me cannot tell you what is in it - but it works. Oil and fuel stains - you have the solution in your own paints from figures. Thin down a little Burnt Umber and let that flow into the cracks and crevices. Then for oil the same except with Lamp Black - put a little in place and then blend it in untill you are satisfied. As for the figures, I think you might struggle there a bit LOL.
Mike.
Hi Mike ! Thank you for those tips ! I'll keep them in mind for the next model I'll do.
As for the figures, I actually was able to work on them a little bit this week-end ! I was more in known territory :p

I'm not sure I should post that here or if I should move this thread to figure painting ?

I started by doing the pant and the leather jacket.

I've carefully glazed 2 or 3 coats and I mad sure to not cover completely the zenithal under coat.
For the pant, Base coat : Light Mud. / High lights : Light mud + Ivory / Shadow / Light mud + Black

To simulate the leather on the Jacket, I applied a base coat of Red Brown. I used wood grain to push the shadow. For the high light I did several coat of dry brush of mix of my base coat with more and more orange brown. The final coat was pure orange brown.

I finally did a edge high light on all the pockets and sewing details with a sandish colour.

IMG-2844.jpg


IMG-2845.jpg


I felt the jacket was to red, so I applied a glaze of Chocolate brown to bring back the brown colour. It also unifies all the colours.
I did pretty much the same thing on the holster and the belt but with different tone of brown to have colour variation.

IMG-2848.jpg


IMG-2849.jpg


Unfortunately, by the time I was done with the body, I had to leave to not miss the train.
If only models where free, I wouldn't have to go work !

Next objective (whenever I'm back home), the head and the other guy!
 

Jim R

SMF Supporter
Joined
Apr 27, 2018
Messages
13,748
Points
113
Location
Shropshire
First Name
Jim
Jacket looks excellent. Looking forward to the rest. Figures are never easy.
 

Scratchbuilder

SMF Supporter
Joined
Jul 2, 2022
Messages
1,946
Points
113
First Name
Mike
Hi Mike ! Thank you for those tips ! I'll keep them in mind for the next model I'll do.
As for the figures, I actually was able to work on them a little bit this week-end ! I was more in known territory :p

I'm not sure I should post that here or if I should move this thread to figure painting ?

I started by doing the pant and the leather jacket.

I've carefully glazed 2 or 3 coats and I mad sure to not cover completely the zenithal under coat.
For the pant, Base coat : Light Mud. / High lights : Light mud + Ivory / Shadow / Light mud + Black

To simulate the leather on the Jacket, I applied a base coat of Red Brown. I used wood grain to push the shadow. For the high light I did several coat of dry brush of mix of my base coat with more and more orange brown. The final coat was pure orange brown.

I finally did a edge high light on all the pockets and sewing details with a sandish colour.

IMG-2844.jpg


IMG-2845.jpg


I felt the jacket was to red, so I applied a glaze of Chocolate brown to bring back the brown colour. It also unifies all the colours.
I did pretty much the same thing on the holster and the belt but with different tone of brown to have colour variation.

IMG-2848.jpg


IMG-2849.jpg


Unfortunately, by the time I was done with the body, I had to leave to not miss the train.
If only models where free, I wouldn't have to go work !

Next objective (whenever I'm back home), the head and the other guy!
Part of the same build so no problem. At least not with me, I might learn something.
Mike
 
Top