Hasegawa 1/72 Beech T34 Mentor

yak face

Wossupwidee?
Staff member
Moderator
SMF Supporter
Joined
Jun 13, 2009
Messages
12,415
Points
113
Location
sheffield
First Name
tony
Its now had a coat of Klear a few days ago and so decal time ! Or so I thought … first off I’ll start with the ‘ meatballs ‘ was my intention but on getting the decals out this is what i was faced with 901E20BD-BEC8-4461-870B-0D3C64EC58E3.jpeg
The white surround is way out of register making them look like googly eyes ! This is why some makers supply the middle spot of RAF roundels separately , the multiple printing of different colours can sometimes result in misalignment. Should be easy enough to make masks right ? No , as it happens my compass cutter only goes down to 10 mm diameter circles and the red part of the fuselage hinomaru is 8mm. So its mask and paint the white and either use a punch cutter to get the red bit of the decal , or use the punch cutter to make masks for the red bits . Either way here it is getting masked up for the white circles.5A836582-5B94-4AF5-A2F2-B489807BF8CE.jpeg
 

adt70hk

I know its a bit sad but I like quickbuild kits!!!
SMF Supporter
Joined
Sep 4, 2019
Messages
9,507
Points
113
First Name
Andrew
That's come a long way Tony. Love the orange! Roundels were bad! Never realised that's why the middles came separately.

ATB.

Andrew
 

flyjoe180

Joe
SMF Supporter
Joined
Jan 18, 2012
Messages
12,426
Points
113
Location
Earth
First Name
Joe
Nobody could ever say they never saw it coming. Looking great Tony
 

yak face

Wossupwidee?
Staff member
Moderator
SMF Supporter
Joined
Jun 13, 2009
Messages
12,415
Points
113
Location
sheffield
First Name
tony
Got the white sprayed a few days ago so today time for the red bits . I planned to use decal for the red , punching it out of spare decals with an 8 mm hollow punch. This didnt go to plan as the edges of the punched circles were a bit rough plus the decals broke up on getting wet. So , plan B - mask up and spray the red . I used the hollow punch again , punching out 8 mm holes in Kabuki tape , stuck onto some shiny label backing paper.04CFABAE-3D0A-4C25-B36F-6F43F4E93EC8.jpeg664E652E-618B-4D12-A2BB-C2227F5D78CC.jpeg249C32E7-50A2-4D04-BD95-8DED13D5E1E7.jpeg
It was tricky to get the bang central but it worked out fine , except for the starboard stabiliser becoming a casualty. This has now been stuck back on and ive started with the rest of the decals. Ive got the matt black areas on the nose and behind the canopy to do next 83381BC1-4F32-4154-835B-C7CC37A36B70.jpeg
 

Attachments

  • 66E7D164-FCF3-4B0A-86B4-881FA7AC5B43.jpeg
    66E7D164-FCF3-4B0A-86B4-881FA7AC5B43.jpeg
    104.9 KB · Views: 1

The Smythe Meister

Born to be WILD....... until about 9pm
SMF Supporter
Joined
Jan 30, 2019
Messages
5,743
Points
113
Location
Devon
First Name
Andy
Excellent stuff with the Red discs there Tony :smiling3:
This is going to be a cool build!
 

yak face

Wossupwidee?
Staff member
Moderator
SMF Supporter
Joined
Jun 13, 2009
Messages
12,415
Points
113
Location
sheffield
First Name
tony
Bit more done today . The wing walkway decals have been applied and the black anti glare sections round the canopy were masked and sprayed .Next up is a sealing coat of satin then its time for the undercarriage . C2364C65-0285-40A0-AAF1-F6A3E318D804.jpeg
 

The Smythe Meister

Born to be WILD....... until about 9pm
SMF Supporter
Joined
Jan 30, 2019
Messages
5,743
Points
113
Location
Devon
First Name
Andy
Bit more done today . The wing walkway decals have been applied and the black anti glare sections round the canopy were masked and sprayed .Next up is a sealing coat of satin then its time for the undercarriage . View attachment 478936
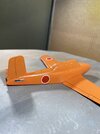
"Anti Glare sections round the canopy"....
... What about some for us looking in Tony !! ;)
(Looks great btw :smiling3:. )
 

Jim R

SMF Supporter
Joined
Apr 27, 2018
Messages
13,751
Points
113
Location
Shropshire
First Name
Jim
I missed this Tony but just had a catch up. Not a bad kit although that silvery plastic looks horrible. Nice job on the cockpit. Excellent job on the orange and well done with the markings. With the little tractor it will make a fine model.
 

yak face

Wossupwidee?
Staff member
Moderator
SMF Supporter
Joined
Jun 13, 2009
Messages
12,415
Points
113
Location
sheffield
First Name
tony
Got the undercarriage fitted and to my surprise it promptly sat on its arse begging for a biscuit .This is despite the ball bearing and lead shot in the nose ( see previous page ) , so what to do? Not many options this late in the build but luckily I had drilled out the engine intakes earlier on , so I resorted to cutting tiny strips of lead about the size of a grain of rice and stuffing them into its nostrils ! After about twenty were put in it just about stayed put but i needed more and the nose was quite full . 6197388F-9751-4E07-B586-0A94665E2BFD.jpeg0D2BD5D5-7EA0-487D-98F4-54B9FFE59ACA.jpegA62DFA08-5AFB-4924-A50C-56511F6D392A.jpeg
So a cheat ive used before was employed to give it a little more weight. The nosewheel doors were yet to be attached , and being quite plain ( albeit with a little curve at the front) were easy enough to replicate with some thin lead . These have now been stuck on and it JUST tips the balance to the front. 8165B70A-AB53-4E5E-A12D-21929EF36A6D.jpeg57EFDBC8-D89D-43AF-86C7-E21EDBC56E8A.jpeg4799CD07-A6E3-4385-9375-116FCF44B0FB.jpeg
 
Top