Unbelievable.
You are using an out of date browser. It may not display this or other websites correctly.
You should upgrade or use an alternative browser.
You should upgrade or use an alternative browser.
HMS Hood 1/200 Amati Models
- Thread starter Bigfoot57
- Start date
Jim R
SMF Supporter
You're not wrong there Paul.Unbelievable.
- Joined
- Sep 4, 2019
- Messages
- 9,526
- Points
- 113
- First Name
- Andrew
Mind-blowing Colin..... If I got that right was that 2000 pieces of PE alone? How many parts for the whole thing?
And if I've got it right, it's about 4' 4" in length?
Again great work.
Andrew
PS apologies if you've covered the above questions previously.
And if I've got it right, it's about 4' 4" in length?
Again great work.
Andrew
PS apologies if you've covered the above questions previously.
boatman
SMF Supporter
HI Colin well ive been following your Hood build an its been very instresting an you are doin very good but pity it was not R/C to sail
ATB
chrisb
ATB
chrisb
Great build! Even the instruction pages are 
Bigfoot57
SMF Supporter
- Joined
- Jun 24, 2015
- Messages
- 860
- Points
- 93
- First Name
- Colin
Having about 30 min to waste whilst waiting for paint to dry I did a pointless excercise using the instructions supplied in this kit adding up each brass fret I got a total of 2098 pieces of photo etch for this model
Regards
Colin
Regards
Colin
- Joined
- Sep 4, 2019
- Messages
- 9,526
- Points
- 113
- First Name
- Andrew
That's mental..... Some of the 1/72 quick-build kits my son and I do in only have 20 parts.... Total.Having about 30 min to waste whilst waiting for paint to dry I did a pointless excercise using the instructions supplied in this kit adding up each brass fret I got a total of 2098 pieces of photo etch for this model
Regards
Colin
Bigfoot57
SMF Supporter
- Joined
- Jun 24, 2015
- Messages
- 860
- Points
- 93
- First Name
- Colin
For those interested here is my estimate of the total kit again using the instruction pages
HMS Hood
2098 Photo Etch
354 Wooden Pieces
375 Planks 1ft Long by 1/2” wide
435 Moulded Plastic
393 Cast White Metal
20 Pieces Of Laser Printed Decking
So a total of around 3675 so allowing for some slight errors say around 3600 to 3700 would be about right
Regards
Colin
HMS Hood
2098 Photo Etch
354 Wooden Pieces
375 Planks 1ft Long by 1/2” wide
435 Moulded Plastic
393 Cast White Metal
20 Pieces Of Laser Printed Decking
So a total of around 3675 so allowing for some slight errors say around 3600 to 3700 would be about right
Regards
Colin
Bigfoot57
SMF Supporter
- Joined
- Jun 24, 2015
- Messages
- 860
- Points
- 93
- First Name
- Colin
HMS Hood 1/200 Hachette /Amati Wooden kit Build Parts 136 Part 2 Adding Rangefinders and Signalling Lamps
So 1st off we add the pe seats to the support pillars then they are painted light grey as normal next he have to place them inside a structure with very little room to actually fit the parts
So what I did was attach the rangefinder to a long piece of dowelling using blutack then add glue to the base of the rangefinder next I slid the rangefinder into position making sure it was correctly orientated before pushing down to secure the base to the decking inside after it had stuck I remove the dowelling from the side leaving the rangefinder in place this was repeated for the remaining 3
I had to resort to this method as there was no room to use tweezers etc in my opinion these should have been fitted several stages earlier before adding the deck on top of them thereby allowing relativity easier access
The other rangefinders were a lot easier as they were glued to the open decks with good access
Next came a section where I used the smallest part of the entire build so far as you can see from the photos with my finger next to them for size comparison these were fitted on to 2 angle type pillar mounts presumably something akin to a clinometers to work out elevation etc
Next we come to the signalling lamps or searchlights with shutters on them this was the 1st screw up by the manufactures the searchlights should have been mounted as shown in the instructions but the actual pieces supplied had been squashed during the process leaving just the top part the mounting bracket section which left me to add the bases using a suitably sized dowel as you can see from my photo of all 4 lined up
Anyway after that was sorted out they got painted and when dry mounted in various positions around the command bridge
This then bought close to building of the command bridge for now I’ve included a 5 view shot of the bridge to show where I’m at next comes the funnels but that’s for part 137
Regards
Colin
peterairfix
SMF Supporter
Reading that I would hate to know how much my bismarck has.For those interested here is my estimate of the total kit again using the instruction pages
HMS Hood
2098 Photo Etch
354 Wooden Pieces
375 Planks 1ft Long by 1/2” wide
435 Moulded Plastic
393 Cast White Metal
20 Pieces Of Laser Printed Decking
So a total of around 3675 so allowing for some slight errors say around 3600 to 3700 would be about right
Regards
Colin
And how you keep up mojo and keep going I will never know.
boatman
SMF Supporter
HI Colin WHAT grey paint make are you usein as owm8 Bob is havin problems with his enmals paint cant understand what he's doin wrong as ive use enmals an the surface came up ok but Bob well its another matter hope you can give him a tip or to ?
chrisb
chrisb
Bigfoot57
SMF Supporter
- Joined
- Jun 24, 2015
- Messages
- 860
- Points
- 93
- First Name
- Colin
I use Mig 1 shot grey primer followed by Revell Aqueous Acrylics to paint my models I used to use enamels but switched to acrylics several years ago and haven’t used anything else since then other than bare metal finishes where I use sweet wrapping foil as in my opinion to simulate metal is to use metal in most cases not all but 90% of the time
Regards
Colin
Regards
Colin
- Joined
- Sep 4, 2019
- Messages
- 9,526
- Points
- 113
- First Name
- Andrew
I may be wrong but bearing in Junior and often do 1/72 quick-build kits..... That's probably the sum of all the kits I've built since coming back to hobby!!For those interested here is my estimate of the total kit again using the instruction pages
HMS Hood
2098 Photo Etch
354 Wooden Pieces
375 Planks 1ft Long by 1/2” wide
435 Moulded Plastic
393 Cast White Metal
20 Pieces Of Laser Printed Decking
So a total of around 3675 so allowing for some slight errors say around 3600 to 3700 would be about right
Regards
Colin
scottie3158
SMF Supporter
Colin,
I just had a good catch up, you have been a busy bee. Coming on very nicely mate.
I just had a good catch up, you have been a busy bee. Coming on very nicely mate.
Bigfoot57
SMF Supporter
- Joined
- Jun 24, 2015
- Messages
- 860
- Points
- 93
- First Name
- Colin
HMS Hood 1/200 Hachette /Amati Wooden kit Build Parts 137 Funnels and more parts for the bridge
Well after nearly a weeks worth of work I’ve finished the funnels as far as building them goes they still need painting along with some brass pe added to another previously built wooden section back in part 130
They also say it’s time to paint the hull in my opinion they are 50 issues too late for that the hull should have been painted as soon as it was finished priming anyway enough of that let’s continue
In assembling the funnels I have had to deal with the smallest parts so far on this model namely eyebolts several of which can be seen on my index finger each funnel has 2 rows of 10 of these little buggers which will be used in the rigging of the funnels to the deck fastenings so there would seem to be a stack more eyebolts to be added to the deck as well so the lines from the funnels have somewhere to anchor to
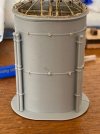
I also didn’t assemble the internals of the funnel as per instructions instead of assembling the platform and walkways then trying to slide them without dislodging what you already built I decided on inserting the platform into the funnel 1st then build on that this gave me a solid foundation on which to build plus with the funnel walls I had the exact template need to add the other pieces namely the curved guard rails etc
Next added some brass pe to a structure previously built and finally several steps with handrails 4 small ones and 1 large one like I said apart from the painting that wraps up the 40 sections of part 137 due to the amount of stages there will be a part 137b with remaining photos from this section only 3 more to go before the dreaded rigging
Regards
Colin


Well after nearly a weeks worth of work I’ve finished the funnels as far as building them goes they still need painting along with some brass pe added to another previously built wooden section back in part 130
They also say it’s time to paint the hull in my opinion they are 50 issues too late for that the hull should have been painted as soon as it was finished priming anyway enough of that let’s continue
In assembling the funnels I have had to deal with the smallest parts so far on this model namely eyebolts several of which can be seen on my index finger each funnel has 2 rows of 10 of these little buggers which will be used in the rigging of the funnels to the deck fastenings so there would seem to be a stack more eyebolts to be added to the deck as well so the lines from the funnels have somewhere to anchor to
I also didn’t assemble the internals of the funnel as per instructions instead of assembling the platform and walkways then trying to slide them without dislodging what you already built I decided on inserting the platform into the funnel 1st then build on that this gave me a solid foundation on which to build plus with the funnel walls I had the exact template need to add the other pieces namely the curved guard rails etc
Next added some brass pe to a structure previously built and finally several steps with handrails 4 small ones and 1 large one like I said apart from the painting that wraps up the 40 sections of part 137 due to the amount of stages there will be a part 137b with remaining photos from this section only 3 more to go before the dreaded rigging
Regards
Colin


Bigfoot57
SMF Supporter
- Joined
- Jun 24, 2015
- Messages
- 860
- Points
- 93
- First Name
- Colin
HMS Hood 1/200 Hachette /Amati Wooden kit Build Part 138
So here we go again1st off we add some more brass pe around a previously built wooden structure then after that has dried some sort of aerial arrangement and when that has dried it is painted light grey
Next we turn our attention to a purely brass pe construction which resembles some sort of gun emplacement and we have to do this twice
To say the pe was uncooperative on this section would be an understatement as you can see from the discolouration I had to resort to anealing the long pieces of brass to make it more compilable funny how you never see that in the instructions there’s is always near enough perfect
Anyway after I got those side panels on you then had to place a sort of top rail around the whole structure another fun trip as you can see they look extremely rough at present and need some severe cleaning up before painting
To finally finish them off a 12mm long piece of 5mm dowel was required to make the supporting pillar then both structures were glued onto the sides of another previously built structure which again had pe cladding added to it
Next we added all 4 casement bases to the deck then started adding the various ventilators and ducting as instructed
Next came some plastic structures to which were added numerous pe pieces resembling some sort of grid for each section these were then painted light grey you can see the use of a wax pencil to place the pe parts onto the glue sometimes this worked perfectly and sometimes it didn’t
Next we made up some sort of ammo boxes for the Lewis guns and then constructed the Lewis gun platform out of piece of circular pe to which a 12mm x 4mm dowel was attached once dry the reinforcing ribs were added
Finally using a pen top as the correct circumference the brass pe railing was installed and when dry the previously made ammo boxes were added to the sides along with a access ladder and finally a previously constructed lewis gun was glued in the centre of the structure this was then painted light grey after the glue had dried
Ok as usual here are the instruction sheets my photos will follow in a 2nd part due to amount
Regards
Colin
Last edited: