Leopard 2A6M CAN

Isitme

SMF Supporter
Joined
Nov 2, 2020
Messages
707
Points
93
First Name
Mike
So while waiting for the base of the D9R to reach completion (sanding, filling, painting etc) I had a dig around my collection of projects started but not finished kits and came up with this offering.
20220204_210242.jpg
(for discussion only)

A Leopard 2A6M CAN with mine roller attachment.....
As I said the kit had been started and the search went out for all the items for the kit - boxes were found scattered about and collated into the model room and it was a bit of a surprise to see exactly how much work had been done. The resin kit of the mine roller was complete except for weathering and attaching to the tank, the antenae had been built, so it is now a case of completing the job.

I had built a Leopard 2A4M CAN in 2018 for my collection...
20220204_211037.jpg
...where it went to the MAFVA Nationals and came away with a Gold.

-------------------------------------------------------------------------------------------------------------------------------------

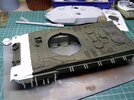
So, onto the new model, the hull is underway and not too bothered about the side seams as they will be hidden under the 'Barracuda' cam blankets. But the non-slip on the upper hull has to be dealt with and this is how I do it... I had also scrounged the engine deck and rear grills from a MENG 2A7 kit that somehow came with two sprues extra. These were grafted onto the HobbyBoss offering and were a better offering...
20220204_204252.jpg
The area is masked off, and as you can see I have the Mig 'anti-slip' tube of paste, but also a small bottle of very fine sand from sand blasting (available from ebay etc).
20220204_204513.jpg
First the paste is put onto a bit of card - a blob about the size of a large pea should do. This is then dabbed on using the cut down paint brush untill the area is covered...
20220204_204612.jpg
.... I then sprinkle on the fine sand and allow it to dry for about 15 minutes and then shake of the excess and once dry gently brush off and remaining sand and remove the masking...
20220204_205635.jpg
... And there you have non-slip...
More later,
Cheers
Mike.
 

Jim R

SMF Supporter
Joined
Apr 27, 2018
Messages
13,835
Points
113
Location
Shropshire
First Name
Jim
Hi Mike
I'll follow the completion of this build with interest. I enjoy your superb modelling. Interesting way to make anti-slip.
I notice you didn't say how long the poor thing had languished half complete. Months, years, decades ? :rolling:
Jim
 

Isitme

SMF Supporter
Joined
Nov 2, 2020
Messages
707
Points
93
First Name
Mike
Hi Mike
I'll follow the completion of this build with interest. I enjoy your superb modelling. Interesting way to make anti-slip.
I notice you didn't say how long the poor thing had languished half complete. Months, years, decades ? :rolling:
Jim
Sorry Jim, about pre covid time period, so it would have been in the stash around 2018. Possibly as I finished one, I could not face all that 'Barracuda' again...
 

Isitme

SMF Supporter
Joined
Nov 2, 2020
Messages
707
Points
93
First Name
Mike
Update,
All the wheels etc plus the underside of the sponsons have been primed ready for a coat of colour, which once the outer sections are on will make it difficult to paint.
The mine roller has now had the chains added and will soon be getting the final details painted...
20220205_153609.jpg
20220205_153618.jpg
20220205_153626.jpg
... It is not fitted to the vehicle yet, this is just a dry run to give you an idea of what it will look like - it still has to have a 'dirt/grime' wash and then once fitted will be weathered along with the rest of the vehicle.
Did I mention the slat armour??? Guess not, this will be fitted with the final slat armour fitted to the Canadian Leopards which is shorter in height than the item offered in the kit - yep! more brass....
More later,
Cheers.
Mike.
 

Jim R

SMF Supporter
Joined
Apr 27, 2018
Messages
13,835
Points
113
Location
Shropshire
First Name
Jim
Hi Mike
Looking very good. More slat armour - you're a glutton for punishment.
Jim
 

Jakko

Way past the mad part
SMF Supporter
Joined
Apr 28, 2018
Messages
10,950
Points
113
First Name
Jakko
Wonder if there is a cure for it...
Build everything there is that ever had slat armour on it? That would remove the need to build more …

Might take a while, of course :smiling3:
 

Andy the Sheep

SMF Supporter
Joined
Apr 7, 2019
Messages
1,553
Points
113
Location
North Eastern Italy
First Name
Andrea
I'm joining the audience with great interest, Mike.
A very nice subject and I'm looking for the weathering phase as Afghan clay dust can be very intrusive and obstructive as brilliantly shown on your MAFVA prize winning model.
 

Isitme

SMF Supporter
Joined
Nov 2, 2020
Messages
707
Points
93
First Name
Mike
Quick update,
The tracks are constructed - 84 per side, and now in track primer.
The hull, suspension arms, wheels have all had a coat of NATO Green as this would be a bit of a struggle to get the paint where required once built.
More pics to follow.
Mike.
 

Isitme

SMF Supporter
Joined
Nov 2, 2020
Messages
707
Points
93
First Name
Mike
Update
It seems like ages since I last put something on here, so here goes.
20220216_152943.jpg
Tracks have been in primer for a week and as I have been busy with other parts they seem to have been ignored - to be rectified in the next couple of days...
20220216_111728.jpg
On the right is the kit offeringand on the left is the scratch offering. On the kit version there should be no plastic under the raised bracket....
20220216_122920.jpg
And here it is in place along with the rear dust flaps and hooks for the rubber flaps.
Now we come to the subject of the slat armour and there are two types early and late as shown below. (illustration for discussion only)...
20220216_153141.jpg
When you first look at the illustrations they seem to be the same but are in fact not...
Now I have constructed both versions....
20220216_152752.jpg
And this is the short set all ready to go onto the model once the brackets are in place.
I then had a thought for all the modellers who through lack of skills in this area, cost, etc do not tackle this brass work, after all one slip and that is the job ruined. I have had multiple comments about how good the job looks, but then it must be off putting for those that wish to add this model to their collection.
SO! the Hobby Boss version comes complete with the early style slat armour, and yes it does look a bit on the thick side, but that is due to production constraints and it is either buy the brass or save your brass and go with the kit....
Never having tried the kit offering, how can I say that the brass is better unless I put my money where my mouth is and try it - so that is what I will do here (I have another Leopard in the stash so the brass will not go to waste).
On checking the references, the slat is the same from the top down except shorter, so the obvious thing to do is to remove the lower sections....
20220216_152802.jpg
As you can see above in the top of the photo is a length of slat from the kit, these sections come as seperate items and in number are seven sections to glue together, the first five sections from the left are the kit offering and to the right is the start of the cut off parts. You can also see there are some of the mounting brackets in place to help with alignment. There is a little 'nib' at the end where you attach the slat in place, but I have cut these off as I will be butt joining the slat to the bracket, this is the save having to sand away the little bit of excess nib once dry.
Next down is the Left side with all of the 'scrap' removed and ready for mounting in place.
Below this are the scrap parts you can get rid of in the recycle bin.
So far I have had no problems, just take your time and line up a couple of brackets at the front and rear and then fill in the other brackets once the first are dry and use them to line up all the brackets.
So what do I think so far? Let's see once the paint is on....
Cheers
Mike
 

Isitme

SMF Supporter
Joined
Nov 2, 2020
Messages
707
Points
93
First Name
Mike
Update,
Tracks now painted and put aside ready for fitting, but before that can happen I need to add the thermal blanket from Milliput fine.
Here we go again buggering and farting around with file and image sizes.
Never again - that is me finished with this forum for good.
 

Attachments

  • 20220222_150904.jpg
    20220222_150904.jpg
    160.3 KB · Views: 9

scottie3158

SMF Supporter
Joined
Apr 27, 2018
Messages
12,769
Points
113
Location
Spalding
First Name
Paul
Mike,
You are a glutton for punishment but gotta love that bar armour. Great work on the convoy marker looks a whole lot better than the kit offering.
 
Top