Scratchbuilder
SMF Supporter
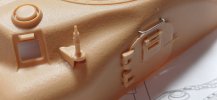
Wobble, this is what happens when you venture to the Dark Side  ... The 'T' shaped handles are for the fire extinguishers, not that they made a ha'pence of difference.
The light guards should have a small jig on one of the sprues so that you can bend the PE around it after softening the brass with a lighter. But for some reason there is not one, solution is to get a round drill bit the same size as the headlight and using your scalpel blade gently fold it around the drill, or you can use the corner of one of the sprues to hole the etch down, and then you can flatten the straight parts out with a knife blade.
Otherwise you seem to be overcoming the problems with prompt action and delivering another superb model.
Wibble
PS looks like I am too late....
... The 'T' shaped handles are for the fire extinguishers, not that they made a ha'pence of difference.The light guards should have a small jig on one of the sprues so that you can bend the PE around it after softening the brass with a lighter. But for some reason there is not one, solution is to get a round drill bit the same size as the headlight and using your scalpel blade gently fold it around the drill, or you can use the corner of one of the sprues to hole the etch down, and then you can flatten the straight parts out with a knife blade.
Otherwise you seem to be overcoming the problems with prompt action and delivering another superb model.
Wibble
PS looks like I am too late....
 Doug I can end up sticking things way out of line, normally to my self ! Can be frustrating and fun at times.


")