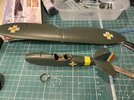
Very slow progress over the last few weeks but hopefully a few days off should speed things up a bit . Ive now got the wing painted ,this will be added last off after painting and decalling the fuselage .The rudder and fuselage band have been painted yellow ,red and blue and masked off , the fuselage being given olive green upper with light blue undersides . Its now a case of adding all the bits to this till it looks something like an aircraft ! The two mesters will be stuck in before the wing goes on .
Got a good session in yesterday so ive moved this on a fair bit. The wing and fuselage have now been decalled ( all 6 of them !) , but I had to source some smaller crosses for the fuselage from the spares box . Trouble is I only had the ones with the blue dots round the white cross so they dont exactly match the ones on the wings but im not bothered , it was only a cheap kit .
Its mainly a case of putting all the bits together now , adding a few bits as I go . The wings have had the aileron actuators added using bits of steel guitar string ( the thinnest one , E is it ?) and the same was used to represent the rudder actuators after drilling a hole in the fuselage .
The ailerons also have those peculiar little winglet thingies on the top , like a little racing car spoiler , which consists of three parts . Ive glued the tiny struts to the winglet but these will be added last off as theyre a certainty to get knocked off otherwise .Ive just placed it on for the pics so you can see what im blabbering on about .
The engine has been glued on now and the cowling ring and the 32 ( count em ) little triangular vents on the fuselage have been painstakingly painted with black , a wash just wouldnt have been sufficient . The two unsuspecting volunteers have also been installed in their respective cockpits . The rear observer/ gunner had to have the seat taken out so he could be facing backwards and once fitted the scarff ring was installed around him . The machine gun mount on the scarff ring broke during clean up so a piece of brass rod was bent to replace this , similarly the inverted V shaped struts that connect the wing to the fuselage were also replaced with brass after being broken .
Next up is fabricating a windscreen ( yes that was missing as well as the decals ! Good job it was only cheap !) then I can think about getting the wing fitted .
Got the windscreen sorted . Using a piece of clear acetate from some packaging ( Aries ejector seat I think) ,I cut a strip off and warmed it over a candle . I measured the width of the fuselage (14mm) and luckily the top profile is a perfect semi circle ,so after warming it over a candle the strip was bent to the correct radius over a conveniently shaped superglue bottle. After cutting and shaping this was attached and the joint touched up.
Even though its a strutted parasol wing the Lublin still has a little bit of wire bracing in a couple of places , namely between the main struts and from the tailplanes to the fin and lower fuselage. I decided to drill the fin and tailplanes and thread the diamond shape all in one piece starting at the lower fuselage. The main struts were drilled and the wire glued in now as I thought it would be easier than after they were fitted.
next is the tricky part of attaching the wing , second pair of hands needed!
Top work Tony. The windscreen you’ve scratched is probably superior to the original kit item! And the detailing to the MG ring and the figures really lift the kit. Terrific stuff.
Cheers, Paul


")