Sci-fi kitbash

SteveT

SMF Supporter
Joined
Jan 18, 2024
Messages
275
Points
93
Location
Lancashire
First Name
Steve
Many thanks Steve, your wish is my command :smiling3:

After some testing, playing the strip over my heat gun at 300°C for 20 seconds softened it just enough to be moulded around a make up brush ferrule:

View attachment 504630

I made plenty. There are a few test rejects in the picture too:

View attachment 504631

Lined up in size order, they were then trimmed and glued in place one by one:

View attachment 504632

View attachment 504633

After some shaping with a rotary tool then sanding with 60 grit, we're starting to get the shape I'm after:

View attachment 504634
Such a clever idea!
 

Gern

'Stashitis' victim
SMF Supporter
Joined
May 17, 2009
Messages
9,696
Points
113
Location
Stourbridge
First Name
Dave
Bit more sanding and filling and that will look very nice. Like it!
 

Ian M

Administrator
Staff member
Administrator
Moderator
SMF Supporter
Joined
Dec 14, 2008
Messages
19,721
Points
113
Location
Falster, Denmark
First Name
Ian
Well you did say "do something different." and it most certainly is that. An interesting build this. .
 

Neil Merryweather

SMF Supporter
Joined
Dec 29, 2018
Messages
4,424
Points
113
Location
London
First Name
Neil
Many thanks Steve, your wish is my command :smiling3:

After some testing, playing the strip over my heat gun at 300°C for 20 seconds softened it just enough to be moulded around a make up brush ferrule:

View attachment 504630

I made plenty. There are a few test rejects in the picture too:

View attachment 504631

Lined up in size order, they were then trimmed and glued in place one by one:

View attachment 504632

View attachment 504633

After some shaping with a rotary tool then sanding with 60 grit, we're starting to get the shape I'm after:

View attachment 504634
Genius!
 

Andy T

SMF Supporter
Joined
Apr 26, 2021
Messages
1,952
Points
113
Location
Sheffield
First Name
Andy
Thanks guys.

I had the house upside down looking for a bottle of the right kind of size & shape as that would have been a lot easier. I even considered whittling down a balsa rod, but I'm happy with what I came up with.
 

langy71

SMF Supporter
Joined
Apr 27, 2018
Messages
1,558
Points
113
Location
Nottingham
First Name
Chris
I like the idea of it being a 'sand skimmer', kind of lends itself to a simple looking diorama .
 

Andy T

SMF Supporter
Joined
Apr 26, 2021
Messages
1,952
Points
113
Location
Sheffield
First Name
Andy
Thanks all. It's taxing my brain but a whole heap of fun!

Will there be guns or just engines? Great imagineering.
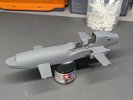
I'm planning weaponry of some kind...

I've spent a bit of time filling & sanding today. The green stuff world UV filler is great in one respect - it hardens in seconds and doesn't sink, allowing large areas or complex shapes to be built up quickly - but by golly is it hard as nails to sand!

This means care is needed with application as the surrounding plastic sands away much quicker, which can leave a lump of filler with a low spot around it. I think I'll be using it for large/deep areas and finishing off with my usual automotive acrylic putty.

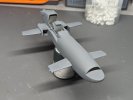
Any way, to check my progress I squirted it with Halfords finest. It's still a very long way from primer in reality but I wanted to see how my filling had gone and get an idea of how the overall shape was looking. Most of the primer will be sanded off before I progress:

1000007136.jpg

1000007137.jpg

The shape isn't perfectly smooth but there should be lots of detail and greebles to disguise that.

I spent the rest of the day searching for tubes of various sizes to start on the engines. I'd give my right arm for a selection of drinking straws :tears-of-joy:
 

Steve-the-Duck

SMF Supporter
Joined
Jul 3, 2020
Messages
1,128
Points
113
Location
Medway Towns
First Name
Chris
Y'know, it would almost be a shame to greeblie up that front bodywork
Almost

Looking forward to the paint job now!
 

Andy T

SMF Supporter
Joined
Apr 26, 2021
Messages
1,952
Points
113
Location
Sheffield
First Name
Andy
Thanks gents. Sorry for the slow reply, I didn't realise it had been so long!

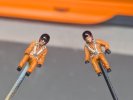
I've been muddling along with this but haven't taken many pictures. However, I did snap the crew before closing up the cockpit:

1000007172.jpg

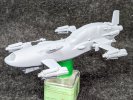
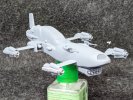
I think I'm at the finish of the build now. I could keep adding more and more bits & bobs but I don't want it to get too cluttered.

Much of it isn't as cleanly built as I'd like, I still struggle to use CA neatly and scribing panel lines over a mixed surface proved tricky for me, but I'm sure I can fudge it with paint:

1000007184.jpg

1000007185.jpg

1000007182.jpg

1000007183.jpg
 

yak face

Wossupwidee?
Staff member
Moderator
SMF Supporter
Joined
Jun 13, 2009
Messages
12,398
Points
113
Location
sheffield
First Name
tony
That looks fantastic andy , cant wait to see the magic happen with the paint job , cheers tony
 
Top