David Lovell
SMF Supporter
Hi havent built or blogged anything for months ,well tell a lie i built a handful of 72nd kits behind the front page here alongside our own Mr Race whilst he was having a bash at the small stuff ,we kinda built in tandem me trying to pass on what or how I went about it ,personally I think he showed the white flag too soon but I could feel his frustration there not every bodys cuppa ,but I thank him for a very pleasurable correspondence session.
Now the clocks have changed and the evenings soon close in intrest has been rekindled SLIGHTLY ,so had a mooch about in the stash and hooked this out ,it was in a job lot on flea Bay a few years back ,now I had picked at it occasionally between builds just for a bit of light entertainment but returned to stash and forgotten.

So took down to the dining table (work bench )and lifted the lid

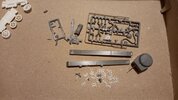
Checked over the contents and all seems to still be there ,if I remember rightly fit of parts was bang on so took a closer look.
Strangely all the running gear was moulded in white plastic? very reminiscent of the old white Historex figures (some of the more elderly members will know).
Some nicely moulded individual track links

Wich it seems go together with no problems sorry chaps but individual links are a piece of cake line em up glue em up and wrap em around .

So ill get it up to primer ,oob im not mucking about with it but already know how i want to set about the paint job no rush I'll bash on in my own time and will return when built.
Dave.
Now the clocks have changed and the evenings soon close in intrest has been rekindled SLIGHTLY ,so had a mooch about in the stash and hooked this out ,it was in a job lot on flea Bay a few years back ,now I had picked at it occasionally between builds just for a bit of light entertainment but returned to stash and forgotten.
So took down to the dining table (work bench )and lifted the lid
Checked over the contents and all seems to still be there ,if I remember rightly fit of parts was bang on so took a closer look.
Strangely all the running gear was moulded in white plastic? very reminiscent of the old white Historex figures (some of the more elderly members will know).
Some nicely moulded individual track links
Wich it seems go together with no problems sorry chaps but individual links are a piece of cake line em up glue em up and wrap em around .
So ill get it up to primer ,oob im not mucking about with it but already know how i want to set about the paint job no rush I'll bash on in my own time and will return when built.
Dave.


")