Doug's 1/48 Airfix Sea King

Waspie

SMF Supporter
Joined
Mar 13, 2023
Messages
2,670
Points
113
Location
Portland - Dorset
First Name
Doug
Quick tip: You know you can go back to your previous post and just grab the image off there instead of posting a full screenshot of the post, right? :smiling3:

Right-click the image, choose to copy its location from the menu that appears, then in your message, type ![](, paste the URL (⌘V) and then type ) right after it:
Code:
![](https://www.scale-models.co.uk/attachments/screenshot-2024-04-30-at-22-29-31-png.507666/)
That’s an exclamation mark, opening and closing square brackets, open parenthesis, URL, close parenthesis.
Err, it was late, I’m old, I didn’t know that, (I do now), the dog needed to out!!!!
I may think of more excuses as the brain warms up!!!
 

Waspie

SMF Supporter
Joined
Mar 13, 2023
Messages
2,670
Points
113
Location
Portland - Dorset
First Name
Doug
Quick tip: You know you can go back to your previous post and just grab the image off there instead of posting a full screenshot of the post, right? :smiling3:

Right-click the image, choose to copy its location from the menu that appears, then in your message, type ![](, paste the URL (⌘V) and then type ) right after it:
Code:
![](https://www.scale-models.co.uk/attachments/screenshot-2024-04-30-at-22-29-31-png.507666/)
That’s an exclamation mark, opening and closing square brackets, open parenthesis, URL, close parenthesis.
Brains warmed up now!!! Pressing ⌘-⇧-3 for screen shot is way quicker for me!!!
 

Jakko

Way past the mad part
SMF Supporter
Joined
Apr 28, 2018
Messages
10,956
Points
113
First Name
Jakko
John might like you better for reusing old images, though ;) But if you’re going to screenshot: ⇧⌘4 lets you select the exact area of your screen you want, or if you press the spacebar after that combo, you can click on a window and get just that window. Oh, and when you keep ⌥ pressed as you click on the window, it won’t include the window’s shadow.
 

Waspie

SMF Supporter
Joined
Mar 13, 2023
Messages
2,670
Points
113
Location
Portland - Dorset
First Name
Doug
John might like you better for reusing old images, though ;) But if you’re going to screenshot: ⇧⌘4 lets you select the exact area of your screen you want, or if you press the spacebar after that combo, you can click on a window and get just that window. Oh, and when you keep ⌥ pressed as you click on the window, it won’t include the window’s shadow.
That's useful Jakko. That's a shortcut that is well worth remembering. :thumb2:
 

Waspie

SMF Supporter
Joined
Mar 13, 2023
Messages
2,670
Points
113
Location
Portland - Dorset
First Name
Doug
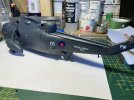
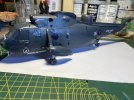
An hour in the garage today produced this lot. (More decals).
Pic 1
Port side today.
IMG_1382.JPG

Pic 2

IMG_1383.JPG

There are few more tiny decals in place that are very small and red so don't show too well.

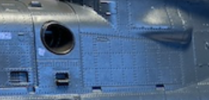
That was it for today. I have a dilemma coming up in the form of two large decals that fit aft of the exhausts both port and starboard. Rick had snags with the port one and I am wondering if it's worth attempting it. I have toyed with the idea of copying the shape, transferring it onto the actual model and then hand painting!!
This place below. Pic 3 (Thanks to Jakko for pointing out how to do a mini screen capture).

Pic 3
Screenshot 2024-05-01 at 19.40.39.png

That's all for today.

C&C's as usual welcomed.
Doug
 

Waspie

SMF Supporter
Joined
Mar 13, 2023
Messages
2,670
Points
113
Location
Portland - Dorset
First Name
Doug
A small anecdote.

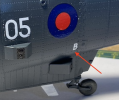
Whilst on 706 NAS at Culdrose carrying out operational flying training. The Sea King has a piece of kit on board to aid salvage, 'sonic locator beacon'. To indicate the aircraft has it fitted a Large 'B' is painted on the port side under the roundel.
On all naval squadrons we brief early in the working day, weather, daily activities and such. On training squadron such as 706 a daily questions for us student filth is the order of the day. This one day my course was to pose the question and field the answers and questions that ensued.
The question this day being all about the sonic locator beacon. Frequencies, battery life durations and other relevant data. The course behind us was a certain Royal who had his own personal training pilot!!!! As was the norm, HRH was briefed by our course on the answer to the question - just in case someone dared ask him to answer!! Only!! We never gave him the right answer!! He was told the 'B' was to indicate to the airfield firemen that the main batteries were situated immediately behind the 'B' and that is where they would hack away to expose the battery and prevent a thermal runaway. (Battery explosion).
Screenshot 2024-05-01 at 20.03.04.png

So, the stage was set. 'Scouse' the chap on my course stood up and asked the question. He paused, looked around the assembled staff and students. Looked directly at HRH and simply said 'Sir'?
Well, HRH duly stood up and pontificated about the thermal runaway and firemen!!!!
OH Dear.
Poo - fan - direct hit!!
The commanding officer stood up - looked to us student filth at the back of the briefing room!! "97 course remain behind".
Every dirty job, every check test flight, every late duty we had it!!
But it was worth it.
 
Last edited:

Airborne01

SMF Supporter
Joined
Mar 30, 2021
Messages
3,223
Points
113
Location
Essex
First Name
Steve
A small anecdote.

Whilst on 706 NAS at Culdrose carrying out operational flying training. The Sea King has a piece of kit on board to aid salvage, 'sonic locator beacon'. To indicate the aircraft has it fitted a Large 'B' is painted on the port side under the roundel.
On all naval squadrons we brief early in the working day, weather, daily activities and such. On training squadron such as 706 a daily questions for us student filth is the order of the day. This one day my course was to pose the question and field the answers and questions that ensued.
The question this day being all about the sonic locator beacon. Frequencies, battery life durations and other relevant data. The course reined us was a certain Royal who had his own personal training pilot!!!! As was the norm, HRH was briefed by our course on the answer to the question - just in case someone dared ask him to answer!! Only!! We never gave him the right answer!! He was told the 'B' was to indicate to the airfield firemen that the main batteries were situated immediately behind the 'B' and that is where they would hack away to expose the battery and prevent a thermal runaway. (Battery explosion).
View attachment 507728

So, the stage was set. 'Scouse' the chap on my course stood up and asked the question. He paused, looked around the assembled staff and students. Looked directly at HRH and simply said 'Sir'?
Well, HRH duly stood up and pontificated about the thermal runaway and firemen!!!!
OH Dear.
Poo - fan - direct hit!!
The commanding officer stood up - looked to us student filth at the back of the briefing room!! "97 course remain behind".
Every dirty job, every check test flight, every late duty we had it!!
But it was worth it.
Love it! His Royal Horlicks was certainly 'one of a kind' - fortunately! My meeting with him Down South put me indelibly in awe of his (professed) skills and capabilities ... !
Steve
 

Waspie

SMF Supporter
Joined
Mar 13, 2023
Messages
2,670
Points
113
Location
Portland - Dorset
First Name
Doug
Love it! His Royal Horlicks was certainly 'one of a kind' - fortunately! My meeting with him Down South put me indelibly in awe of his (professed) skills and capabilities ... !
Steve
During my service career I 'bumped' into him on many occasion. Not one 'bump' did him any favours as far as respect goes. Even SWMBO thinks he's a sleaze ball, her words after a visit to the local VHS shop on Fraggle. He was perusing the under the counter bottom shelf Vids!!!

Same squadron, 706, he came into the crew room asking for a back seater to sit on the radar during a check test flight he was to fly. Amazing how quick. crew room can clear!!!! We all have doctors, dental simulator checks to attend.
 

rickoshea52

SMF Supporter
Joined
Dec 20, 2011
Messages
3,986
Points
113
Location
North West
First Name
Rick
HRH met me once at Lossiemouth. Being on a Sea King flight a load of us got rounded up on our day off and bussed over to the Sgt’s mess. Needless to say we weren’t interested in being there or listening to his lousy smalltalk. He asked three of us about how we saw our futures in the RAF; one was leaving after his 22 years, another was joining the Police and I told him I had PVR’d because I hated Sea Kings. He looked like someone had just farted under his nose while the sqn 2ic tried not to burst out laughing and the SWO* turned red with rage.
I do remember HRH creeped out all the WAAFs he was introduced to.

Station Warrant Officer - responsible for discipline and standards on an RAF station.
 

Airborne01

SMF Supporter
Joined
Mar 30, 2021
Messages
3,223
Points
113
Location
Essex
First Name
Steve
HRH met me once at Lossiemouth. Being on a Sea King flight a load of us got rounded up on our day off and bussed over to the Sgt’s mess. Needless to say we weren’t interested in being there or listening to his lousy smalltalk. He asked three of us about how we saw our futures in the RAF; one was leaving after his 22 years, another was joining the Police and I told him I had PVR’d because I hated Sea Kings. He looked like someone had just farted under his nose while the sqn 2ic tried not to burst out laughing and the SWO* turned red with rage.
I do remember HRH creeped out all the WAAFs he was introduced to.

Station Warrant Officer - responsible for discipline and standards on an RAF station.
In Stanley (Upland Goose bar (Endex)) he was initially rebuffed by one of my team and responded with the immortal words 'Don't you recognise me/know who I am ...'? Tony's response was on the lines of ' Never heard of you - are you a Navy Rupert ...? :cool:
Steve
 

Waspie

SMF Supporter
Joined
Mar 13, 2023
Messages
2,670
Points
113
Location
Portland - Dorset
First Name
Doug
Today's progress was slow and damaging!!! (Minor damage).

The first thing I tried today was fit the decal aft of the port exhaust. The problem is that there is a bulge the decal has to blend around. The main problem is the decal isn't flexible to work itself around the bulge. As I said, 'tried' and failed. I ended up with the same problems as Rick. So I aborted the whole thing, port and starboard.
However!!
Prior to trying the decal, I traced around the pair and cut out a template. The shape was then transferred with a pencil to the Sea King. Then I painted the perimeter of the shape and filled it in. Colour was too light so I added black to darken it up. I may have to mix up a darker batch tomorrow, we'll see. The area will be covered in black exhaust muck so I'll assess that the next time I get to the bench.
The minor damage occurred during that process. One of the HF aerial stanchions snapped off. Easy enough to re-attach!!

Pic 1
Port side painted. lighter grey.
IMG_1385.JPG

Pic 2
Slightly darker.
IMG_1387.JPG

Pic 3
Starboard side, touch up needed on lower edge.
IMG_1388.JPG


Whilst the paint was drying I had a go at making a Mic-tel lead for the back sonar console. Needs painting black and attaching. Any thoughts?
Good, bad, how does it look in its un primed form!!

Pic 4
Mi-tel lead!
IMG_1386.JPG

That was enough for the day.
Doug
 

Jakko

Way past the mad part
SMF Supporter
Joined
Apr 28, 2018
Messages
10,956
Points
113
First Name
Jakko
If a mic-tel lead is a coiled cable like the kind you used to get on keyboards, then it looks good to me :smiling3: Those decals for behind the exhaust already seemed unlikely to me when Rick was building his, and I think you proved it beyond any doubt that most people would be better off just painting those patches instead.
 

Waspie

SMF Supporter
Joined
Mar 13, 2023
Messages
2,670
Points
113
Location
Portland - Dorset
First Name
Doug
If a mic-tel lead is a coiled cable like the kind you used to get on keyboards, then it looks good to me :smiling3: Those decals for behind the exhaust already seemed unlikely to me when Rick was building his, and I think you proved it beyond any doubt that most people would be better off just painting those patches instead.
The mic-tel is indeed a v-long coiled lead. It allows a back seat crew member to remain in contact when moving around the whole cabin area. I may now attempt to build a couple more for the crew stations. (2 pilots + 2 back seaters) There are more but I think 4 + the long one may well be enough.

As for the exhaust decal. My thoughts are anyone considering building this Airfix kit. Then disregard the decals. Mark off and mask up the area then paint prior to ANY decals being affixed. The decals are very inflexible and unsuitable for negotiating the humps and bumps of the aft gearbox area - port side.

Thanks Jakko for your confirmation of what two of us on here have now experienced difficulties with.:thumb2:
 

Waspie

SMF Supporter
Joined
Mar 13, 2023
Messages
2,670
Points
113
Location
Portland - Dorset
First Name
Doug
Finished with all the decals! Repainted the exhaust bodge a darker shade, I'm happier with the result. It will be covered in exhaust detritus in a few days!!

Managed to do a few more mic-tel leads today. Hopefully I'll be able to attach them with no hassle.

Pic 1
Exhaust decal cover up = 3 parts nato black and 2 parts dark sea grey 4 parts thinning agent. Hand painted!! Nice to have had a few rivet lines to use to keep me on the straight and level!!
IMG_1389.JPG

Pic 2
I'll cut the coils to length when I can get inside the cabin area.
IMG_1390.JPG

Finishing line is now in sight. Port cabin door to fit, plus the port pitot tube and now a HF stanchion. A coat of matt varnish. Followed by a dark wash, (advice will be needed prior to doing that. - Another Waspie first). (I'll be You-Tubing it as well but that can get too confusing.) Then some weathering/dirtying up and job will be complete!!! A couple of tiny probes to fit after masking comes off windscreen. Maybe a week's work at my current work rate!!!

Thanks for looking in - any Q's, comments, criticisms or general mud slinging - all welcomed.

Doug
 

Waspie

SMF Supporter
Joined
Mar 13, 2023
Messages
2,670
Points
113
Location
Portland - Dorset
First Name
Doug
Progress has been slow of late, well, backwards really I guess!!
I put a matt varnish coat over the decals to seal it all in. Great I thought. Step nearing the finishing line!!
THEN I read a wash needs to go over a 'gloss' coat!! (:unamused:!! Round spherical things!! :poop:). As it happens, I noticed I hadn't painted the air bags on the undercarriage sponsons so quickly rectified that!!
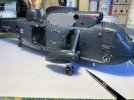
Now, a day later than planned, the 'King' sits with a fresh coat of gloss varnish on it, now waiting for that to cure then I can attack with a Vallejo black wash. (I use Vallejo paints). It'll be my first attempt at a wash and to be honest I have read so much I am in a state of confusion - but, nothing new there so it will be a massive learning curve!!!

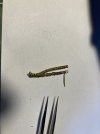
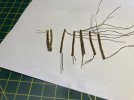
I did manage to prepare the mic-tel leads, they are now black!!

Pic 1
Just need to decide on length and locations to place them. (Tweezers permitting!!!!)
IMG_1391.JPG

And finally - the sun has finally decided to make an appearance after a whole day of dank, wet miserable weather!!!
For those of you workers in the UK - enjoy your day off tomorrow!!! Same old - same old for us pensioners!!!! Just another day in paradise. Wet but paradise!!!!
 

Waspie

SMF Supporter
Joined
Mar 13, 2023
Messages
2,670
Points
113
Location
Portland - Dorset
First Name
Doug
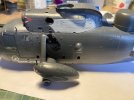
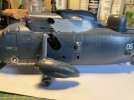
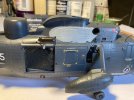
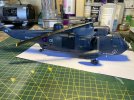
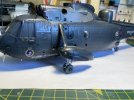
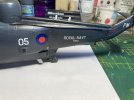
Attacked the king today with a wash! Completed 75% and have mixed feelings over the result.
Wash used was the Vallejo black wash.
I settled on a method whereby I painted the wash over the rivet lines and general dividing lines, such as breaks in the airframe!! Then I washed over the whole area. I then started wiping the wash with a tissue with a dab of airbrush thinner, finishing off with a cotton bud.
The area was certainly a tad darker due to the wash. Part of me likes the effect, makes it look dirty, which used ASW Mk5's did, well my squadrons did.
I'll let you all make your minds up. I really would appreciate any comments or criticism as it's my first attempt.
Pic 1
Unwashed side. (Well, unwashed as far as aft of the roundel!).
IMG_1396.JPG

Pic 2
The complete port side has received a wash. Doorway never received a wash as it's only being used as a blank for the open door that it will end up with!
IMG_1395.JPG

Pic 3
Closer shot of the tail cone which has been coated in wash!
IMG_1394.JPG

Thanks for looking in. Comments most welcome.

Doug
 

vizenz

SMF Supporter
Joined
Apr 19, 2024
Messages
125
Points
63
Location
Bavaria
First Name
Andreas
Hi Doug,
I can't really tell the difference in the pictures. But of course I've worked with washes like this often enough that I understand what you mean.
Personally, I wouldn't use acrylic washes for such effects as they are far too difficult to control. I would always either use a glossy varnish layer to seal and work on top with enamel washes - or on a matt or semi-matt surface with oil washes. Both have the advantage that you can simply remove the effect if you don't like something. This is very difficult with acrylic washes.
 
Top