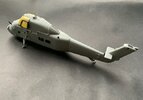
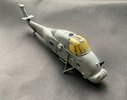
Geoffers - Italeri 1/72 Wessex UH.5 - Royal Navy Rescue helicopter

Geoffers

SMF Supporter
Joined
Jan 26, 2017
Messages
1,100
Points
113
Location
Shropshire
First Name
Geoff
Well I’ve finally started the build :smiling4:

First up was dealing with the ejector pin marks in the cabin.

These were filled old school using a bit of CA glue mixed with talc.

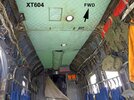
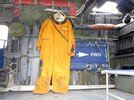
I managed to find some good interior pictures of the interior of a RAF rescue Wessex
268C2146-60A7-4C85-B635-AD316E99F41E.jpeg
Quite a bit more detail than the kit supplies so it was out with the scratch build scraps box to see if I could improve things.

First up was to try and recreate some of the plumbing using lead wire.
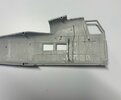
F63CCBCF-2E07-4115-BF01-56DF1B2E8563.jpeg

I have also added a roof from some plasticard.
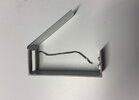
94370EF1-A383-4024-8202-01AB329C988D.jpeg
I cemented the cabin in place to give me more reference points when adding some of the extra details.
These include more plumbing and some heating ducting made from normal electrical wire.
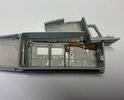
2F730A5D-FD5A-44AA-9B78-212B73A8E3CA.jpeg

I’ve also made some quilted lining for the roof and a curtain door at the back of the cabin.
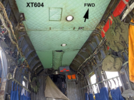
443E08CC-8B8E-4BAE-8A15-873922699DF9.png

This is my version made from wine bottle foil scored gently with the back of a blade.
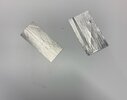
045341BB-1685-4ABE-BD88-57B3C956A95D.jpeg

Once I was happy with it I painted it with Vallejo Model Air - eau de nil 71.009 which was the closest match I had.
It’s had a bit of weathering added too using Tamiya panel line wash.
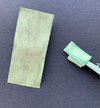
DA554F0E-8B8F-46DC-8395-9255961E35E4.jpeg
This will be glued into place along with the cabin seats which will be painted separately once the cabin has been painted.

Unfortunately a lot of this won’t be seen but it’s fun to do and I know it’s there ;)

Another update soon, thanks for looking :thumb2:

Geoff.
 
Last edited:

Mini Me

SMF Supporter
Joined
Jun 1, 2018
Messages
10,164
Points
113
First Name
Rick
That roof lining came out nice.....very close color match too. keep it coming :thumb2:
 

Geoffers

SMF Supporter
Joined
Jan 26, 2017
Messages
1,100
Points
113
Location
Shropshire
First Name
Geoff
Geoff,
Lovely details and I really like the quilting.
Thanks Scottie, it’s come out ok but is a little bit too subtle so may not be visible at all once put together.
In hindsight it may have been better to do the scoring directly onto the plasticard :thinking: , maybe next time.

Good find, it seems there are fewer seats in the rescue version than we thought :smiling3: Are you going to add the big yellow suit too?
No I’ll give that a miss Jakko ;)

Lovely start on the detailing
Thank you Mick :thumb2:

That roof lining came out nice.....very close color match too. keep it coming :thumb2:
Cheers Rick, as I said to Scottie I think it would have been better done directly onto the plasticard roof but we’ll see once it’s in place.

Geoff.
 

Geoffers

SMF Supporter
Joined
Jan 26, 2017
Messages
1,100
Points
113
Location
Shropshire
First Name
Geoff
Hello chaps,

Bit of progress to report :smiling:

It’s been slow progress as I’ve been sorting out all the fiddly interior details.

After gluing various pieces of lead wire and plastic rod to recreate some of the interior plumbing, heating ducts etc the cabin was firstly primed with Mr Surface 1500 black primer which was followed up with a coat of Vallejo Model Air 71.273 Ocean aGrey which seemed a reasonable match.

Once this had dried I started to carefully pick out all the details using various colours.

The seat were also painted, the pilot / co-pilots seat had a small pad of milliput added to try and recreate sheep skin cushions.

The control panels had the various buttons picked out in white, not very realistic but not much will be visible once the cockpit is complete.

C3352296-A5C6-4B64-B031-70186F198D7F.jpeg

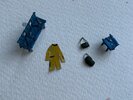
The PE seat belts were painted and added and I also made a couple of bags from air dried clay and Tamiya tape to hang up in the cabin to replicate this reference photo.

43A2DD60-925B-4CAE-824B-58B31501FBE5.jpeg

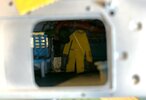
And by popular request I had a go at recreating the yellow suit from wine bottle foil :smiling4: It’s very basic, just the general shape cut out and painted.

Here are all the small parts before they were added to the model.

099A4E48-871F-4367-82F5-0A7D2E901FCB.jpeg

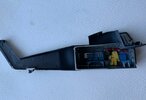
These were then added to the interior using CA glue.

4632EA90-67D2-4742-9E31-73BE020CF8D2.jpeg

The windows were then added before the fuselage halves were cemented together.

Unfortunately not a lot of the interior detail is visible now it’s all been buttoned up :sad-face:

ABB0F3CD-CC6F-4BE5-A4FE-7DDFC2B5673D.jpeg

Undercarriage and lots of lumps and bumps to be added next.

Another update soon, thanks for looking :thumb2:

Geoff.
 

rtfoe

SMF Supporter
Joined
Apr 29, 2018
Messages
7,572
Points
113
Location
Malaysia
First Name
Richard
Late in Geoff, nice progress and a good addition of the yellow suit. Did the UH-34 a few years back and loved it. I guess the details would be just as good on this. I modified mine with cockpit windows slid back, pilots heads turned and the heli hovering over a rice paddy.
You'd be surprised how much is revealed when you peek in even if thinking very little is seen. Looking forward to the rescue color scheme.

Cheers,
Wabble
 

Geoffers

SMF Supporter
Joined
Jan 26, 2017
Messages
1,100
Points
113
Location
Shropshire
First Name
Geoff
Thanks Rick and thank you Tim :smiling4:

Geoff,
Some really nice additions and love the yellow suit.
That suit really will make the model, if you ask me :smiling3:
Great work geoff , love the quilting and the yellow suit , cheers tony
Thank you guys, I didn’t intend to include the suit but was am glad I persuaded to do it now :thumb2:

Late in Geoff, nice progress and a good addition of the yellow suit. Did the UH-34 a few years back and loved it. I guess the details would be just as good on this. I modified mine with cockpit windows slid back, pilots heads turned and the heli hovering over a rice paddy.
You'd be surprised how much is revealed when you peek in even if thinking very little is seen. Looking forward to the rescue color scheme.

Cheers,
Wabble
Thanks Richard, that sounds like an impressive diorama :smiling:

Geoff.
 
Top