- Home
- Forums
- Group Builds
- The New Group Builds (2017 on)
- The User Created Group Builds
- 2024 Builds
- Papa 695's Build a Bi-plane GB: Jan - April 2024
You are using an out of date browser. It may not display this or other websites correctly.
You should upgrade or use an alternative browser.
You should upgrade or use an alternative browser.
Allen's 1/32 WnW Hansa-Brandenburg W.12 (early)
- Thread starter Allen Dewire
- Start date
Nice progress Allen. Pit is looking very sweet.
scottie3158
SMF Supporter
Dude, glad to hear your feeling better mate. Loving the work on the office.
Neil Merryweather
SMF Supporter
Great to hear you are feeling better and back at the coalface, Allen.
Good start, keep the faith!
Good start, keep the faith!
Waspie
SMF Supporter
What a build so far - amazing.
Sorry to hear about the sinus issue. On that I can empathise, I have suffered intensely with it in the past. Not nice!!!
But that cockpit area!! How do you do it? Looks superb Allen. Going to follow this one!!
Sorry to hear about the sinus issue. On that I can empathise, I have suffered intensely with it in the past. Not nice!!!
But that cockpit area!! How do you do it? Looks superb Allen. Going to follow this one!!

Last edited:
Evening from a cold Bamberg,
Work goes on with the W.12 as it's too damn cold to go outside. Hopefully soon, the temp will go over -1° during the day. We won't talk about the temps at night...Anyway,
Over the past few days, it was time toattack attempt to do up the Lukgraph resin 150hp Benz motor. It was actually not too shabby to paint. I thought it would be a lot harder being a single piece. I painted the cylinder heads and then went on to doing all the little details. When it was dry, I painted the spark plugs white,
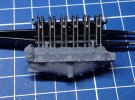
The pushrods were done in AV Metal Chrome. The funny thing is that when you look closely, you can see the resin printing lines on them. The channel behind them is for the spark plug cables from the magneto to the cylinders. It will be capped with a strip of sheet plastic later. I also drilled out the magneto cap for the wires. Then it was on to the nerve wracking job of wiring this baby Benz up,
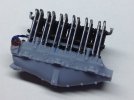
The right side is done and, as usual, I forgot to take pics of how I did it. Again, the channel will be capped later. Another view,
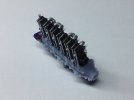
The chrome pushrods do look like crap here. I will try another coat to fix them up. I did remember to take pics of my wiring work on the left side. It takes a steady pair of hands with the hope, the shakes don't come,
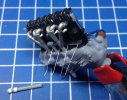
For the wires, I used 0.2 mm lead wire from Plus Model. I drilled out the holes with a 0.3 mm drill bit and yeah, I managed to break one in the progress. A dab of MIG CA on the holes and carefully insert the wires into the them. You have to be very gentle as the lead wire is soft and always wants to bend up in different directions. After this, I went about painting them with my favorite plug wire color, French Blue. I don't paint the whole wire, just around 3/4 of them. This allows you to use the tweezers to put them in place,
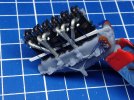
A piece of folded strip was inserted to aid in the bending of them up to the spark plugs. A drop of CA on the plug head and press the wires onto them. I added another drop on top to make sure they stayed put. Once dried, I finished painting the wires and gently nipped off the excess wire. Lastly, I added a dab of black for the caps on top of the spark plugs. That was enough for today as the nerves were frayed and I needed a cold one. Tomorrow, I will finish the magneto wires, add the channel covers and get on with painting the rest of the Benz motor. After that and with nerves willing, I can assemble HGW seat belts for the pit. They are some tiny little critters with 10 pcs. for each belt x 4 = 40 total!!!...
That's it for tonight and thank you all very much for the interest in my madness. Stay warm and have a great week...
Prost
Allen
Work goes on with the W.12 as it's too damn cold to go outside. Hopefully soon, the temp will go over -1° during the day. We won't talk about the temps at night...Anyway,
Thanks my friend! It's amazing what you can do when you can wear the Optivisor again...Beautiful work Allen. Great to hear you are feeling better.
Thanks Chris and I sure do have a lot more to do too!!!...Outstanding. Good to see you back to it and progressing apace
Much appreciated Tony! I'm trying to make the wood butchers on here jealous for a change...Great to hear youre getting back to normal allen , the cockpit is looking excellent , cheers tony
Thanks so much Tim! No curtains here, but believe it or not, The pilot has a double window in the pit floor on this puppy...Nice progress Allen. Pit is looking very sweet.
Thanks Bro! Sinus infections really suck, but I can finally get back to driving on with this build. Dashboard decals are giving me a scare though, as they are kinda tiny...Dude, glad to hear your feeling better mate. Loving the work on the office.
Thank you too Fred! I did lose over a week, but I'm making up for it now. I'm having a blast (see below)!!! Give my best to Ginger too...Great to hear you are feeling better and back at the coalface, Allen.
Good start, keep the faith!
Don't know about amazing Doug, but the worst part of the sinus infection was it was only on the right side of my melon. You blow out the crap and take a breath and the cold air goes straight into the void and the pain is incredible in the right sinus cavity. The pit is just a base coat of Lifecolor Dust. When dry, I sponge some Burnt Umber cheap acrylic oil paint over it and let that dry. Then I quickly brush it all with a mix of Tamiya Clear Orange, Clear Yellow mixed with their X-20A thinner. One swipe with a flat brush as it dries quick, and if you try to go over it, it comes off (typical Tamiya). Set it aside and let it dry overnight. The seat frame and table was done using AV 71.040 Burnt Umber straight from the bottle in a mottle/streak pattern. HTH's and makes sense my friend...What a build so far - amazing.
Sorry to hear about the sinus issue. On that I can empathise, I have suffered intensely with it in the past. Not nice!!!
But that cockpit area!! How do you do it? Looks superb Allen. Going to follow this one!!
Great news Buddy and glad to hear the Roads Council hired you to fix them potholes. Hope the tarmac arrives soon and you can drive on Mick. Thank you for the kind compliment too...Waiting for more tarmac to arrive so had a catch up. That cockpit is outstanding
Thanks Dude 2 (aka B-Boy) Feeling great and happy to report that Richard has been evacuated from the lava flow and is back home!!!Dude 1 , great work and glad your feeling better.
Over the past few days, it was time to

The pushrods were done in AV Metal Chrome. The funny thing is that when you look closely, you can see the resin printing lines on them. The channel behind them is for the spark plug cables from the magneto to the cylinders. It will be capped with a strip of sheet plastic later. I also drilled out the magneto cap for the wires. Then it was on to the nerve wracking job of wiring this baby Benz up,

The right side is done and, as usual, I forgot to take pics of how I did it. Again, the channel will be capped later. Another view,

The chrome pushrods do look like crap here. I will try another coat to fix them up. I did remember to take pics of my wiring work on the left side. It takes a steady pair of hands with the hope, the shakes don't come,

For the wires, I used 0.2 mm lead wire from Plus Model. I drilled out the holes with a 0.3 mm drill bit and yeah, I managed to break one in the progress. A dab of MIG CA on the holes and carefully insert the wires into the them. You have to be very gentle as the lead wire is soft and always wants to bend up in different directions. After this, I went about painting them with my favorite plug wire color, French Blue. I don't paint the whole wire, just around 3/4 of them. This allows you to use the tweezers to put them in place,

A piece of folded strip was inserted to aid in the bending of them up to the spark plugs. A drop of CA on the plug head and press the wires onto them. I added another drop on top to make sure they stayed put. Once dried, I finished painting the wires and gently nipped off the excess wire. Lastly, I added a dab of black for the caps on top of the spark plugs. That was enough for today as the nerves were frayed and I needed a cold one. Tomorrow, I will finish the magneto wires, add the channel covers and get on with painting the rest of the Benz motor. After that and with nerves willing, I can assemble HGW seat belts for the pit. They are some tiny little critters with 10 pcs. for each belt x 4 = 40 total!!!...
That's it for tonight and thank you all very much for the interest in my madness. Stay warm and have a great week...
Prost
Allen
Glad you are feeling better and are back at the bench.
These WnW kits look pretty darn good. Pity I missed that boat.
Great work on the cockpit and the motor.
These WnW kits look pretty darn good. Pity I missed that boat.
Great work on the cockpit and the motor.
David Lovell
SMF Supporter
Great to see your back up and well you know ,I dont /can't run anymore. Certainly looking the part great attention to detail also many thanks for making the whole thing a enjoyable read through your progress so far. Dave
Just catching up on this Allen, some cracking work.
An engine, great work, I do love an engine.
scottie3158
SMF Supporter
Allen, very nice mate the extra detail adds a whole new level.
Evening folks and I truly apologize for the late replies. It seems the older we get, the less time we have for anything. I have still been playing at the table, but ketching up on here isn't going too well...So,
killing building 2 bi-planes with one stone Sir. And they are both looking fantastic too!!!
So, I have been driving on here with the Hansa and things are getting done. I always forget to take pics, so the following is a little wacky and maybe boring. I will try to take better ones tomorrow of the newer progress. I finished up the Benz and added the crankcase decal. I also added the decals to the dashboard. Still a couple to add though,
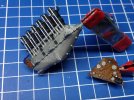
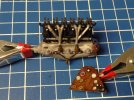
I also started prepping the MG for the driver. The kit includes molded and etch barrel sleeves, but I really like what Master Model had to offer as a replacement. The cooling jacket is pre-formed and the barrel is very fine too,
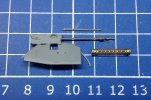
You nip off the plastic barrel, drill into the gun body and you have the above. With some CA and AV Metal Color Steel, you end up with this puppy,
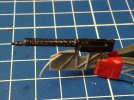
I just need to add the front sight and paint the inside of the side panel it's mounted on. I decided to do a test fit of the Benz in the fusi as the Lukgraph resin motor is a bit different in make-up than the kit's motor. As I stated in an earlier post, I had to trim the motor mount plate to fit it. The test,
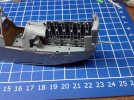
It was pretty tight and some adjustments were in order. It sat too far back because the front curved cooling pipe was hitting the radiator. You can see it better here,
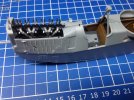
I just nipped it off as it wasn't used on this particular wing thingy for the cooling system. The rear one was used and had a cooling hose that ran forward to the radiator. It will be fitted after the motor is CA'd in place. So far, everything is going the way it should! Back to doing all the little things that need to be done. Gun sight and last decals on the dash,
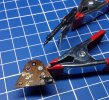
That's what makes these kits so good and can also drive you crazy too...Lotsa tiny details and decals, but mostly, the amount of tidbit painting that's needed. It's time consuming and hell on the hairy sticks, as you are using lots of different colors...Last weekend, we had a decent warmer day and with high winds. I have to hang the booth hose out of the window to vent. Luckily the high winds were blowing in the right direction and I managed to shoot the linen color on the wings and flappies. I used a mix of Tamiya XF-57 Buff, added some XF-2 White, and added 50% X-22 Clear to it. Thinned with X-20A in a 60-40 ratio, I went crazy with the hissy stick. I Let everything dry for a day and a half. In the the meantime, I went at the HGW seatbelts and finished them. No pics of this or the linen paint job. I then got brave and started the naval lozenge decals on the upper wings and rear flappy,
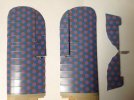
I went a different route this time and slobbered Micro Set all over the surface with an old brush before applying them. This worked a lot better than it did with my Halberstadt lozenge decals. Once in the proper place, I dried up all the excess with a paper towel and used Q-tips to remove/smooth out the air bubbles underneath. Worked out really great and the decals didn't tear. After they dried, I hit them with Micro Sol to get them to snuggle down. I had to do this a few times to get the edges to settle. I'm real happy with the results and can only hope the upper wing bridge and the bottom wing decals come out the same...
That's it for now. I have done some more and will try to remember to take pics tomorrow. Thank you all again and sorry for my lack of comments of late......Ketchup, ketchup and more ketchup is in order...Have a great week good people and stay safe!
Prost
Allen
Thanks Boss! I really love these kits and if you get lucky and keep your eyes peeled, you might be able to snag one at a reasonable price. Tonight in evilbay, an AEG G.IV twin engine bomber, WnW #32042, went for €138 + postage. That's pretty cheap!!!Glad you are feeling better and are back at the bench.
These WnW kits look pretty darn good. Pity I missed that boat.
Great work on the cockpit and the motor.
Your most welcome Dave and thank you for the kind words. I'm having a good time, but I still wish a day had 36 hours in it. Then I might be able to get more done Buddy...Great to see your back up and well you know ,I dont /can't run anymore. Certainly looking the part great attention to detail also many thanks for making the whole thing a enjoyable read through your progress so far. Dave
Thank you Ian! I can't believe you areJust catching up on this Allen, some cracking work.
Me too Colin! Everybody loves a Benz and I really like your little Fokker build too!!! Thanks Sir...An engine, great work, I do love an engine.
Much appreciated Bro!!! I'm trying to have some fun here, but it takes too much time to do. I should keep my head out of the research and just build it. You run out of rivets yet, Paul???Allen, very nice mate the extra detail adds a whole new level.
So, I have been driving on here with the Hansa and things are getting done. I always forget to take pics, so the following is a little wacky and maybe boring. I will try to take better ones tomorrow of the newer progress. I finished up the Benz and added the crankcase decal. I also added the decals to the dashboard. Still a couple to add though,


I also started prepping the MG for the driver. The kit includes molded and etch barrel sleeves, but I really like what Master Model had to offer as a replacement. The cooling jacket is pre-formed and the barrel is very fine too,

You nip off the plastic barrel, drill into the gun body and you have the above. With some CA and AV Metal Color Steel, you end up with this puppy,

I just need to add the front sight and paint the inside of the side panel it's mounted on. I decided to do a test fit of the Benz in the fusi as the Lukgraph resin motor is a bit different in make-up than the kit's motor. As I stated in an earlier post, I had to trim the motor mount plate to fit it. The test,

It was pretty tight and some adjustments were in order. It sat too far back because the front curved cooling pipe was hitting the radiator. You can see it better here,

I just nipped it off as it wasn't used on this particular wing thingy for the cooling system. The rear one was used and had a cooling hose that ran forward to the radiator. It will be fitted after the motor is CA'd in place. So far, everything is going the way it should! Back to doing all the little things that need to be done. Gun sight and last decals on the dash,

That's what makes these kits so good and can also drive you crazy too...Lotsa tiny details and decals, but mostly, the amount of tidbit painting that's needed. It's time consuming and hell on the hairy sticks, as you are using lots of different colors...Last weekend, we had a decent warmer day and with high winds. I have to hang the booth hose out of the window to vent. Luckily the high winds were blowing in the right direction and I managed to shoot the linen color on the wings and flappies. I used a mix of Tamiya XF-57 Buff, added some XF-2 White, and added 50% X-22 Clear to it. Thinned with X-20A in a 60-40 ratio, I went crazy with the hissy stick. I Let everything dry for a day and a half. In the the meantime, I went at the HGW seatbelts and finished them. No pics of this or the linen paint job. I then got brave and started the naval lozenge decals on the upper wings and rear flappy,

I went a different route this time and slobbered Micro Set all over the surface with an old brush before applying them. This worked a lot better than it did with my Halberstadt lozenge decals. Once in the proper place, I dried up all the excess with a paper towel and used Q-tips to remove/smooth out the air bubbles underneath. Worked out really great and the decals didn't tear. After they dried, I hit them with Micro Sol to get them to snuggle down. I had to do this a few times to get the edges to settle. I'm real happy with the results and can only hope the upper wing bridge and the bottom wing decals come out the same...
That's it for now. I have done some more and will try to remember to take pics tomorrow. Thank you all again and sorry for my lack of comments of late......Ketchup, ketchup and more ketchup is in order...Have a great week good people and stay safe!
Prost
Allen
Steve-the-Duck
SMF Supporter
What to praise most?
Engine? Brilliant
Guns? Fantastic
Getting the huge lozenge transfers to set so well? Top marks, sir!
Engine? Brilliant
Guns? Fantastic
Getting the huge lozenge transfers to set so well? Top marks, sir!
- Joined
- Apr 28, 2018
- Messages
- 6,212
- Points
- 113
- First Name
- Bob
Very, very late Allen my apologies!
Superb build as usual, love the look of these WW1 planes
Superb build as usual, love the look of these WW1 planes
Jim R
SMF Supporter
