Andrews's 1/48 Eduard ProfiPACK Yak-3

adt70hk

I know its a bit sad but I like quickbuild kits!!!
SMF Supporter
Joined
Sep 4, 2019
Messages
9,517
Points
113
First Name
Andrew
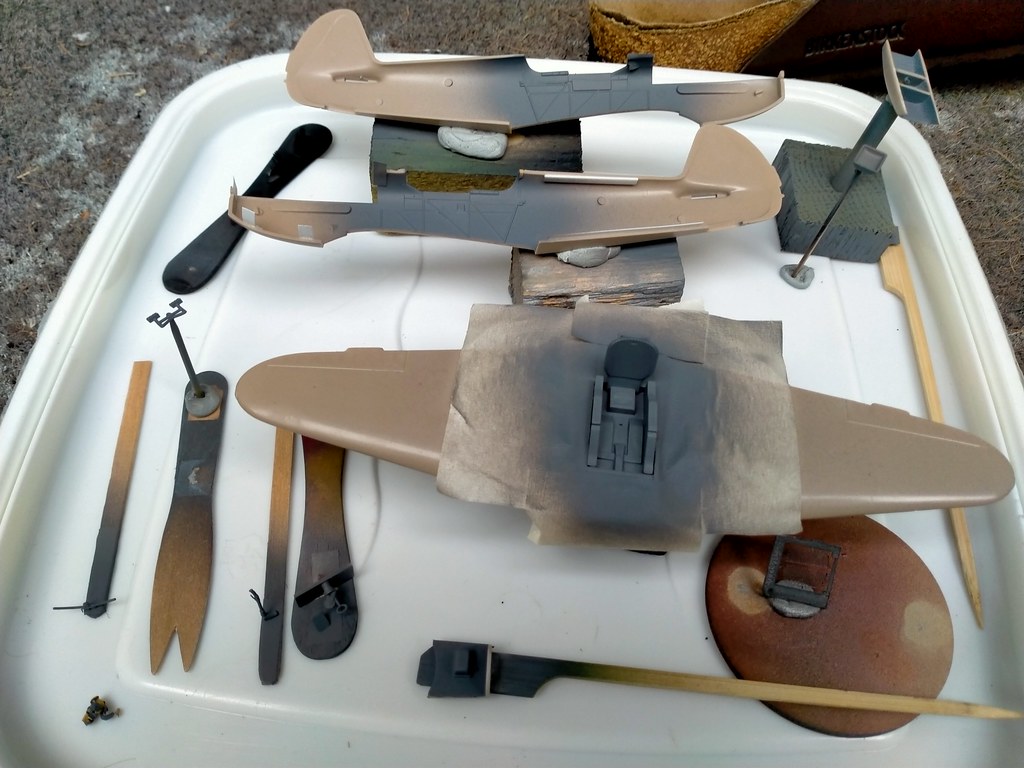
OK chaps...so the base paint blotches are on.

As it a blue and grey paint scheme I simply used the underside AMT-7 Light blue for them.

Although this is only the 6th plane I have done using the black basing technique, I love it. Given that you can vary the size and density of the blotches and then how much paint you lay down over the top, they is a huge range of effects you can achieve.

Although it wasn't my intention, I seem to have done tighter, denser blotches on the underside and larger ones with less definition on the top. It will be interesting to see how they turn out.

This was also my first time using AK 3rd Gen and although I still need to have a play around, I was quite pleased with how it worked.

ACW as usual.

Andrew


adt70hk

I know its a bit sad but I like quickbuild kits!!!
SMF Supporter
Joined
Sep 4, 2019
Messages
9,517
Points
113
First Name
Andrew
Looking good Andy. Hope you feel better soon as well.

Wow, I missed this build. Nice work Andrew, agree with the others, primer looks the business.

Looking really good Andrew. And like everyone says, a very smooth finish on the primer.

Just catching up with your build Andrew :thumb2:

Nice cockpit details and good scratch work, you now the missing part is bound to turn up anytime now :tears-of-joy:

Geoff.


Thanks chaps! Glad you're liking it. I was pleased with how smooth the primer went down, very pleased indeed!


Tim - feeling better thanks. Just a cold, nothing major just left me feeling very tired.

Geoff - of course it will....probably in about a year! I just have to hope now that the scratch one fits ok!! :cold-sweat:


Thanks again all


ATB

Andrew
 

JR

Member of the Rabble and Pyromania Consultant
SMF Supporter
Joined
May 26, 2015
Messages
17,334
Points
113
Location
lincs
First Name
John
Glad you are feeling better Andrew, hate this time of the year for infections etc .
Your doing well , like the replacement support , nice .
 

yak face

Wossupwidee?
Staff member
Moderator
SMF Supporter
Joined
Jun 13, 2009
Messages
12,416
Points
113
Location
sheffield
First Name
tony
Nice work andrew , the cockpit looks great and the scratched undercarriage link is excellent . Looking forward to the paint going on , cheers tony
 

adt70hk

I know its a bit sad but I like quickbuild kits!!!
SMF Supporter
Joined
Sep 4, 2019
Messages
9,517
Points
113
First Name
Andrew
Glad you are feeling better Andrew, hate this time of the year for infections etc .
Your doing well , like the replacement support , nice .
Just seen this one Andrew, some cracking work going on.
Nice work andrew , the cockpit looks great and the scratched undercarriage link is excellent . Looking forward to the paint going on , cheers tony

Thanks chaps for the support and apologies for the delay in coming back to you!

As you can see there has been an update!

ATB

Andrew
 

adt70hk

I know its a bit sad but I like quickbuild kits!!!
SMF Supporter
Joined
Sep 4, 2019
Messages
9,517
Points
113
First Name
Andrew
Hi all

So Monday evening, I manage to get the blue underside down but not had the chance to post a picture before. As with previous builds, I've kept the mottling fairly subtle.

Apologies but it was taken in a rush, so is not the best shot.

I've actually just finished applying the top side camo but it is drying at the moment.

ACW as usual!

ATB

Andrew


Magneto

Oberleutnant
SMF Supporter
Joined
Oct 25, 2023
Messages
295
Points
63
Location
Sky
First Name
Paul
Good evening all

So given this is mine and Kar's GB, it is with some embarrassment I finally join the rest of you that have started out so quickly! ;)

So this is the first Eduard kit I have ever built, which of course makes it the first ProfiPACK kit too.

I had intended to a Weekend edition as my first Eduard kit but all the planes in the stash that fitted the bill were ProfiPACKs, so this will be a baptism of fire with all that nice PE!!

The kit itself is a 2011 reboxing of a 1998 tooling and aside from no locator pins (I understand this was a mark of early Eduard kits), it has gone together well so far. A loose dry fit of the taped up fuselage shows it is a MUCH better fit than the Raiden, although the instructions are not clear on a couple of points

Luckily it only has 53 parts, so PE aside it should hopefully be reasonably straight forward. It's obviously not up there with their latest offerings but it looks ok to my eyes on the sprue.

ATB

Andrew


------------------------------------------------------


The obligatory box art and other shots!


So this was as far as I got at model club on Tuesday night.


Following with interest - I only really do German planes but am a Eduard fan - will wait to see how you deal with ‘micro PE’!
 

Magneto

Oberleutnant
SMF Supporter
Joined
Oct 25, 2023
Messages
295
Points
63
Location
Sky
First Name
Paul
Good morning all

So I managed to get some primer on for the cockpit areas at the weekend and then got the base coat down - albeit I did it twice as I wasn't quite happy with the colour.

In terms of the 'correct' colour, knowing nothing about Soviet colours my initial research discovered Yak-3 cockpits "should" be AKAN A-14, a mid-grey. A couple of website suggest Humbrol 27 or 140 as close-ish matches. Vallejo 70.992 Neutral Grey is not that far off Humbrol 27.

However, the instructions call for a yellow colour, which I discovered was the primer which should but was not always used - apparently - see here.

In the the end I plumped for a mix of Vallejo 70.992 Neutral Grey and Vallejo 71.259 Violet Grey RLM 75....it looks ok to my eye.

For bare PE I have used good old Halfords rattle can car primer....Vallejo primer can be a bit iffy on PE. The air intake grills got a coat of Vallejo's Metal Colour 77.712 Steel. If anyone is after a water based metallic paint, these are simply outstanding and spray beautifully!

All comments welcome as usual!

Andrew


--------------------------------------------------------------------------------------------

For some reason the way the light catches the cockpit area has wiped out all the detail but it is there.


Ah! Keep PE on sprues and spray. Great tip for me!
 

Jim R

SMF Supporter
Joined
Apr 27, 2018
Messages
13,789
Points
113
Location
Shropshire
First Name
Jim
A few problems to sort out Andrew but you've made good progress. Despite the issues the cockpit looks good and as is often the case not a lot will be seen. Paint job is looking the part.
In my limited experience Eduard ProfiPACK kits are usually good. This one seems less good. Is it a fairly old kit?
 

adt70hk

I know its a bit sad but I like quickbuild kits!!!
SMF Supporter
Joined
Sep 4, 2019
Messages
9,517
Points
113
First Name
Andrew
A few problems to sort out Andrew but you've made good progress. Despite the issues the cockpit looks good and as is often the case not a lot will be seen. Paint job is looking the part.
In my limited experience Eduard ProfiPACK kits are usually good. This one seems less good. Is it a fairly old kit?

Thanks Jim, it is coming on nicely now. Although I did lose heart for a while.

According to Scalemates this is 2011 reboxing with "new parts". I may be wrong but l wonder if this simply the pre-painted PE. The plastic is actually a 1998 tooling and so I believe might be one of their earliest kits but actually it still fits together than many newer kits I have seen, for example the wing root join was flawless!

Thanks again.

Andrew
 
  • Like
Reactions: JR

JR

Member of the Rabble and Pyromania Consultant
SMF Supporter
Joined
May 26, 2015
Messages
17,334
Points
113
Location
lincs
First Name
John
Keep going Andrew. That paint work is neat .
 

adt70hk

I know its a bit sad but I like quickbuild kits!!!
SMF Supporter
Joined
Sep 4, 2019
Messages
9,517
Points
113
First Name
Andrew
Good morning all

So as my wife was out for the day with friends in London yesterday, I managed to get the top side camo done.

I forgot to say that I'm experimenting with AK's newer 3rd Gen paints as I'd heard good things about them. I therefore bought their 'Special Set - Soviet Fighter Colors 1943-1945' AK 11742. This contains:
  • AK11916 - AMT-7 Light Blue
  • AK11917 - AMT-11 Blue-Grey
  • AK11918 - AMT-12 Dark Grey
So far I've had not issues with spraying them, albeit the mixing ratios are slightly different from what I'm used to with Vallejo Model Air. They are not only much thicker and take more thinning than Model Air, they are also thicker and need more thinning than even Model Colour.

However, colour wise and to my highly untrained eye, they seem quite a bit darker than the colour callouts would have and indeed most other builds I have seen (including reviews by very experienced modellers)....whilst the black basing may be part of that reason, I don't think it's the whole reason but I'll live with it.

Maintaining the mottling under the darker grey was obviously tricky but at least in real life there is a hint of it there.

Next up are the undercarriage bays and undercarriage and then I can get the clear coats on!

ACW as usual.

Andrew


--------------------------------------------


So I applied the AMT-11 Blue-Grey freehand and then masked over the top, with AK Plastic Putty before applying the AMT-12 Dark Grey....for those that have not used it, the Plastic Putty feels really weird to the touch but works very well.


Top camo applied....


Andy T

SMF Supporter
Joined
Apr 26, 2021
Messages
2,024
Points
113
Location
Sheffield
First Name
Andy
Nice neat work on the camo. That pre-shading shows through really well.

I like that putty but find it has a life of its own, especially when warm. You put it in place then after a few minutes it slumps and moves a bit.

Kinda handy most of the time as it can even out any imperfections.
 

adt70hk

I know its a bit sad but I like quickbuild kits!!!
SMF Supporter
Joined
Sep 4, 2019
Messages
9,517
Points
113
First Name
Andrew
Nice neat work on the camo. That pre-shading shows through really well.

I like that putty but find it has a life of its own, especially when warm. You put it in place then after a few minutes it slumps and moves a bit.

Kinda handy most of the time as it can even out any imperfections.


Thanks Andy.

It is odd stuff isn't it. It feels really greasy but it isn't and and as you say has a life of it's own. But as you say I love the way if flows a bit and irons out imperfections. It also seems to regain it's volume a bit after it's been down for a while....and then also goes from matt to very shiny....all very odd

I heard/read somewhere that it is a very thick non-Newtonian fluid, which is why it flows. I hadn't realised it flowed and this is what my Mossie looked like.....and there were some worse patches than these.....


Jostro65

SMF Supporter
Joined
Mar 13, 2021
Messages
45
Points
18
First Name
Ritchie
Thanks Andy.

It is odd stuff isn't it. It feels really greasy but it isn't and and as you say has a life of it's own. But as you say I love the way if flows a bit and irons out imperfections. It also seems to regain it's volume a bit after it's been down for a while....and then also goes from matt to very shiny....all very odd

I heard/read somewhere that it is a very thick non-Newtonian fluid, which is why it flows. I hadn't realised it flowed and this is what my Mossie looked like.....and there were some worse patches than these.....


A word on the putty....this stuff works just the same for a fraction of the price (£2 a tin), if you can ignore the crazy colours
I used this on a spitfire after the tamiya tape took off some paint, (maybe left the masking tape on too long?).
It's not as big a tin as the expensive gear but at this price get a few in.

https://giftgiant.co.uk/products/mini-smart-bright-and-bold-putty
 

Tim Marlow

Little blokes aficionado
SMF Supporter
Joined
Apr 27, 2018
Messages
16,834
Points
113
Location
Somerset
First Name
Tim
I use this one….the cheapest I could find on amazon.
C09EA54F-9563-4009-A7F4-928615AD896A.jpeg
It does drip if you leave it though…
79FF7C2B-FC4F-4E8A-9FFB-134DC23005BC.jpeg
Oh, and if you end up at the physiotherapist for hand issues they could give you the stuff for strengthening exercises. Different colours having different resistance.
This is yellow, the lowest resistance. It was a ball when I put it in there.
AD8F4D3F-8749-4F8B-A969-45CA87D84C13.jpeg.
 
Top