Boatmans Super Tomcat F14D Build

boatman

SMF Supporter
Joined
Nov 8, 2018
Messages
13,049
Points
113
Location
NORFOLK UK
First Name
christopher
Nil desperandum Chris, I'm sure you'll put it in order!!
HI Doug thanks for your kind thoughts but i know when im beaten so im just goin to glue the I/P 's in place an see if i can get this build movin as its been over two months now an hardly anything done normally i would have had it at least half built by now so im pushin on comments an critisum welcome
chrisb
 

Jakko

Way past the mad part
SMF Supporter
Joined
Apr 28, 2018
Messages
10,982
Points
113
First Name
Jakko
Rather than try to paint lines on the screens, what might work is to scribe them with a needle. Are the red and green painted on? And if so, is the paint on the front or on the rear? Because if it’s on the front, then scribing lines with a needle will give you pale lines that should show up more brightly when the light behind the screens is on.

If you want darker lines, you could scribe them as well, then put some black paint into them and wipe that off before it dries. Some paint will stay behind in the scribed line and show up darker when you turn on the light.

Perhaps test this first on some spare material, though :smiling3:
 

boatman

SMF Supporter
Joined
Nov 8, 2018
Messages
13,049
Points
113
Location
NORFOLK UK
First Name
christopher
Rather than try to paint lines on the screens, what might work is to scribe them with a needle. Are the red and green painted on? And if so, is the paint on the front or on the rear? Because if it’s on the front, then scribing lines with a needle will give you pale lines that should show up more brightly when the light behind the screens is on.

If you want darker lines, you could scribe them as well, then put some black paint into them and wipe that off before it dries. Some paint will stay behind in the scribed line and show up darker when you turn on the light.

Perhaps test this first on some spare material, though :smiling3:
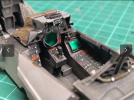
HI Jakko many thanks for your ideas but no the coloured acetate is glued on the I/P's back but dont know if i can scribe a line in that acetate as it very hard materieral an its may not be seen when fitted in ayway as ive still got to paint all them white an black buttons yet
 

Ancientmariner

SMF Supporter
Joined
Feb 11, 2018
Messages
665
Points
93
Location
United Kingdom
First Name
James
That's looking fantastic Chris! Shame about the light but acetate looks good. I use the green holographic/mirror type wrapping paper for that just plain with nothing on it and it looks ok, see below pic
 

Attachments

  • Screenshot_20240331-082623~2.png
    Screenshot_20240331-082623~2.png
    931.6 KB · Views: 13

boatman

SMF Supporter
Joined
Nov 8, 2018
Messages
13,049
Points
113
Location
NORFOLK UK
First Name
christopher
That’s also why I suggested trying on some spare material first :smiling3:
YES Jakko i take your point but i think i may try an paint a very thin white line on that big screen an then see what that looks like but will use a very fine ended paint brush an Bri that cockpit pic above is james cockpit from his tomcat not mine i cant do it that good im afraid
chrisb
 

boatman

SMF Supporter
Joined
Nov 8, 2018
Messages
13,049
Points
113
Location
NORFOLK UK
First Name
christopher
HI GUYS well just to say im still tryin to build this tomcat but its a rotten fit as ive had to do a lot of filein to try an get bits to fit an im still tryin to fit 2 leds behind the I/P but its not lookin to good an im not very happy with it only hope the rest of the kit fits better or the bin may be beckoning only hope the hornet kit is a better fit
chrisb
 

boatman

SMF Supporter
Joined
Nov 8, 2018
Messages
13,049
Points
113
Location
NORFOLK UK
First Name
christopher
HI AGAIN GUYS well been at that cat all afternoon an now i think i have saved it from crash landing in the bin as its lookin a bit better not great but better as ive managed to fit in the leds behind both I/P an they now light up but as i say not great but enough to keep me building on this big cat but its provein a right trail but no pics yet till i think it deserves it
chrisb
 

Jakko

Way past the mad part
SMF Supporter
Joined
Apr 28, 2018
Messages
10,982
Points
113
First Name
Jakko
It’s OK to show photos of things that didn’t go as intended :smiling3: If only to remind people that not everything always goes perfectly.
 

boatman

SMF Supporter
Joined
Nov 8, 2018
Messages
13,049
Points
113
Location
NORFOLK UK
First Name
christopher
It’s OK to show photos of things that didn’t go as intended :smiling3: If only to remind people that not everything always goes perfectly.
HI Jakko well i 'll rather not chance it at the moment as my laptop is full of junk an cant get rid of over 600 cookies an such so i will only post a pic when i deem its worth it as several times now it wont upload pics as it says no storeage space left but ive found that if i leave it a while then laptop will upload a couple of pics now an then an yes i should know how to sort out my probs on my laptop but i dont im afraid im completey computer illitrate
chrisb
 

boatman

SMF Supporter
Joined
Nov 8, 2018
Messages
13,049
Points
113
Location
NORFOLK UK
First Name
christopher
HI ALL well ive wired in the leds in behind the I/P's an painted all the switches an such an i had the shakes bad on this so i dont think ive done to bad but im not happy with it but best i can do IMG_8925.JPG

AND I HAVE fitted green acestate in the vid screen but its not come out how i was hopein it would an the camera has over exsposed the lights in the pic so dont think ther are that bright as the poor ole pilot would be blinded lolIMG_8926.JPG

IMG_8927.JPGIMG_8928.JPGIMG_8929.JPG
 

boatman

SMF Supporter
Joined
Nov 8, 2018
Messages
13,049
Points
113
Location
NORFOLK UK
First Name
christopher
OH DEAR if you guys dont like these pics i'll remove them an i think i will paint the vid screens with tamyia clear green to darken the lights a bit urg well hopefully this wont look to bad once the plane has been built around it
chrisb
 

boatman

SMF Supporter
Joined
Nov 8, 2018
Messages
13,049
Points
113
Location
NORFOLK UK
First Name
christopher
Chris,
Great work on the office mate the displays look good to me.
THANKS Scottie i just wish it had come out better as it was a terrible fit an i have not fitted in the bang seats yet as they also are a bad fit an the instruckions showin how this all goes togeather are rubbish as it dont show an afterfit pics an i fitted several pics as there are the cockpit sides added in the last pics
urg
ATB to you sir
chrisb
 

Jakko

Way past the mad part
SMF Supporter
Joined
Apr 28, 2018
Messages
10,982
Points
113
First Name
Jakko
Looks good to me, it’s sure to make an impression when you switch it on.
 

boatman

SMF Supporter
Joined
Nov 8, 2018
Messages
13,049
Points
113
Location
NORFOLK UK
First Name
christopher
Looks good to me, it’s sure to make an impression when you switch it on.
MANY THANKS Jakko for your nice undeservaldy comments as i was hopein the decals would fit in the screens to dampen the lights down a bit more but when i put them in water they all just splintered an i treid to useing a very fine tipped hairy stick to try an paint on the vid screen but not very good as shakes hit bad so i quit while i was ahead Aaaarrrccchhhhh im not used to failure like this
chrisb
 

Jakko

Way past the mad part
SMF Supporter
Joined
Apr 28, 2018
Messages
10,982
Points
113
First Name
Jakko
A thought I suddenly had: do you maybe have some old, cheap sunglasses that you could just a bit of darker material from? Or else give the screens a coat (or two) or Tamiya Smoke?
 
Top