I've been so busy enjoying this model and doing other things that I forgot to update the blog, so here goes.
I've building the kit, mostly in the order of the instructions with some painting along the way.
As I'm knew to this I'd appreciate any comments of what I've done and what people may have done differently and also thoughts on my plan going forward/
Paints I am using and planning to use are:
Tamiya rattle can grey primer
Tamiya rattle can dark green
Mostly Vallejo acrylic paints for the details (brush painting) with some Humbrol enamels which I have left over, like Matt Black and Flesh.
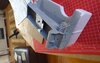
I started by building the lower Hull which was pretty straightforward. I then primed this using
Tamiya grey primer


I can see that work is required on a gap at the front but I'll deal with that when I assemble the upper Hull.
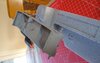
I also built and primed the suspension. When priming I didn't attach to the body of the tank as I wasn't sure if I would be able to spray them all over. I'm not sure if this is what other people will do and I am thinking of spraying them in the base colour off tank too.

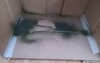
I then started work on the upper Hull and assembled it mostly.
I've attached most parts on the outside of the Hull but plan to paint the parts such as the spade etc separately off tank and attach later.

On the inside of the upper Hull I attached some parts but decided to paint some of the parts off tank as I don't think I'd be able to reach them. I primed the lower Hull inside plus the other parts which will go in there.

I then sprayed the inside of the upper and lower Hulls with the green, masking to protect parts which were going to be white.

I then painted the white inside parts of both the upper and lower Hull. There is more colour to add inside the Hull.


Whilst waiting for paint to dry I've also started the build of the gun breach and turret.

So my next steps are:
Complete the detailed painting inside the lower and upper Hull
Apply the gloss varnish to the inside of the Hull
Assemble the lower and upper Hull
I'll then continue with the turret in the same manner as the other parts
Once all outside parts are completed and full assembled I'll tidy up the outside and spray it all in one go.
Any detailed parts which I haven't attached such as the Spade will be added after this.
Like I said, any comments would be appreciated as I'm on a huge learning curve. And I'll give more regular updates going forward.
I using a sprue cutter for the first ever time and that has made a massive difference. Also the acrylic paints are interesting as I've only ever used Humbrol enamels before. And spray painting is completely new to me.


 as they stink a lot (mainly a problem for your family because we love the smell of thinners in the morning, ...smells like fun
  ) and are not really healthy to inhale (someone with a wilder youth than mine shall disagree
  on that last point...