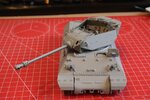
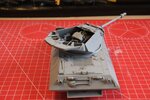
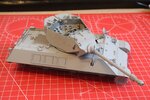
Above all, have fun and just do what your "insides" tell you.........common sense will take care of the rest and if you get stuck, you have a HUGE database at your disposal here on the Forum  BTW she's looking good. Rick H.
- Home
- Forums
- Military Vehicles
- Military Vehicles Under Construction
- Armoured Vehicles Under Constuction
You are using an out of date browser. It may not display this or other websites correctly.
You should upgrade or use an alternative browser.
You should upgrade or use an alternative browser.
British Tank Destroyer M10 IIC Achilles 1/35
- Thread starter Valeron
- Start date
Valeron
SMF Supporter
I think I need to improve on my masking skills. This isn't the end of the world and I have paint to be able to touch it up with.
The paint has seeped through the masking. I used Tamiya masking tape and it seems to have work in all other places but not here. I guess it is the raised details on the floor which have prevented the masking tape from sealing properly with the level of pressure I applied.
To be honest I was more worried about the masking tape pulling off the green paint.

Mark1
SMF Supporter
As you say nothing that can't be sorted,I generally paint whichever part is gonna be easier to mask first and give the tape a good poke down with a cocktail stick in all the corners.
- Joined
- Apr 28, 2018
- Messages
- 10,951
- Points
- 113
- First Name
- Jakko
Generally, I find Sherman bogies (the M10 is a Sherman-based vehicle, the whole lower hull is identical) easier to attach after painting, because it gives much better access for painting the tyres. Only if I’m going to spray the whole lower hull in a dirt colour do I normally attach them before painting.I also built and primed the suspension. When priming I didn't attach to the body of the tank as I wasn't sure if I would be able to spray them all over. I'm not sure if this is what other people will do and I am thinking of spraying them in the base colour off tank too.
American vehicle tools were painted the same colour as the vehicle itselfI've attached most parts on the outside of the Hull but plan to paint the parts such as the spade etc separately off tank and attach later.
 They weren’t sprayed along with it (normally) but dip-painted olive drab at the factory. This makes life a lot easier for modellers, even if most don’t actually seem to know about it: just glue them in place and paint them along with the rest of the model.
Did you brush-paint them? An easier way, I think, would have been to spray the insides white first, with a can of white primer rather than regular paint, then mask off the bits that need to stay white and paint the outside. This gets around the problem of white paint covering poorly and unevenly if you brush it.I then painted the white inside parts of both the upper and lower Hull.
You’re doing very well, if you ask me. The important thing, though, is that you find methods that work for you. We can offer tips and advice, but don’t feel like you need to slavishly follow it.Like I said, any comments would be appreciated as I'm on a huge learning curve. And I'll give more regular updates going forward.
However, the historical accuracy part of me wants to mention that dark green is not the right colour
 The outside and the interior floor of the real vehicle would have been painted in olive drab, which is a very brown-green colour, not green green
Last edited:
Steve Jones
Steve Jones Scale Modelling Site
The outside and the interior floor of the real vehicle would have been painted in olive drab, which is a very brown-green colour, not green green
If you look at photos from the time Jakko its actually B&W


Valeron
SMF Supporter
However, the historical accuracy part of me wants to mention that dark green is not the right colourThe outside and the interior floor of the real vehicle would have been painted in olive drab, which is a very brown-green colour, not green green

I thought this too after I painted. I'm using the paint as per the Tamiya instructions and even Tamiya paint for the green. It looks nothing like the green on the model box.
- Joined
- Apr 28, 2018
- Messages
- 10,951
- Points
- 113
- First Name
- Jakko
Valeron
SMF Supporter
Thansk for that Jakko. For this one, I'm going to stay with the colour I've already applied. But going forward, I'm going to start researching my subject more. Not only will it make a more accurate model, it will be very interesting and an extra level to this hobby.
- Joined
- Apr 28, 2018
- Messages
- 10,951
- Points
- 113
- First Name
- Jakko
One of the benefits of a hobby like this is that you can take things as far as you want. If you’re happy building a kit straight from the box and painting it like the manufacturer recommends, go for it, but you can also do a lot of research to add and correct every last detail, determine accurate colours and markings, and so on. It’s entirely up to you how far to go with any of this.
That makes sense - I've never thought of that.Mike,
An idea for masking where you have raised detail, run some masking fluid along the edge first and then tape over it, then the flud will peel off with the tape.
Mike.
Pete
Valeron
SMF Supporter
Progress has been a little bit slow as real life has take over and been a bit busy.
I have started to get back into this though.
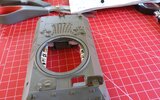
I fixed the paint problem caused by the masking, completed painting the Sponsons and attached missiles and attached these to the upper Hull. It's surprising how little you can actually see when they're attached.
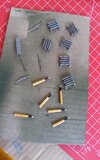
I've also started to paint some of the items which will attach to the Hull, once I have sprayed this.
I think I could probably do with purchasing some better finer brushes for detail at some point. I only have a couple which came with an Airfix starter kit and they don't have very pointy ends.
My next job is to attach more items to the upper hull, complete the Turret and do a bit more hand painting of attachments.
I'll then think about attaching the lower and upper Hulls and turret and then spraying the whole of the exterior.


- Joined
- Apr 28, 2018
- Messages
- 10,951
- Points
- 113
- First Name
- Jakko
The point is the most important part. The size of the brush is less important than many people think: for most jobs, even ones that require painting very fine bits, you don’t actually need a very small brush — a larger one that holds its point well, will do just fine too. This has the advantage of holding more paint, so you can continue things like fine lines for longer than with a smaller brush.I think I could probably do with purchasing some better finer brushes for detail at some point. I only have a couple which came with an Airfix starter kit and they don't have very pointy ends.
Valeron
SMF Supporter
scottie3158
SMF Supporter
All looking rather splendid.
Good stuff, looking excellent from here…
Unless Steve you like me a forgetIt is very much personal preference Mike. There are modellers out there who will paint all the running gear and tracks on the vehicle! This I have never understood because as you say you want to reach all areas of the build. When you go down in scale ie 1/72 then its more common. However at 1/35 scale I find it easier to paint and weather the tyres, wheels, tracks and lower hull on a separate basis. As your skills increase you will want to get into the world of weathering and pigment work. This will give you the opportunity to bring all the separate units together as final weathering can be done once all the wheels, bogies and tracks are attached to the lower hull.
For your first build its turned out really well and all heading in the right direction. Keep up the great work my friend
 .
.Excuse me Mike .
Mike all looking good, you've certainly put a lot of thought in to the build.
I can see you being the proud owner of a Dogs Award before too long.
I'll let some one else tell you about it
I can see you being the proud owner of a Dogs Award before too long.
I'll let some one else tell you about it


