- Home
- Forums
- Military Vehicles
- Military Vehicles Under Construction
- Artillery pieces Under Construction
You are using an out of date browser. It may not display this or other websites correctly.
You should upgrade or use an alternative browser.
You should upgrade or use an alternative browser.
Britsh 25 PDR. Field Gun & Quad Gun Tractor
- Thread starter Steve Jones
- Start date
Si Benson
SMF Supporter
- Joined
- Apr 27, 2018
- Messages
- 3,326
- Points
- 113
- First Name
- Si
My god man, you’ve gone full upgrade again haven’t you!
I’ll get matron to increase your medication till it calms down....she may give you a sponge bath too, if your unlucky
I cannot keep up with you mate....looks like your enjoying yourself so I’ll just nod and smile splendid work sir....keep it up
I’ll get matron to increase your medication till it calms down....she may give you a sponge bath too, if your unlucky
I cannot keep up with you mate....looks like your enjoying yourself so I’ll just nod and smile
splendid work sir....keep it up- Joined
- Apr 28, 2018
- Messages
- 10,864
- Points
- 113
- First Name
- Jakko
That must be the cause of my insomnia, yes …Jakko you have let the side down!I cannot understand why you didnt do 144 rivets on the back of the wheels so no one can see it. I am surprised you can sleep at night knowing they are not there.
I would guess the starter motor. It’s on the side of the engine, if there’s an axle inside it’ll be parallel to the crankshaft, and it seems to connect to the front of the transmission housing.I made a start on the engine. First question is what does the white styrene rod represent??.
Here’s a real CMP engine:
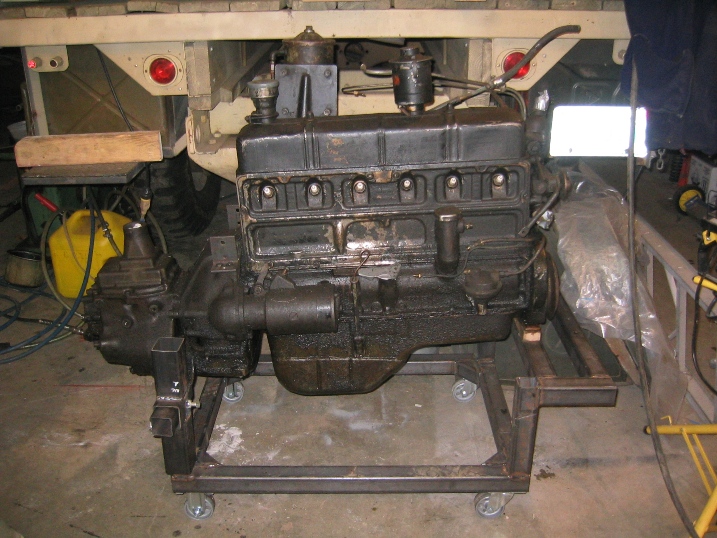
Looks like a starter motor to me.
Steve Jones
Steve Jones Scale Modelling Site
Hi Everyone
Pete/Jakko - Many thanks guys with the help on the thingy me jig at the bottom of the engine
Si - It's starting to get away from me now and I just cant stop
Pete/Jakko - Many thanks guys with the help on the thingy me jig at the bottom of the engine
Si - It's starting to get away from me now and I just cant stop
Last edited:
scottie3158
SMF Supporter
Steve,
More excellent scratchduggery and etch work.
More excellent scratchduggery and etch work.
Absolutely knocked out Steve with the detail. I just don't know how you manage to achieve such work in your modelling.
Certainly take my hat off to you. Well done mate.
Are you sure you are not related to the one known as MR T from up north, , he has trained you well.
John.
Certainly take my hat off to you. Well done mate.
Are you sure you are not related to the one known as MR T from up north, , he has trained you well.
John.
Jim R
SMF Supporter
Hi Steve
Just caught up. So much great work. Love the engine and particularly the bumper damage. I definitely appreciate the 'warts and all' style of your blogs.
Jim
Just caught up. So much great work. Love the engine and particularly the bumper damage. I definitely appreciate the 'warts and all' style of your blogs.
Jim
rtfoe
SMF Supporter
Steve, that's good work on the scratchery. Take note on the alignment of parts and use the lines on the work matt as a guide. I believe the parts in the last picture have not been glued yet and will need adjustment or it might pose a problem later in assembly. Everything else is fine... so much to see I'd get cross eyed if I had to do what you did.
The Padwan has done well Jedi T...
Cheers,
Richard
so much to see I'd get cross eyed if I had to do what you did.The Padwan has done well Jedi T...
Cheers,
Richard
Steve Jones
Steve Jones Scale Modelling Site
Hi Everyone
Cheers Paul. I appreciate your support mate. Now get on and do some building yourself!
They say I am Mr T's love child but I'm not so sure John . Hope you get better soon. That will teach you to sniff all that CA
There would be more "warts" Jim but we would be here all day
Thanks Greg
When it was attached to the front Richard everything squared up okay as you will now see
Cheers Paul. I appreciate your support mate. Now get on and do some building yourself!
They say I am Mr T's love child but I'm not so sure John
. Hope you get better soon. That will teach you to sniff all that CAThere would be more "warts" Jim but we would be here all day
Thanks Greg
When it was attached to the front Richard everything squared up okay as you will now see
Last edited:
rtfoe
SMF Supporter
Hi Everyone
When it was attached to the front Richard everything squared up okay as you will now see
Steve
Now I see the part above was the old plastic put there for comparison.The white plastic and metal parts are starting to overpower the rest of the kit.
Looking good. Cheers,
Richard

Steve,
See, even at this early hr He from the Darkside is on the prowl. Take heed of the wise one.
As for me..... Can't sleep, so mug of tea and the forum to while away the night.
 .
.
Question....... On the second to last photo there's a plate in white across the frame ( where the two fuel tanks are .) that detail of the lipping around the inspection hole is top rate, so small but effective.
John.
See, even at this early hr He from the Darkside is on the prowl. Take heed of the wise one.
As for me..... Can't sleep, so mug of tea and the forum to while away the night.
.Question....... On the second to last photo there's a plate in white across the frame ( where the two fuel tanks are .) that detail of the lipping around the inspection hole is top rate, so small but effective.
John.
Steve Jones
Steve Jones Scale Modelling Site
Richard - That's the look I like as well. One day I will be brave and leave as is with no paint on
Mr T/Mr Race - It's bad enough that I have to start work at 4 in the morning but to have you both blogging at 2 and 3.15 is a bit extreme. As for the springs I tried to bend them as I made them but they just sprung back to their original shape. I assume I have to use super super CA glue when I attach them to the chassis and bend them then. If you have any other suggestions from the dark side I am all ears. I would like to take credit for the support beam across the chassis JR but that is how it came off the sprue and I made it fit snugly in place
Mr T/Mr Race - It's bad enough that I have to start work at 4 in the morning but to have you both blogging at 2 and 3.15 is a bit extreme
. As for the springs I tried to bend them as I made them but they just sprung back to their original shape. I assume I have to use super super CA glue when I attach them to the chassis and bend them then. If you have any other suggestions from the dark side I am all ears. I would like to take credit for the support beam across the chassis JR but that is how it came off the sprue and I made it fit snugly in place
Last edited:
What ever mate It's still brilliant work.Richard That's the look I like as well. One day I will be brave and leave as is with no paint on
Mr T/Mr Race It's bad enough that I have to start work at 4 in the morning but to have you both blogging at 2 and 3.15 is a bit extreme. As for the springs I tried to bend them as I made them but they just sprung back to their original shape. I assume I have to use super super CA glue when I attach them to the chassis and bend them then. If you have any other suggestions from the dark side I am all ears. I would like to take credit for the support beam across the chassis JR but that is how it came off the sprue and I made it fit snugly in place
Myself I would suggest fire to bend into shape, but my experiments usually end in complete disaster. HTH
John
Jim R
SMF Supporter
Hi Steve
Gobsmacked. Every update shows just how much you are putting into this. My version is in the cabinet next to the computer as I type and it is looking more and more toy like as I watch this progress. Keep it coming.
Jim
Gobsmacked. Every update shows just how much you are putting into this. My version is in the cabinet next to the computer as I type and it is looking more and more toy like as I watch this progress. Keep it coming.
Jim
That Wouter is right,...... Dr RivetHi Doctor Jones, you are becoming more and more a scratchmaster ey. A real joy to watch this unfold. Great stuff!
Cheers

John.
Steve Jones
Steve Jones Scale Modelling Site
Hi Everyone
JR x 2 - I tried your burning method for bending mate and this is what happened
I think I will just stick to doing rivets
Thanks Mick. I think he must be related to Guy Fawkes
I know a song about that Wouter Thanks for the kind words
That's high praise indeed Jim. Those are the sorts of comments that keep the mojo up. Many thanks my friend
JR x 2 - I tried your burning method for bending mate and this is what happened
I think I will just stick to doing rivets
Thanks Mick. I think he must be related to Guy Fawkes
I know a song about that Wouter
Thanks for the kind wordsThat's high praise indeed Jim. Those are the sorts of comments that keep the mojo up. Many thanks my friend
Last edited: