Geoffers’ Revell 1/72 F4U-1B Corsair - Royal Navy

Geoffers

SMF Supporter
Joined
Jan 26, 2017
Messages
1,047
Points
113
Location
Shropshire
First Name
Geoff
Hello Chaps,

Firstly a big thank you to Karl for organising this Group Build.

This is my entry.
CEA82B75-9E5A-40BF-B931-E03FC2A454E9.jpeg

It has Revells new style instructions
FD59B657-4560-4A1D-BFD7-7C8E0A61EBAB.jpeg
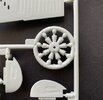
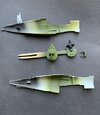
Five frames of crisp grey plastic.
4AAD84D9-AA55-4293-9696-BFFB1CF09865.jpeg

CA41CBAC-6CF8-465B-AA37-215F9D6C90F5.jpeg

9FD3D598-B9BC-4A70-8391-2EA21214F59A.jpeg
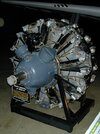
Some reasonable details for the scale.
1AD27761-3177-44A6-B238-BE3238DD2496.jpeg

ED0D69F4-FCCD-43DF-99DC-2535BA80F88A.jpeg

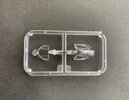
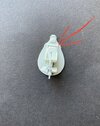
Also one small clear frame.
36533B52-6A6D-4DC9-A871-D72FBCCA944C.jpeg

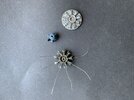
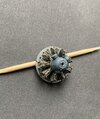
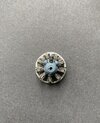
I’ll be adding some of these seat harnesses.
D4D80F72-B073-4943-A9A0-9EAE060C3613.jpeg

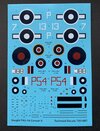
I decided against the kit markings. I’m not sure they are correct as it is my understanding that the red on the roundels were generally removed to avoid being mistaken for the Japanese Hinomaru.

So I’ll be using these instead.

AF9279B6-8E20-472A-8473-58C44D9C4C1B.jpeg

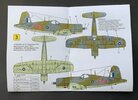
I’m going for these markings.
6E43FEAE-D4A5-4501-BA3B-F12DF9D6C9AF.jpeg
These are the actual transfers which look very nice
E19C4C26-299D-4CAD-9BDE-2163F2BC6A3B.jpeg

I won’t be doing too much with it just yet as I’ve got another couple on the go that I want to finish first.

Thanks for looking :thumb2:

Geoff.
 

Attachments

  • C08FB733-A133-432B-A8C6-44A4C4B5865E.jpeg
    C08FB733-A133-432B-A8C6-44A4C4B5865E.jpeg
    132.2 KB · Views: 3
  • 593F7FB7-C98C-43F2-9BE0-526139BF9951.jpeg
    593F7FB7-C98C-43F2-9BE0-526139BF9951.jpeg
    90.2 KB · Views: 1
  • DB168B32-E74F-4866-92D7-83DBB83CA125.jpeg
    DB168B32-E74F-4866-92D7-83DBB83CA125.jpeg
    116.6 KB · Views: 1
  • A6CBFC86-F407-4A6A-9246-83C092080925.jpeg
    A6CBFC86-F407-4A6A-9246-83C092080925.jpeg
    99.4 KB · Views: 1
Last edited:

Jim R

SMF Supporter
Joined
Apr 27, 2018
Messages
13,804
Points
113
Location
Shropshire
First Name
Jim
Looks a nice kit Geoff. Some very fragile looking parts to remove from the sprue.
 

Geoffers

SMF Supporter
Joined
Jan 26, 2017
Messages
1,047
Points
113
Location
Shropshire
First Name
Geoff
Hello Chaps,

Despite planning to finish another couple of builds I have on the go before starting this one I couldn’t resist having a little play :smiling4:

First up as nearly always is the cockpit.
IMG_2626.jpeg
Quite a few well detailed parts had to be removed and cleaned up. There was a tiny bit of flash in places but nothing a couple of swipes of a sanding stick couldn’t sort out.

These were the assembled with no real difficulty.

IMG_2627.jpeg

Painting next, should look nice under a coat of interior green.

Another update soon, thanks for looking :thumb2:

Geoff.
 

The Smythe Meister

Born to be WILD....... until about 9pm
SMF Supporter
Joined
Jan 30, 2019
Messages
5,788
Points
113
Location
Devon
First Name
Andy
Hello Chaps,

Despite planning to finish another couple of builds I have on the go before starting this one I couldn’t resist having a little play :smiling4:

First up as nearly always is the cockpit.
View attachment 480804
Quite a few well detailed parts had to be removed and cleaned up. There was a tiny bit of flash in places but nothing a couple of swipes of a sanding stick couldn’t sort out.

These were the assembled with no real difficulty.

View attachment 480805

Painting next, should look nice under a coat of interior green.

Another update soon, thanks for looking :thumb2:

Geoff.
Apologies Geoff,I missed the start of this one until now. :sad:
It certainly looks a nice kit,and,as you say,some pretty good details. ;)
Looking forward to seeing how you go about it. :smiling3:
Andy
 

colin m

Moderator
Staff member
Moderator
SMF Supporter
Joined
Dec 26, 2008
Messages
8,608
Points
113
Location
Stafford, UK
First Name
Colin
I do believe Geoff, you're the only Corsair in this GB. Which also happens to be a very popular aircraft with many people. So, errr, come along Geoff, I need my Corsair fix.
 

Geoffers

SMF Supporter
Joined
Jan 26, 2017
Messages
1,047
Points
113
Location
Shropshire
First Name
Geoff
Nice looking kit, bit small for my fat fingers though....

Cheers Karl, I’m used to 1/72 but some of the parts do seem very tiny :surprised:

I do believe Geoff, you're the only Corsair in this GB. Which also happens to be a very popular aircraft with many people. So, errr, come along Geoff, I need my Corsair fix.
Thanks Colin, I’m surprised there aren’t more Corsairs being built. I’ve not had much time at the bench recently due to family issues but will hopefully be able to get cracking with the build soon :thumb2:
Geoff,
Sorry late to the party, I will pull up a chair.
No probs Scottie, not much of a party going on so far but glad to have you along ;)

Geoff.
 

Geoffers

SMF Supporter
Joined
Jan 26, 2017
Messages
1,047
Points
113
Location
Shropshire
First Name
Geoff
Hello Chaps,

Finally managed to get a bit more bench time this week and have managed a bit of progress :smiling4:

First up I’ve added some framework behind the pilot seat which the seat harness attaches to.

Like this.
IMG_2685.jpeg

Before
IMG_2627.jpeg

After
IMG_2682.jpeg

I used some Evergreen plastic rod for this which was relatively straightforward.

The cockpit parts have then all been given a coat of Vallejo model air 71.137 U.S. light green.

IMG_2683.jpeg

I’ve also been working on the engine.

These are the main parts and are reasonably detailed for the scale.

IMG_2675.jpeg

However I wanted to try and get a bit closer to this.

IMG_2681.jpeg

I drilled a couple of holes in each piston before painting the parts with Vallejo metal Color 77.703 Dark Aluminium.
I then used. Ava glue to fix a small section of 5amp fuse wire into the previously drilled holes.
These lengths have been given a rub with AK True Metal AK460 Brass.
They will be bent and cut to length once everything has had chance to dry properly
But for now it looks a bit spidery :anguished:

IMG_2684.jpeg

That’s as far as I’ve got but hopefully will be able to update again soon.

Thanks for looking :thumb2:

Geoff.
 

Attachments

  • IMG_2684.jpeg
    IMG_2684.jpeg
    115.3 KB · Views: 1
  • IMG_2681.jpeg
    IMG_2681.jpeg
    104.7 KB · Views: 1
  • IMG_2683.jpeg
    IMG_2683.jpeg
    114 KB · Views: 0
  • IMG_2682.jpeg
    IMG_2682.jpeg
    127.7 KB · Views: 0
  • IMG_2683.jpeg
    IMG_2683.jpeg
    114 KB · Views: 0

Geoffers

SMF Supporter
Joined
Jan 26, 2017
Messages
1,047
Points
113
Location
Shropshire
First Name
Geoff
Hello Chaps,

Another quick update :smiling4:

The cockpit and engine have been finished.

IMG_2705.jpeg

The wiring added to the engine was trimmed and bent into position before the parts were cemented into place. A wash from Tamiya Panel liner has helped define some of the details and some of the bolts have been highlighted with silver paint.

IMG_2706.jpeg

IMG_2707.jpeg

The cockpit has had the various decals added, along with some dirtying up with a wash.

The seatbelts are 3D decals which I thought would be better than PE however now they are in place I’m not that impressed :confused:

IMG_2708.jpeg
IMG_2711.jpeg
IMG_2709.jpeg
IMG_2710.jpeg
The build should go together quite quickly now the fiddly parts are done.

Hopefully another update soon, thanks for looking :thumb2:

Geoff.
 

Attachments

  • IMG_2707.jpeg
    IMG_2707.jpeg
    133.9 KB · Views: 1
  • IMG_2706.jpeg
    IMG_2706.jpeg
    143.6 KB · Views: 1

The Smythe Meister

Born to be WILD....... until about 9pm
SMF Supporter
Joined
Jan 30, 2019
Messages
5,788
Points
113
Location
Devon
First Name
Andy
Some nice work on the fiddly stuff there Geoff,the seatbelts look pretty good from where I'm sitting :thumb2:,and as for the motor, well that's most excellent :cool:.
Good stuff mate!
 
Top