Grant CDL in 1:35

Jakko

Way past the mad part
SMF Supporter
Joined
Apr 28, 2018
Messages
10,839
Points
113
First Name
Jakko
Thanks, I’ve now added more paint and also tracks:
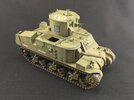
9E3E50CD-86BC-42E3-BE52-5B9229D19E80.jpeg

I’ve dirtied up the model with a wash of Revell dark earth, fairly thin along the lower parts, thinner still over the rest of the vehicle, because I want it to appear a bit dirty but not filthy from having been in the field for a longer period of time. It needs some more work, and also some more scrubbing back the dirt (by painting OD and similar over the top of it) to show traces of the vehicle having actually been used after the dirt got on it.

If the colour seems different, then that’s because I’ve used my new black background for the portable photo studio (just a piece of cloth with velcro sewn to two sides so I could put it in), and that affects the colour of the model.
 

Tim Marlow

Little blokes aficionado
SMF Supporter
Joined
Apr 27, 2018
Messages
16,798
Points
113
Location
Somerset
First Name
Tim
Thanks, I’ve now added more paint and also tracks:

View attachment 476893

I’ve dirtied up the model with a wash of Revell dark earth, fairly thin along the lower parts, thinner still over the rest of the vehicle, because I want it to appear a bit dirty but not filthy from having been in the field for a longer period of time. It needs some more work, and also some more scrubbing back the dirt (by painting OD and similar over the top of it) to show traces of the vehicle having actually been used after the dirt got on it.

If the colour seems different, then that’s because I’ve used my new black background for the portable photo studio (just a piece of cloth with velcro sewn to two sides so I could put it in), and that affects the colour of the model.
Looking good Jakko. It’s come out really well. Your black background isn’t affecting the colour, by the way….what is happening is that the camera sensor is trying to make the black into a mid grey so it is overexposing the image and washing out the colour intensity.
 

Jakko

Way past the mad part
SMF Supporter
Joined
Apr 28, 2018
Messages
10,839
Points
113
First Name
Jakko
what is happening is that the camera sensor is trying to make the black into a mid grey so it is overexposing the image and washing out the colour intensity.
I know, but the net effect is that the colour of the model in this photo looks different than in the last one, which is what I was trying to get across :smiling3:
 

The Smythe Meister

Born to be WILD....... until about 9pm
SMF Supporter
Joined
Jan 30, 2019
Messages
5,749
Points
113
Location
Devon
First Name
Andy
Thanks, I’ve now added more paint and also tracks:

View attachment 476893

I’ve dirtied up the model with a wash of Revell dark earth, fairly thin along the lower parts, thinner still over the rest of the vehicle, because I want it to appear a bit dirty but not filthy from having been in the field for a longer period of time. It needs some more work, and also some more scrubbing back the dirt (by painting OD and similar over the top of it) to show traces of the vehicle having actually been used after the dirt got on it.

If the colour seems different, then that’s because I’ve used my new black background for the portable photo studio (just a piece of cloth with velcro sewn to two sides so I could put it in), and that affects the colour of the model.
Just caught up with this one Jakko :smiling3:
... Looking superb mate..
... Loving the paint job and tracks especially. ;)
 

Jakko

Way past the mad part
SMF Supporter
Joined
Apr 28, 2018
Messages
10,839
Points
113
First Name
Jakko
Thanks. The tracks were painted in my now usual way: earth/rust colour for the metal parts, followed by drybrushing with a gun metal colour for where they would have been rubbed bare. Then dark grey for the rubber with a wash made from thinned-down Indian ink over that, and when that was dry, drybrushing with a medium–dark grey. I then added the same dirt wash as on the rest of the tank, taking care to keep the running surfaces (on both sides) clean, but it didn’t show up as well as I wanted it to in the openings between the track blocks. Then I had to drybrush the metal again because it had gone rather dull.
 

Scratchbuilder

SMF Supporter
Joined
Jul 2, 2022
Messages
1,948
Points
113
First Name
Mike
Jakko,
For some reason I kept missing your build on this model, have now caught up and what a splendid job you have done.
Mike.
 

Jakko

Way past the mad part
SMF Supporter
Joined
Apr 28, 2018
Messages
10,839
Points
113
First Name
Jakko
Thanks, Mike :smiling3: It still needs a little more work, but the finish line is in sight …
 

adt70hk

I know its a bit sad but I like quickbuild kits!!!
SMF Supporter
Joined
Sep 4, 2019
Messages
9,507
Points
113
First Name
Andrew
Coming on nicely Jakko!
 

Allen Dewire

Proud Rabble Member
SMF Supporter
Joined
Apr 27, 2018
Messages
4,105
Points
113
Location
Bamberg
First Name
Allen
You gotta love that finish Jakko!!! Excellent job and getting nearer to the finish line now, eh!!! Nice work....

Prost
Allen
 

Jakko

Way past the mad part
SMF Supporter
Joined
Apr 28, 2018
Messages
10,839
Points
113
First Name
Jakko
Thanks, though I don’t think I’m that good of a painter :smiling3: Which I will prove when I show the photos of the figure that will go into the open hatch ;)
 

Mickc1440

SMF Supporter
Joined
Apr 27, 2018
Messages
4,264
Points
113
Location
Sheffield
First Name
Mick
Just had a catch up and that's turned out really nice Jakko, great paint job
 

Jakko

Way past the mad part
SMF Supporter
Joined
Apr 28, 2018
Messages
10,839
Points
113
First Name
Jakko

JayCee

SMF Supporter
Joined
Aug 13, 2019
Messages
1,002
Points
113
First Name
John
You never fail to impress, Jakko. Looking really good.
John.
 
Top