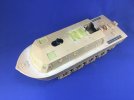
Land-Wasser-Schlepper No. 1071

Jakko

Way past the mad part
SMF Supporter
Joined
Apr 28, 2018
Messages
10,793
Points
113
First Name
Jakko
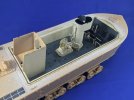
After the off-white interior, I added a wash made from Vallejo German dark yellow, followed by heavy drybrushing with Army Painter pale flesh (much the same colour as the Portland Stone base) and lighter drybrushing with white to highlight the details:
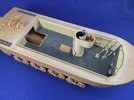
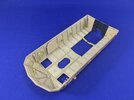
90160A1D-C7D6-4261-841C-16236D31CD98.jpegCD8D7652-0CD0-4729-9BCB-E0AA68BBCF76.jpeg

I still need to paint most of the details, but did apply Panzer grey to the centre of the rear wall, because it will be hard to spray once the cabin is on the hull. Bronco indicates this rear area should be in the interior colour, but on the real vehicle it was painted like the outside, because it was on the outside :smiling3:

Also, I took the masking tape off the insides of the windows, mainly so I won’t forget to later (I know myself pretty well …).
 

Jakko

Way past the mad part
SMF Supporter
Joined
Apr 28, 2018
Messages
10,793
Points
113
First Name
Jakko
13C6AFCD-F3E9-482E-B424-436A2AAFA555.jpegE1D785FF-51E3-45CC-BB6D-CF44FC183451.jpeg

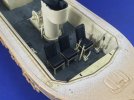
This is most of the interior finished now, except for mainly the dashboard. The seats were fun, several legs had to be glued back on during painting and when I glued the seats to the floor, all four legs of the last (rightmost) one snapped off entirely :sad: Getting them all back on the seat and then the seat to the floor with wet glue at eight points was a bit of a juggling act, and the seat still looks a little crooked.
This model reminds me of aircraft kits: with those, you spend what feels like ages plodding on working on the cockpit with very little to show for it, and then when that’s done you can glue the fuselage halves together and the model suddenly seems to go much quicker. This one looks like it will be much the same, so I’m nearly there :smiling3:
 

Jim R

SMF Supporter
Joined
Apr 27, 2018
Messages
13,724
Points
113
Location
Shropshire
First Name
Jim
Hi Jakko
Nicely done interior. Hope you're right and the rest is straightforward.
Jim
 

Jakko

Way past the mad part
SMF Supporter
Joined
Apr 28, 2018
Messages
10,793
Points
113
First Name
Jakko
After I can get the top on, it looks like it’ll just be glueing bits to the outside :smiling3: Well, other than the woven bumpers that I will have to scratchbuild because they’re not in the kit, and the only options for them are inaccurate resin ones that may no longer be available, or real woven ones that look like they’re only made to order and would have to come from Canada … in which case the model could go back on the shelf for quite a while, I suspect. Most likely, I’ll be making them from two-part epoxy putty and hope they come out OK.
 

Jim R

SMF Supporter
Joined
Apr 27, 2018
Messages
13,724
Points
113
Location
Shropshire
First Name
Jim
I've seen someone on YouTube make those woven bumpers. I'm sorry but I can't remember where or when but you seem to be good at finding stuff on the web ;) Might be worth a look.
 

Jakko

Way past the mad part
SMF Supporter
Joined
Apr 28, 2018
Messages
10,793
Points
113
First Name
Jakko
I found the manufacturer’s site earlier, but I haven’t looked for how to do this myself. What I did see on that site, though, made me think I don’t want to bother with thread and needles and all that, and just stick to what I know …
 

Jakko

Way past the mad part
SMF Supporter
Joined
Apr 28, 2018
Messages
10,793
Points
113
First Name
Jakko
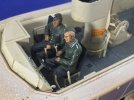
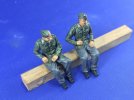
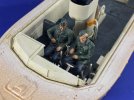
The two crewmembers to go into the cab are also done now:

98E7C4A0-9266-4339-9230-D8A3F781DEB2.jpeg

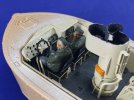
These are from the Tamiya Sd.Kfz. 9 kit, and though I never built or even bought that, I do have the figures from it because someone gave them to me long enough ago that I don’t even remember when or who that was … They will do nicely here, as they’ll be largely hidden inside the vehicle. That’s also why I painted them quickly with the wash-and-drybrush method — well, that, and I don’t really like painting figures due to the shading and highlighting involved, so this was the easy way out :smiling3:

Here they are in their seats:

9CCCADD7-3EB3-4434-8370-A1E082907BAB.jpegCA4FA751-8ED3-4D0B-A416-8A7F125FA074.jpeg
 
Last edited:

Tim Marlow

Little blokes aficionado
SMF Supporter
Joined
Apr 27, 2018
Messages
16,777
Points
113
Location
Somerset
First Name
Tim
They will do the job alright :thumb2:

Driver looks like private Godfrey to me….I think it’s the smile ;)
 

Jakko

Way past the mad part
SMF Supporter
Joined
Apr 28, 2018
Messages
10,793
Points
113
First Name
Jakko
Thanks :smiling3: They fit very nicely in the seats, I must say, though it’s partly because I of course selected legs that did fit reasonably well. Still, I think that set of figures is very handy to have if you need German vehicle drivers or passengers occasionally.

But I thought Godfrey had been a medic, not a vehicle driver … ;)
 

Tim Marlow

Little blokes aficionado
SMF Supporter
Joined
Apr 27, 2018
Messages
16,777
Points
113
Location
Somerset
First Name
Tim
Yep, you are correct. As a medic Godfrey got the MM at the battle of the Somme…..which was also where Arnold Ridley, the actor playing him, almost lost the use of his arm. Ridley actually served right through the first world war, being wounded several times, being left with recurring black outs due to injury. Despite that, he immediately volunteered at the outbreak of WW2, serving in France throughout the phoney war, being evacuated out of Boulogne on the last destroyer to leave. Invalided out after that he promptly volunteered and served in the home guard for the rest of the war! Oh, and he also wrote the wonderful play “the ghost train”.
 

Jakko

Way past the mad part
SMF Supporter
Joined
Apr 28, 2018
Messages
10,793
Points
113
First Name
Jakko
It’s a common mistake — it’s actually a life preserver :smiling3: That’s why I painted it yellow-orange, rather than as metal or canvas.

After comments made elsewhere by someone who knows a lot more about this than I do, I painted a skill badge on the left-hand crewman’s upper sleeve to represent his being a Steuermann (lit. “Steerman”, approximately “coxswain”), and I also promoted him to Unteroffizier (Sergeant) with some more white paint:

25EE8FC9-75D9-4216-A3EC-697637E0C8EB.jpeg

That done, I taped up the hatch openings in the roof and the rear door:

5530FFD4-4A42-48B9-A91C-3BE318EA2876.jpeg

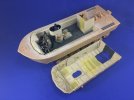
… and then glued the cabin to the hull:

317844C9-810A-4813-97D2-12CF7EDF9334.jpeg

This was a little tricky, but as I had dry-fitted it lots of times it wasn’t really a problem. Once it was fully in place, I ran liquid cement into the joint and let it set. The fit, once the two are pressed together, is good enough that it doesn’t need clamping.
 

Jakko

Way past the mad part
SMF Supporter
Joined
Apr 28, 2018
Messages
10,793
Points
113
First Name
Jakko
Who’s Josef? :smiling3:
 

MAK2020

SMF Supporter
Joined
Sep 25, 2021
Messages
121
Points
63
First Name
MAK2020
Who’s Josef? :smiling3:
Joke. You are Josef, mechanical engineer in some German machine construction bureau.

It is gernerally joke in Croatia (on Germans :smiling3: ), not so widespread, but in situation when somebody do somethig good, anybody will understand.
:smiling3:
 

Jakko

Way past the mad part
SMF Supporter
Joined
Apr 28, 2018
Messages
10,793
Points
113
First Name
Jakko
Ah, OK :smiling3: Unfortunately it went over my head, but thanks for the compliment in that case :smiling3:
 

minitnkr

Rabble & escape committee member
SMF Supporter
Joined
Apr 27, 2018
Messages
6,717
Points
113
Location
Dayton, OH
First Name
Paul
Beautiful job. I take it the sgt. goes down w/the ship as only one preserver?
 
Top