Revell 1/72 B17-G Flying Fortress.

spanner570

SALAD DODGER
SMF Supporter
Joined
May 26, 2009
Messages
13,006
Points
113
First Name
Ron
Apart from the prospect of some good G.B's or two, this will hopefully be my main winter project. ;)

P1350224.JPG


What an advancement from the B-17 I built in the '60's. which eventually ended up here on Scale Models wrapped around some airfield huts!

We made it....just! 106.jpg


The detail on this new kit is terrific. It would be bonkers of me to build it without the internal detail. More bonkers still, to waste my time building it complete, only to button all up! So I intend to build the complete kit and hack off parts of the portside fuselage to show all the otherwise unseen luuurvally detail.

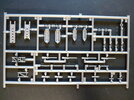
Sprue shot? I'll give you sprue shots- All 237 pieces! All packed into a model around 12" long.......

P1350225.JPG


P1350226.JPG

Closer detail...
P1350227.JPG


P1350228.JPG


P1350230.JPG


P1350231.JPG


P1350233.JPG


P1350234.JPG


P1350235.JPG

A huge amount of clear plastic means a lot of painting to reveal the windows and general metal framework. (Multi. choice in some cases)
P1350232.JPG

One or two decals.
P1350229.JPG

....and where to stick them! Plenty of different colours too.
P1350238.JPG

...and more!
P1350237.JPG

Simple, straight forward instructions. Follow the arrows and this bit goes there. Can't go wrong:cold-sweat:
P1350239.JPG


Finally, my work bench / den, all tidied up and ready for some action.:upside:
P1350247 (2).JPG

Cheers.
Ron
 

Attachments

  • P1350231.JPG
    P1350231.JPG
    179.6 KB · Views: 5

Mini Me

SMF Supporter
Joined
Jun 1, 2018
Messages
10,160
Points
113
First Name
Rick
Not sure about dissecting a perfectly good bomber......but I do recall seeing quite a few of these in film clips that made it back safely after being pretty well ventilated by them kraut flyboys. Might look the part if you can make your surgery look like battle damage 570.... I'm parked in the back to keep from getting pelted with popcorn !! :thumb2:
 

rtfoe

SMF Supporter
Joined
Apr 29, 2018
Messages
7,516
Points
113
Location
Malaysia
First Name
Richard
I'd be cooked in a set up like yours in my neck of the woods but it looks cosy with a good view.
I'm guessing the kit is manufactured in Germany from the detailed sprues you have laid out. Looks like something worth getting. Pulling up a chair to watch this one Ron.

Cheers,
Richard aka Wabble
 

Jim R

SMF Supporter
Joined
Apr 27, 2018
Messages
13,746
Points
113
Location
Shropshire
First Name
Jim
That does indeed look very nice Ron. With the very cold weather we are having at the moment that cosy den looks the best place to be. I'll enjoy following along.
 

spanner570

SALAD DODGER
SMF Supporter
Joined
May 26, 2009
Messages
13,006
Points
113
First Name
Ron
Thanks for the humorous and varied posts chaps. All well appreciated for sure.

Rick. Much as it's good thinking, I can't attempt your battle damaged idea simply because to show all of the internal detail, most of the port side fuselage would have to go. Rather too much 'Damage' I fear.

I'm certainly not going down the (To me) daft route of going to the trouble of adding all the inside detail, only to have it all disappear when the two halves of the aircraft are joined. Life is way too short for such things..... ;)


Your good buddy.

1st. Lt. Paul R. McDowell (Pilot)
 

spanner570

SALAD DODGER
SMF Supporter
Joined
May 26, 2009
Messages
13,006
Points
113
First Name
Ron
As it was a bit brisk outside this last week or so, I've made a start on this aircraft.

After a bit of pondering and loads of hesitation, I've decided to go ahead with me 'Exploded' B-17G. The port side will be open to the world.........

Here's where I'm at at the minute.

After seeing where the various bulkheads will go, I marked out the areas to be removed as close as I dared to the aforementioned thingies.
P1350534.JPG


P1350535.JPG


Then, I took a step back. Should I being even contemplating this? So, after consuming a can of best ale to calm me down, I wound up my 'Poundshop' Dremel lookalike, and set too.

Here's the initial surgery. I used a 2mm twist drill and be assured, no animals were hurt during the exercise.....
P1350549.JPG

Damn fine grouping from the A.A. 88's, what!
P1350550.JPG


The initial cleaning up. With the twist drill still pounding away, I ran it along, breaking out the plastic between the drillings.
P1350553.JPG

P1350551.JPG

P1350555.JPG


Then I removed the drill bit, fitted a diddy abrasive wheel into the chuck and went to work smoothing out the cuts.
P1350557.JPG

P1350556.JPG

P1350559.JPG


After a few minor alterations to remove a bit more plastic to increase the viewing area, I brushed on a second coat of Vallejo Air Aluminyuum to obliterate any pencil marks still showing.
P1350560.JPG

There you go. Job done and am I glad that part of the build is behind me.

Now I can follow the instructions.....

Cheers.
I. Ada Swetton
 
Last edited:
Top