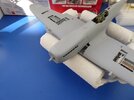
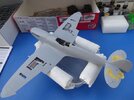
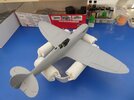
1/24 Airfix Spitfire (the new one)

Neil Merryweather

SMF Supporter
Joined
Dec 29, 2018
Messages
4,461
Points
113
Location
London
First Name
Neil
I made the fuselage join before I glued the leading and trailing edges together, it just gives you the small amount of movement needed and a leading edge is much simpler to sort out than the fuselage/wing join. In fact there is little that will need to be done.
This is a step well known to those of us who build models of aeroplanes and it can be, to put it mildly, a bit of a jostle. This was pretty straightforward, so well done Airfix.
That's a new one on me, hope I remember it next time I build a wingy thingy.
Thanks for sharing, oh wise one!
 

stona

SMF Supporter
Joined
Jul 22, 2008
Messages
11,491
Points
113
First Name
Steve
The engine, the engine.
So, the engine looks nice enough that I was really tempted to build it. However, I know that this model will end up being displayed closed up. I am not going to build the engine in its entirety, so this thread becomes irrelevant for a while for those who will.
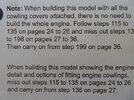
The instructions are clear that you can build the engine and still have the option to fit the panels, though the build sequence is different. The instructions on this, and everything else, are very good.

destructions.jpg

Because I will never pose this model with panels off and because I'm a lazy b*gger, I'm taking the route outlined above, steps 115-135 before carrying on from step 199.

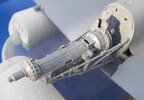
Here is almost as much of the engine as I will build. I haven't worried too much about doing anything other than slapping it together. The bearers are not yet glued into the firewall and the engine (such as it is) is not glued to the bearers. All that will be done in conjunction with the panels when hopefully it will all fit.

engine.jpg
 

Tim Marlow

Little blokes aficionado
SMF Supporter
Joined
Apr 27, 2018
Messages
16,874
Points
113
Location
Somerset
First Name
Tim
Very nice work. Must be a wrench not displaying the engine though….
 

stona

SMF Supporter
Joined
Jul 22, 2008
Messages
11,491
Points
113
First Name
Steve
This will be the last update for a few days as I'm off to work tomorrow. There strikes on public transport in the Netherlands at the moment, so I'm looking forward to getting to and from the venue!

So...the nose.

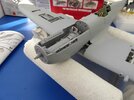
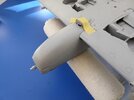
I've already made the decision to build the nose 'closed', so I thought I'd follow the instructions for this method. Well, I couldn't! If you can make them work, building the entire nose, on nothing, in mid air, you're a better man than me. My advice? Leave the engine to firewall join unglued to give some play. Fit the two side panels which have a positive fit, you can't get them wrong. Fit the lower cowling, initially in two halves (I taped them together) and make sure each side fits with its respective side panel. Now, several stages later than the instructions, fit the spinner backplate and glue the two halves of the bottom cowling together and to it.

You end up with something like this:

P1010626.JPG

Other side, bottom:

P1010627.JPG

Onto which the top cowling should drop nicely:

P1010628.JPG

Clearly there is a little tidying up to do and one or two things can now be fixed in place, but overall it has gone together quite nicely, just not the way Airfix said it would!
 

Jakko

Way past the mad part
SMF Supporter
Joined
Apr 28, 2018
Messages
10,954
Points
113
First Name
Jakko
There strikes on public transport in the Netherlands at the moment
Only local public transport, though, so if you need to take a train you’re probably good. Unless it’s Ariva, in which case you may or may not, I gather.
 

stona

SMF Supporter
Joined
Jul 22, 2008
Messages
11,491
Points
113
First Name
Steve
Only local public transport, though, so if you need to take a train you’re probably good. Unless it’s Ariva, in which case you may or may not, I gather.
Thanks Jakko.
I'll take some kind of train from Schipol to the RAI (rather than going all the way in to the central station) assuming I can get one. I usually take the Metro back and forth between there and the hotel, so hopefully GVB is not on strike. It's only one stop or quite a long walk!
 

tr1ckey66

SMF Supporter
Joined
Mar 6, 2009
Messages
3,686
Points
113
First Name
Paul
Excellent progress Steve.
It’s interesting to get your take on assembling the main wing spar and the fit of the engine cowls, these areas seem to require a particularly careful approach. I think I will build at least one of my 2 kits with the full engine in and try to get the cowlings detachable with magnets. Doing it this way is fraught with danger though and there’s every chance of getting things out of alignment. Your Spit looks beautifully aligned and is coming together really nicely. Are there enough parts to build a separate Merlin engine to display externally?

Cheers
Paul
 

Jakko

Way past the mad part
SMF Supporter
Joined
Apr 28, 2018
Messages
10,954
Points
113
First Name
Jakko
I'll take some kind of train from Schipol to the RAI (rather than going all the way in to the central station) assuming I can get one.
In that case, you should be good. Ariva only runs trains in the east and north, but up in Holland, as well as in more normal parts of the country, they’re all NS and that’s not on strike as they don’t fall under the local public transport collective labour agreement. No idea about the Amsterdam metro, though — they might be.
 

stona

SMF Supporter
Joined
Jul 22, 2008
Messages
11,491
Points
113
First Name
Steve
Hi Jakko.

The Metro is good. I took a 'Sprinter' train from Schipol to the RAI (had to call in to pick up some passes) and then metro to Overamstel...all good.
 

stona

SMF Supporter
Joined
Jul 22, 2008
Messages
11,491
Points
113
First Name
Steve
I think I will build at least one of my 2 kits with the full engine in and try to get the cowlings detachable with magnets. Doing it this way is fraught with danger though and there’s every chance of getting things out of alignment. Your Spit looks beautifully aligned and is coming together really nicely. Are there enough parts to build a separate Merlin engine to display externally?

Cheers
Paul
Hi Paul, Airfix seem to believe that the cowlings will fit with the complete engine inside, as this is one of the 'threads' (for want of a better term) in the instructions. I can't vouch for it though!

There are certainly enough bits to build the engine as a separate display. You could do that and still complete the model, though you would have to come up with some means of attaching the propeller...surely not beyond the wit of man :smiling3:
 

wotan

SMF Supporter
Joined
May 16, 2018
Messages
1,045
Points
113
Location
Quebec
First Name
John
Steve

I know I keep going on about this but on Nigel's modelling bench, on Youtube he is building this Spitfire and he has carefully modelled and fettled the engine compartment to contain the full engine build AND to fit the engine cowling panels so that they are detachable and fit well. Just for anyone who wants to give it a try.

John
 

stona

SMF Supporter
Joined
Jul 22, 2008
Messages
11,491
Points
113
First Name
Steve
Just to prove I'm still at it, I have had a chance to fiddle with the empennage today. I've been unfeasibly busy for someone who is supposed to be winding back on work, but I should have a chance to make some good progress over the next couple of weeks.
There's not much to see, a lot of this is just taped on. I have to put the labels on because I can never remember which bit goes on which side!

P1010630.JPG

It all fits very nicely....and it's getting very big.
 

yak face

Wossupwidee?
Staff member
Moderator
SMF Supporter
Joined
Jun 13, 2009
Messages
12,443
Points
113
Location
sheffield
First Name
tony
Looking really good steve , cheers tony
 

stona

SMF Supporter
Joined
Jul 22, 2008
Messages
11,491
Points
113
First Name
Steve
I spent a while yesterday cleaning up and fitting various panels. I won't post a picture because the model looks exactly like it did in the previous post, just with less holes in it.

My mind has, however, turned towards the painting. I've used Sovereign Hobbies' Colourcoats (which are enamels) on the interior but fancy using MRP's 'acrylic lacquers' for the exterior. This is not about ease of use, I've been spraying enamels for years and find them very easy to use. Thinning does not bother me at all. I have used the MRP paints once before, also finding them easy and simple to use. They spray straight out of the bottle and seem almost like inks.
This is about the colours. The more, ahem, experienced among us will remember the fold out sheet of '32 facsimile colour chips' at the back of the RAF Museum's 1976 publication and imaginatively titled 'British Aviation Colours of World War Two'. To my eye Colourcoats have always been a good match for these colours, one of the principle reasons I have used them.

So how does MRP compare?

Armed with an airbrush, some plastic from a milk bottle, a decent digital camera, what passes for natural light at this time of year and absolutely zero aptitude for anything photographic I made a comparison. I'll emphasise that point, It's a comparison! Given my photographic ineptitude, the vagaries of you computer or phone screen, etc. this is not intended to show the exact properties of the two sets of colours.
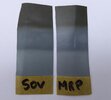
P1010632.JPG

There's nothing in it. I would say that MRP's Ocean Grey (middle colour) may be a little bluer but otherwise, comparing two models finished in each set of paints, I doubt you could tell which which.

So, MRP it will be, I've bought the things now anyway! Of course, I'll have to finish building the model first.
 

adt70hk

I know its a bit sad but I like quickbuild kits!!!
SMF Supporter
Joined
Sep 4, 2019
Messages
9,526
Points
113
First Name
Andrew
As you say Steve, nothing in it.

Looking forward to seeing the painted plane.

ATB.

Andrew
 

stona

SMF Supporter
Joined
Jul 22, 2008
Messages
11,491
Points
113
First Name
Steve
Sometimes, when a very familiar shape emerges, it's worth a picture:

P1010633.JPG

Airfix took the curious decision not to make the elevator and rudder posable, for which I don't blame them, all those rods and photo-etch hinge parts typical of a Tamiya kit would seriously push up the price, but the trim tabs themselves are moveable.
 

adt70hk

I know its a bit sad but I like quickbuild kits!!!
SMF Supporter
Joined
Sep 4, 2019
Messages
9,526
Points
113
First Name
Andrew
Looking very good Steve!
 

tr1ckey66

SMF Supporter
Joined
Mar 6, 2009
Messages
3,686
Points
113
First Name
Paul
Steve
Every time I build a Spit, as soon as the wings go on, I just have to admire the shape. The form is simply perfect.
Your Mk. IX is really coming along. I’m taken aback a bit by the speed of build. A quality build (as usual) but much faster than my glacial pace.
Looking forward to seeing yours with some paint on.
Cheers
Paul
 
Top