You are using an out of date browser. It may not display this or other websites correctly.
You should upgrade or use an alternative browser.
You should upgrade or use an alternative browser.
1/24 Airfix Spitfire (the new one)
- Thread starter stona
- Start date
stona
SMF Supporter
- Joined
- Jul 22, 2008
- Messages
- 11,481
- Points
- 113
- First Name
- Steve
It was drying at the nozzle. Once you get some deposition it seems to seed more , not an exclusive property of MRP I hasten to add.Never tried MRP, but if it’s drying in the cup perhaps try fitting a cup cover to minimise evaporation? If the AB doesn’t come with one some clingfilm with a hole pricked in it to let the pressure equalise will work…..
It did dry in the cup, but that was because of the time taken to outline a colour and then start filling in. I think I mentioned above that if you were just spraying one colour parts (like a spinner or gear doors blades) or against masking it would not be an issue. That it did is not at all unreasonable and not a criticism on my part, just an observation.
I've been experimenting with acrylics, I'm normally an enamel guy too. I have also experienced the nozzle drying issue. I've found thinning a lot more than normal helps to prevent the frequency of tip drying, but it does require more coats. Anyway, your Spitfire is looking great Steve.It was drying at the nozzle. Once you get some deposition it seems to seed more , not an exclusive property of MRP I hasten to add.
It did dry in the cup, but that was because of the time taken to outline a colour and then start filling in. I think I mentioned above that if you were just spraying one colour parts (like a spinner or gear doors blades) or against masking it would not be an issue. That it did is not at all unreasonable and not a criticism on my part, just an observation.
stona
SMF Supporter
- Joined
- Jul 22, 2008
- Messages
- 11,481
- Points
- 113
- First Name
- Steve
The MRP stuff is thinned and ready to go out of the bottle. I guess that you could thin it more, but you'd risk having other issues.
Again, my problem is the time taken to freehand a camouflage scheme like this. You have to spray close to the surface and keep manipulating the model so that you always spray away from the intended demarcation whilst following an outline. It just takes time and paints that dry quickly will dry! I simply took for granted how relatively easy this is to do with a slow drying enamel.
Again, my problem is the time taken to freehand a camouflage scheme like this. You have to spray close to the surface and keep manipulating the model so that you always spray away from the intended demarcation whilst following an outline. It just takes time and paints that dry quickly will dry! I simply took for granted how relatively easy this is to do with a slow drying enamel.
Hi Steve. Just been catching up with this. You are doing your usual great job on this excellent kit.
I have probably been using MRP, exclusively, longer than anyone here and I have never had any tip dry at all.
I can see how taking a long time freehanding a camo might give rise to this. It is only because of the confidence I gained in MRP that I freehanded my 1/32 ZM Ta152, my first time painting a camo like that. I have since free handed several times like this without tip dry, but mostly using clever putty camo masking.
Thinking back, I do remember adding a little MLT (no more than 10%) when spraying at about 7-9 psi when doing this, just sufficient psi to atomise and using an airbrush that I had just deep cleaned (mostly, I spray at 10-15psi). Perhaps that all helped. I do tend to deep clean before free handing any detail or camo.
Actually, thinking back I have once suffered tip dry. It was a hot summer day when using an airbrush I had not deep cleaned as often as I usually did. It was also a long session and I was pushing it to get the job done. I put it down to my cleaning discipline failing and over confidence in the paint. I am sure that does not apply to you though!
Well, even MRP is clearly not perfect!
stona
SMF Supporter
- Joined
- Jul 22, 2008
- Messages
- 11,481
- Points
- 113
- First Name
- Steve
Thanks for that considered reply Barry. I know you have a lot of experience with these paints! No paint is perfect and I do like the MRP paints. In general use they spray beautifully and I'll certainly be using them again. I suspect freehand camouflage on such a large model may have been an ill advised first use on my part.
I've bought the colours to do the national markings which will, of course, be masked. I can't imagine that I will have any problem with them, unless self inflicted
I've bought the colours to do the national markings which will, of course, be masked. I can't imagine that I will have any problem with them, unless self inflicted

stona
SMF Supporter
- Joined
- Jul 22, 2008
- Messages
- 11,481
- Points
- 113
- First Name
- Steve
I've started spraying the markings. Time is an issue, but I've had a couple of hours to get the two fuselage roundels done (there is one on the other side).
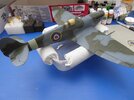
I've used a set of generic 'Spitfire' masks from Maketar who fortunately do some in this scale. I've previously used 1/24 custom masks from Mal's Masks, but I don't think he's still doing them.
I've used MRP again for the markings with no drama. The colours are close enough, there are some more accurate available if you are a fully signed up colour nerd.
Next up the fin flashes and code letters, just leaving the easy to do upper and lower wing roundels to finish off. Sadly, I don't have masks for the serial numbers/letters in this scale, so I'll use the decals.
stona
SMF Supporter
- Joined
- Jul 22, 2008
- Messages
- 11,481
- Points
- 113
- First Name
- Steve
This afternoon I have managed to finish spraying all the markings that will be sprayed.
This is where the fast drying nature of the MRP paints has really been a big advantage. I started of being a bit circumspect about masking colours, leaving them for half an hour or so. Eventually I became braver and masked after about ten minutes. I suspect you could do it even sooner than that. It meant that you could spray, say, a pair of three colour roundels like those on the underside of the wings (red ,white and blue) in less than half an hour, which is very nice indeed! I'm used to leaving a couple of hours (at least) between colours.
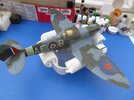
I'm hoping to get some varnish on and start decals by the end of the week. The best laid plans....etc.
This is where the fast drying nature of the MRP paints has really been a big advantage. I started of being a bit circumspect about masking colours, leaving them for half an hour or so. Eventually I became braver and masked after about ten minutes. I suspect you could do it even sooner than that. It meant that you could spray, say, a pair of three colour roundels like those on the underside of the wings (red ,white and blue) in less than half an hour, which is very nice indeed! I'm used to leaving a couple of hours (at least) between colours.

I'm hoping to get some varnish on and start decals by the end of the week. The best laid plans....etc.

Cracking work Steve.
stona
SMF Supporter
- Joined
- Jul 22, 2008
- Messages
- 11,481
- Points
- 113
- First Name
- Steve
Neil Merryweather
SMF Supporter
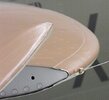
Is this the model or the real thing?Just throwing this out there as I'm a bit stumped and am considering just gluing the 'wire' in place, even at this scale.
This is the attachment on the tail plane for the IFF wire that runs to the fuselage (roughly at the red of the roundel).
View attachment 476566
How would you do it?
stona
SMF Supporter
- Joined
- Jul 22, 2008
- Messages
- 11,481
- Points
- 113
- First Name
- Steve
The image is the real thing. I'm trying to think how to replicate that at 1/24, other than just gluing the 'wire', which will be fishing line, to the leading edge of the tail plane.Is this the model or the real thing?
Did they still have IFF wires on the mark IX Steve? I know you’ll know more than me, but thought it was worth an ask.Just throwing this out there as I'm a bit stumped and am considering just gluing the 'wire' in place, even at this scale.
This is the attachment on the tail plane for the IFF wire that runs to the fuselage (roughly at the red of the roundel).
View attachment 476566
How would you do it?
If so, I’d probably go with gluing the cable into a hole then scratching a cover to go over it that looks like the bit with the button end.
Neil Merryweather
SMF Supporter
Melt the end of the nylon into a button and glue on a piece of tube?The image is the real thing. I'm trying to think how to replicate that at 1/24, other than just gluing the 'wire', which will be fishing line, to the leading edge of the tail plane.
stona
SMF Supporter
- Joined
- Jul 22, 2008
- Messages
- 11,481
- Points
- 113
- First Name
- Steve
The Mk II I.F.F. system (with the wires from tail lane to fuselage) was phased out through 1943 for aircraft of the metropolitan air force. This aircraft was delivered to the squadron in February that year. It doesn't have the antenna for the later version of IFF and I've convinced myself I can see a wire in this image of the same aircraft, taken sometime in March that year, after Johnson had 'acquired' it.Did they still have IFF wires on the mark IX Steve? I know you’ll know more than me, but thought it was worth an ask.
If so, I’d probably go with gluing the cable into a hole then scratching a cover to go over it that looks like the bit with the button end.
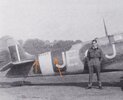
I can't believe that's a photographic anomaly in exactly the right place for an IFF antenna wire

stona
SMF Supporter
- Joined
- Jul 22, 2008
- Messages
- 11,481
- Points
- 113
- First Name
- Steve
That's probably the best way to go. It needs to be a very thin/small tube.Melt the end of the nylon into a button and glue on a piece of tube?
I feel a rummage coming on!

