You are using an out of date browser. It may not display this or other websites correctly.
You should upgrade or use an alternative browser.
You should upgrade or use an alternative browser.
Defending the Hauptstadt...Berlin '45...
- Thread starter Allen Dewire
- Start date
Jim R
SMF Supporter
That is coming on a treat Allen. Every problem you come across you sort a solution. The cobbles will pull it all together. Love the shell painting production line.
Allen please accept my apologies and a crate of cold ones - ive only just found this thread. Been having a read through and theres some fantastic work going on here , scratching of the finest order. A fascinating subject too , new to me and a great choice for a dio . Now sat at the back of the rabble with a beer and a bag of pork scratchings ,watching with interest , cheers tony
Thanks so much for your continued interest and patience good people. We are progressing......A little. First,
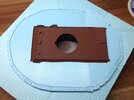
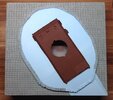
In between my bouts of reality loss and money squandering, I glued the 'berm ring' to the base and let it dry,
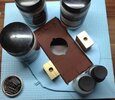
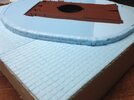
Had to use lots of things to hold it down so it would dry flat around the Panther. The shells are finally finished and a couple of sample cobbles put down to check the height,
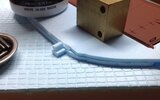
Not too bad and they sit about level with the 'berm ring'. Then I noticed that the cobbles were longer than the cobbles in the street. Oh boy, that's not cutting it at all!!! Did a measure and they are about 2mm longer than they should be. Bad words later and a cold one, it was time to correct this major malfunction,
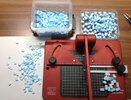
Singing the Isley Brothers' song "Work to Do", I went at it, 3 blocks at a time!!! Old ones in the tub, newly cut ones in the lid and scraps on the paper. I didn't cut them all down because I wanted to start laying them to see how many I would really need. Mixed white glue with some water and let the games begin!!! Eventually, and with many new gray hairs, we had this,
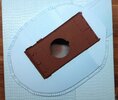
The first row done and set aside to dry. There are a few places where I should have spaced them further apart and in others, the glue drew them together. For the first row, I think it came out pretty well. When I do the second row on top, I can fix them with a bit more space in between. I'll then concentrate on filling the back side behind the Panther. All this will be covered in dirt and the gaps will also have dirt filled in them. After the second row is done and dry, I will give the street and the cobble rows a thin coat of cheap acrylic paint to seal the foamboard. We're getting there..........
Thanks again for stopping in, and all your fine comments are greatly appreciated. All C, C, ideas and Abuse welcome......
Prost
Allen
Thanks Bro, I can't stop now even if I wanted to. Loads of fun!!!..Dude.
Good to see you cracking on with this. Looking good.
Most of them came from you and your work with the foamboard Dude 2. Thanks for that!!!...Following this Dude1 , very nice reading through your methods .pm on way .
It's finally starting to get there and thanks Paul. I'm not sure about figures as it might be hard to know which ones to use. I did think about 1 or 2 tankers running away because they were out of ammo or maybe a civilian standing there looking at the turret and wondering.Looking good Allen. It’ll be interesting seeing this develop. Do you plan any figures?
Cheers, P
Appreciate it Jim. It's a learning curve for sure, but I must say it's fun at the same time. I think Henry Ford would be proud too!!!...That is coming on a treat Allen. Every problem you come across you sort a solution. The cobbles will pull it all together. Love the shell painting production line.
No chamfering here Buddy!!! Double row of cobbles around the whole thing for a little added protection is the plan (like the pic)...Excellent progress Mr. Allen, will you be chamfering the edges of your foam dirt pile or is that not necessary given you are using cobble stones?
Never a need to apologize Tony and with so much happening on the forum, one can never keep up. Hell, I didn't see your Loopin' build until it was finished Sir!!! Thanks for the crate of beer and you can share it with the rabble. I grabbed a new rack last Thursday while at Stammtisch at the Wagner brewery...Allen please accept my apologies and a crate of cold ones - ive only just found this thread. Been having a read through and theres some fantastic work going on here , scratching of the finest order. A fascinating subject too , new to me and a great choice for a dio . Now sat at the back of the rabble with a beer and a bag of pork scratchings ,watching with interest , cheers tony
In between my bouts of reality loss and money squandering, I glued the 'berm ring' to the base and let it dry,

Had to use lots of things to hold it down so it would dry flat around the Panther. The shells are finally finished and a couple of sample cobbles put down to check the height,

Not too bad and they sit about level with the 'berm ring'. Then I noticed that the cobbles were longer than the cobbles in the street. Oh boy, that's not cutting it at all!!! Did a measure and they are about 2mm longer than they should be. Bad words later and a cold one, it was time to correct this major malfunction,

Singing the Isley Brothers' song "Work to Do", I went at it, 3 blocks at a time!!! Old ones in the tub, newly cut ones in the lid and scraps on the paper. I didn't cut them all down because I wanted to start laying them to see how many I would really need. Mixed white glue with some water and let the games begin!!! Eventually, and with many new gray hairs, we had this,

The first row done and set aside to dry. There are a few places where I should have spaced them further apart and in others, the glue drew them together. For the first row, I think it came out pretty well. When I do the second row on top, I can fix them with a bit more space in between. I'll then concentrate on filling the back side behind the Panther. All this will be covered in dirt and the gaps will also have dirt filled in them. After the second row is done and dry, I will give the street and the cobble rows a thin coat of cheap acrylic paint to seal the foamboard. We're getting there..........
Thanks again for stopping in, and all your fine comments are greatly appreciated. All C, C, ideas and Abuse welcome......
Prost
Allen
Looking fine Allen. Was thinking the off cuts as a pile of commissar's book burning or cut to be Irma or MP40 clips showing crew holdout to last bullet. Ravings before first cuppa.
Neil Merryweather
SMF Supporter
I know this is German but do you really have to be SO precise with the berm cobbles?
It's going to look great when it's done. I like the idea of the civilian wondering.
It's going to look great when it's done. I like the idea of the civilian wondering.
rtfoe
SMF Supporter
The street base is looking good Allen similar to a "kueh lapis" layered cake. The cobble stones remind me of the peas I used for mine. It never dawned on me to use foam for it even after I had used Faller foam brick detailed plates for my Hold until Relieved dio.
Once you've sealed it with the acrylic paint then the fun continues with dirt and debris.
Cheers,
Wabble
Once you've sealed it with the acrylic paint then the fun continues with dirt and debris.
Cheers,
Wabble
Neil Merryweather
SMF Supporter
And aren't cobbles actually longer and laid end on, rather than cubes?
Looking at the original picture I'm sure I spotted some rectangular ones laid on their sides....
Looking at the original picture I'm sure I spotted some rectangular ones laid on their sides....
Jim R
SMF Supporter
That looks good Allen. Shame about all the extra work , all for 2 mm. Still worth it and it's what this hobby is so often about - correcting cock- ups 
Thanks Paul and they are some ideas to ponder. I would imagine that after the last 75mm was fired, the crew would bail and retreat. I know I wouldn't hang around with just an MP-40 with red hordes coming at me...Looking fine Allen. Was thinking the off cuts as a pile of commissar's book burning or cut to be Irma or MP40 clips showing crew holdout to last bullet. Ravings before first cuppa.
I know this is German but do you really have to be SO precise with the berm cobbles?
It's going to look great when it's done. I like the idea of the civilian wondering.
Sorry Mr. Merryweather, but it's a bad habit of mine. Trying to be too precise that is. Cobblestones for the most part were rectangular and laid longwise. There were square ones that were used for fillers on row ends, lining streetcar tracks and for ringing sewer covers and the like. I have some of those too, to be placed about. I think I have the perfect civilian figure in the stash too Neil...And aren't cobbles actually longer and laid end on, rather than cubes?
Looking at the original picture I'm sure I spotted some rectangular ones laid on their sides....
I don't think you would want to eat this Wabble. I remember your build with the peas well. Didn't you have a prob with bugs or something afterwards? Foamboard is really cool and I am having some fun learning how to use it. I can't wait to start slinging dirt around on it...The street base is looking good Allen similar to a "kueh lapis" layered cake. The cobble stones remind me of the peas I used for mine. It never dawned on me to use foam for it even after I had used Faller foam brick detailed plates for my Hold until Relieved dio.
Once you've sealed it with the acrylic paint then the fun continues with dirt and debris.
Cheers,
Wabble
Thanks Jim and you are so correct there. Being retired now, does give me the chance to fix my brain farts. Maybe I will also learn to do it right the first time too...LOL!!!That looks good Allen. Shame about all the extra work , all for 2 mm. Still worth it and it's what this hobby is so often about - correcting cock- ups
Here's another pic of the same Panther a bit later on,
For Reference Only
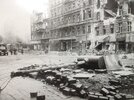
As Neil said, there were square and rectangular cobbles used, as well as some other debris...
Prost
Allen
scottie3158
SMF Supporter
Looking mighty fine dude.
Judging by the expended cartridges in your first photo, the crew was pretty hard core.
Morning world, from a dark and dreary Bamberg. Sorry I have been away for a while, but I have been busy but I'm still driving on with this...
I have been driving on with a hard.....You know the rest folks. After cutting all the cobbles to the new size and doing the first row, I moved on to the second. I usually leave the glue mix overnight to dry before doing the next step. I mixed up a new batch and went at it. After an hour, we had the second row in place. I also did the first row behind the Panther,
I tried to lay this row a bit looser for effect. For the most part, it worked. In a few places, the glue mix drew the cobbles together while drying. Oh well!!! Another pic,
I then realized my brainfart #23 and saw the Panther still sat too deep in the hole. I pulled the skewers, removed the hull, trimmed the foam again and raised it another 3mm. Re-skewered it and hoped it would be ok. When the glue had dried, I mixed up a batch in another cup and added a generous amount of AV Med Sea Grey into it and started painting the street. Using a flat wide brush worked good for this. After 1 coat, we had a good basis and the foam was almost sealed,
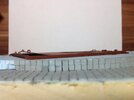
While waiting for the first coat to dry, I added the second row of cobbles behind the hull. Again, you have to let the glue dry overnight, before doing anything else, so in the meantime, I brushed the second coat on the cobbles. Now here is a side view,
The hull should now sit high enough to add the dirt on the berm. I played around making a mix of AV mud watered down and added some model RR ballast sand in it. Using a stiff flat brush, I applied a coat to see how it would work,
I guess I didn't mix it well enough as the sand clumped up and didn't smooth out the way I wanted. Ok, adding the ballast wasn't the way to go. I let this dry overnight and yesterday, smeared a coat of AV mud on using a small trowel. Dipping it in water and then pushing the mud around to keep it uniform and fill all the gaps. In the end, it came out like this,
I'll admit, that worked out rather well. I have to do some filling in around the hull so I can build up another layer to it. I put the turret on to see how it would look together. The mud is still drying as the coat was pretty thickly applied. I can now weather the hull and do some touch ups as needed. I can also do more painting on the cobbles and a few washes on them as well. Progress is being made..........
Thanks all for looking in and all abuse is needed to keep me on my toes. Have a great Wednesday!!!
Prost
Allen
Thanks Bro, but not as good as that mo'cycle of yours...Looking mighty fine dude.
Why thank you Mr. Benson. Great to see you back and hope the family is doing well my friend...Solid work so far Mr D, this is coming along at quite the pace sir…..and very nicely too
The cobbles were a PITA, but they are done now Rick. I do appreciate your patience too Buddy..., and all the adjectives what the others used for me as well. Great stuff and glad to see you are getting on well with the cobbles once they were sorted out dimensionally.
Thanks Dude 2. It's not too shabby for having no clue of what I'm doing though...Loving it Dude 1, just loving it .
No worries Andrew as you also have a lot on your plate at the moment too. Thanks, and It is great to see you stopping in. How's the laundering going???...Allen,
Apologies for VERY behind on this. That's coming on very nicely indeed!
It's funny Paul, but the more I study the photo, the more I believe it was staged, to a point, for propaganda. It was definitely taken well after the battle as there are too many civilians out walking around. It is also hard to find out exactly when the pic was taken. True, the crew were probably pretty hardcore, but the turret shows no sign of damage to it and live rounds laying there too. One of those things we will never know for sure I guess, unless one was there in '45...Judging by the expended cartridges in your first photo, the crew was pretty hard core.
Thanks too Graeme! I'm glad you like it and I hope you are doing well Sir...Coming along nicely Allen.
I have been driving on with a hard.....You know the rest folks. After cutting all the cobbles to the new size and doing the first row, I moved on to the second. I usually leave the glue mix overnight to dry before doing the next step. I mixed up a new batch and went at it. After an hour, we had the second row in place. I also did the first row behind the Panther,

I tried to lay this row a bit looser for effect. For the most part, it worked. In a few places, the glue mix drew the cobbles together while drying. Oh well!!! Another pic,

I then realized my brainfart #23 and saw the Panther still sat too deep in the hole. I pulled the skewers, removed the hull, trimmed the foam again and raised it another 3mm. Re-skewered it and hoped it would be ok. When the glue had dried, I mixed up a batch in another cup and added a generous amount of AV Med Sea Grey into it and started painting the street. Using a flat wide brush worked good for this. After 1 coat, we had a good basis and the foam was almost sealed,

While waiting for the first coat to dry, I added the second row of cobbles behind the hull. Again, you have to let the glue dry overnight, before doing anything else, so in the meantime, I brushed the second coat on the cobbles. Now here is a side view,

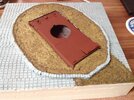
The hull should now sit high enough to add the dirt on the berm. I played around making a mix of AV mud watered down and added some model RR ballast sand in it. Using a stiff flat brush, I applied a coat to see how it would work,

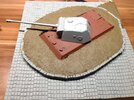
I guess I didn't mix it well enough as the sand clumped up and didn't smooth out the way I wanted. Ok, adding the ballast wasn't the way to go. I let this dry overnight and yesterday, smeared a coat of AV mud on using a small trowel. Dipping it in water and then pushing the mud around to keep it uniform and fill all the gaps. In the end, it came out like this,

I'll admit, that worked out rather well. I have to do some filling in around the hull so I can build up another layer to it. I put the turret on to see how it would look together. The mud is still drying as the coat was pretty thickly applied. I can now weather the hull and do some touch ups as needed. I can also do more painting on the cobbles and a few washes on them as well. Progress is being made..........
Thanks all for looking in and all abuse is needed to keep me on my toes. Have a great Wednesday!!!
Prost
Allen
- Joined
- Sep 4, 2019
- Messages
- 9,514
- Points
- 113
- First Name
- Andrew
Mike that's coming on very nicely!!Morning world, from a dark and dreary Bamberg. Sorry I have been away for a while, but I have been busy but I'm still driving on with this...
Thanks Bro, but not as good as that mo'cycle of yours...
Why thank you Mr. Benson. Great to see you back and hope the family is doing well my friend...
The cobbles were a PITA, but they are done now Rick. I do appreciate your patience too Buddy...
Thanks Dude 2. It's not too shabby for having no clue of what I'm doing though...
No worries Andrew as you also have a lot on your plate at the moment too. Thanks, and It is great to see you stopping in. How's the laundering going???...
It's funny Paul, but the more I study the photo, the more I believe it was staged, to a point, for propaganda. It was definitely taken well after the battle as there are too many civilians out walking around. It is also hard to find out exactly when the pic was taken. True, the crew were probably pretty hardcore, but the turret shows no sign of damage to it and live rounds laying there too. One of those things we will never know for sure I guess, unless one was there in '45...
Thanks too Graeme! I'm glad you like it and I hope you are doing well Sir...
I have been driving on with a hard.....You know the rest folks. After cutting all the cobbles to the new size and doing the first row, I moved on to the second. I usually leave the glue mix overnight to dry before doing the next step. I mixed up a new batch and went at it. After an hour, we had the second row in place. I also did the first row behind the Panther,
View attachment 472599
I tried to lay this row a bit looser for effect. For the most part, it worked. In a few places, the glue mix drew the cobbles together while drying. Oh well!!! Another pic,
View attachment 472600
I then realized my brainfart #23 and saw the Panther still sat too deep in the hole. I pulled the skewers, removed the hull, trimmed the foam again and raised it another 3mm. Re-skewered it and hoped it would be ok. When the glue had dried, I mixed up a batch in another cup and added a generous amount of AV Med Sea Grey into it and started painting the street. Using a flat wide brush worked good for this. After 1 coat, we had a good basis and the foam was almost sealed,
View attachment 472601
While waiting for the first coat to dry, I added the second row of cobbles behind the hull. Again, you have to let the glue dry overnight, before doing anything else, so in the meantime, I brushed the second coat on the cobbles. Now here is a side view,
View attachment 472602
The hull should now sit high enough to add the dirt on the berm. I played around making a mix of AV mud watered down and added some model RR ballast sand in it. Using a stiff flat brush, I applied a coat to see how it would work,
View attachment 472603
I guess I didn't mix it well enough as the sand clumped up and didn't smooth out the way I wanted. Ok, adding the ballast wasn't the way to go. I let this dry overnight and yesterday, smeared a coat of AV mud on using a small trowel. Dipping it in water and then pushing the mud around to keep it uniform and fill all the gaps. In the end, it came out like this,
View attachment 472604
I'll admit, that worked out rather well. I have to do some filling in around the hull so I can build up another layer to it. I put the turret on to see how it would look together. The mud is still drying as the coat was pretty thickly applied. I can now weather the hull and do some touch ups as needed. I can also do more painting on the cobbles and a few washes on them as well. Progress is being made..........
Thanks all for looking in and all abuse is needed to keep me on my toes. Have a great Wednesday!!!
Prost
Allen
Laundering is is going ok.... Finding my feet again with studying!
