Oh dear it's a 1/72 Bristol Beveldere

adt70hk

I know its a bit sad but I like quickbuild kits!!!
SMF Supporter
Joined
Sep 4, 2019
Messages
9,506
Points
113
First Name
Andrew
Hi Richard

Not had much forum time recently and so got behind on this.

When it comes to this hobby I am an 'assembler', in that I basically build OOB, with maybe a few modifications on the way.

Then there are people like Scottie and your goodself that take it to the next level and then some.....to an artform in many ways!

This is yet again one of those times....in summary.....

DAMN that"s good!!!

Quite simply outstanding.

Looking forward to seeing this finished.

ATB.

Andrew
 

rtfoe

SMF Supporter
Joined
Apr 29, 2018
Messages
7,518
Points
113
Location
Malaysia
First Name
Richard
Hi Richard

Not had much forum time recently and so got behind on this.

When it comes to this hobby I am an 'assembler', in that I basically build OOB, with maybe a few modifications on the way.

Then there are people like Scottie and your goodself that take it to the next level and then some.....to an artform in many ways!

This is yet again one of those times....in summary.....

DAMN that"s good!!!

Quite simply outstanding.

Looking forward to seeing this finished.

ATB.

Andrew
Thanks Andrew, I like OOB's too and do that occasionally for relaxation.

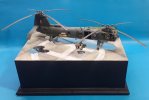
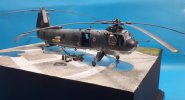
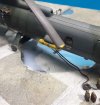
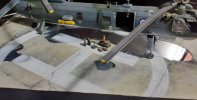
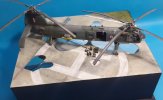
This however I'm loosing a bit of hair with this build. The heli is fine except for the split on the cockpit bubble chin window. Tried to hide it with a thin strip of paint. Still prominent and should use a lighter shade. May toy with the idea of vac forming and replacing it.
The base is also touch and go. A crack appeared across two puddles and a friends idea to lay a long hose across it was brilliant so that's made from wire. The Future I poured onto the puddles was too thick and clouded in some parts so I will remove it and apply a thinner coat. Everything is dry places for the moment. I have remove the Future from the bottom left puddle which took of the light mist of white that I sprayed on for the circle. Here are the photos...
20231129_003403.jpg20231129_003216.jpg20231129_003629.jpg20231129_003733.jpgGot to get this done for this weekends event.

Cheers,
Wabble
 

Andy T

SMF Supporter
Joined
Apr 26, 2021
Messages
1,976
Points
113
Location
Sheffield
First Name
Andy
Wow Richard, that's looking amazing, even before your final flourishes!
 

Waspie

SMF Supporter
Joined
Mar 13, 2023
Messages
2,512
Points
113
Location
Portland - Dorset
First Name
Doug
Thanks Andrew, I like OOB's too and do that occasionally for relaxation.

This however I'm loosing a bit of hair with this build. The heli is fine except for the split on the cockpit bubble chin window. Tried to hide it with a thin strip of paint. Still prominent and should use a lighter shade. May toy with the idea of vac forming and replacing it.
The base is also touch and go. A crack appeared across two puddles and a friends idea to lay a long hose across it was brilliant so that's made from wire. The Future I poured onto the puddles was too thick and clouded in some parts so I will remove it and apply a thinner coat. Everything is dry places for the moment. I have remove the Future from the bottom left puddle which took of the light mist of white that I sprayed on for the circle. Here are the photos...
View attachment 496215View attachment 496217View attachment 496218View attachment 496219Got to get this done for this weekends event.

Cheers,
Wabble
That works well Richard. One of the other things I was going to suggest was 45 gallon drums and a hose and a hand pump.

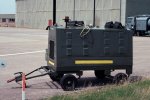
I could only find one image of a electrical supply trailer, (Houchin).Image.jpg

I did find many fuel wagons but there were so many I wouldn't have a clue which one would be correct for the period!!
 

rtfoe

SMF Supporter
Joined
Apr 29, 2018
Messages
7,518
Points
113
Location
Malaysia
First Name
Richard
Wow Richard, that's looking amazing, even before your final flourishes!
Thanks Andy, I'm still trying to convince myself that it doesn't look weird. I think with a few wet patches might just convince me.
That works well Richard. One of the other things I was going to suggest was 45 gallon drums and a hose and a hand pump.

I could only find one image of a electrical supply trailer, (Houchin).View attachment 496236

I did find many fuel wagons but there were so many I wouldn't have a clue which one would be correct for the period!!
Thanks for looking up the fuel wagon Doug. The hose incidentally goes pass two oil drums and a jerry can behind the heli out of view in the photos. Since it carries on out of the dio I won't be needing it but I will scratch the extinguisher trolley if I find the 1/144 scale F18 tyres.

Nothing done today as I was busy sorting images for a three page interview in January's Model Art Japan. Hope it gets published. Unfortunately it will be in Japanese and not translated but I'll know what it says since the interview was conducted in English.

Cheers,
Wabble
 

rtfoe

SMF Supporter
Joined
Apr 29, 2018
Messages
7,518
Points
113
Location
Malaysia
First Name
Richard
Looking fantastic Richard.
Thanks Ian.
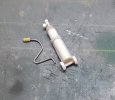
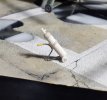
Today I scraped all the Future off the puddles and reapplied it using the airbrush. Turned out better and had that slight shimmering when there is a breeze. Also added cracks to the tarmac and stuck the accessories down including the hose.

20231130_231535.jpgI worked on scratch building the extinguisher and trolley...still need to add the short hose.
20231130_231912.jpg

Cheers,
Wabble
 

Jim R

SMF Supporter
Joined
Apr 27, 2018
Messages
13,749
Points
113
Location
Shropshire
First Name
Jim
Great work as always Richard. You certainly have a lot of skill and patience.
 

rtfoe

SMF Supporter
Joined
Apr 29, 2018
Messages
7,518
Points
113
Location
Malaysia
First Name
Richard
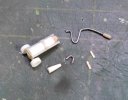
Hi guys, mojo came back and started on the actual extinguisher as this one was too large and probably is some oxygen or propellant if some kind. No pictures of it painted yet but here are the unassembled parts of the other extinguisher...
IMG_20240104_101121.jpg
They look like similar components but there is a nozzle and clamp levers. I haven't added the pressure gauge.

Cheers,
Wabble
 

JR

Member of the Rabble and Pyromania Consultant
SMF Supporter
Joined
May 26, 2015
Messages
17,275
Points
113
Location
lincs
First Name
John
Ooh Wabble, cleaver and very neat.
 

rtfoe

SMF Supporter
Joined
Apr 29, 2018
Messages
7,518
Points
113
Location
Malaysia
First Name
Richard
My mojo didn't stop just now guys...was just lazy to find my CA glue which I had upstairs on the other bench. So now it's assembled...
IMG_20240115_120803.jpg
Now it's off to get a black primer on and painting starts...

Cheers,
Wabble
 
Top