Revell 1/32 Westland Lysander(Shuttleworth Collection Addition)

Vaughan

SMF Supporter
Joined
Apr 1, 2011
Messages
2,707
Points
113
First Name
Vaughan
Hi Dave

On the face of it following those instructions sounds quite difficult and thats fine about 'pinching' a few ideas because that's what these forums are all about getting ideas and hints and tips. If my build helps you then all the better.

Vaughan
 

Vaughan

SMF Supporter
Joined
Apr 1, 2011
Messages
2,707
Points
113
First Name
Vaughan
Hi All

I have sprayed the exhaust manifold and dry fitted to the engine cowling. I have also sprayed the wings prior to fitting to the fuselage as I think it will be easier that way. Black underside done and have started on the upper wing camo. I have decided to go for the 1944 SD version so it won't be the standard dark earth, dark green and sky.

Vaughan

View attachment 36139

View attachment 36140

View attachment 36142

11.jpg

15.jpg

14.jpg
 
T

tecdes

Guest
I like the photo of the engine cowling Vaughan. Very nice.

No doubt this is going to be my next model. This aircraft is different from any other. Seems to hover between a biplane & a mono plane but not wanting to be attached to either species.

Laurie
 

Vaughan

SMF Supporter
Joined
Apr 1, 2011
Messages
2,707
Points
113
First Name
Vaughan
Hi Laurie

Thanks for that. I think it's going to look very different from the models I have made so far.

Vaughan
 

colin m

Moderator
Staff member
Moderator
SMF Supporter
Joined
Dec 26, 2008
Messages
8,604
Points
113
Location
Stafford, UK
First Name
Colin
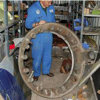
Make it two for the engine ! That exhaust collector is a difficult colour to get right I've seen a few different examples around and can't help wondering what metal it's made from ?

Rewgards

Colin M....
 

Vaughan

SMF Supporter
Joined
Apr 1, 2011
Messages
2,707
Points
113
First Name
Vaughan
Hi Colin

I'm not sure what the exhaust collector was made of either I found this image which might throw some light on the matter could it have been made of copper?

I've yet to matt down mine as at the moment it's far too glossy.

Vaughan

View attachment 36148

Screen shot 2011-07-12 at 17.47.28.jpg
 

yak face

Wossupwidee?
Staff member
Moderator
SMF Supporter
Joined
Jun 13, 2009
Messages
12,400
Points
113
Location
sheffield
First Name
tony
Great progress vaughan, i prefer the look of the black/green/grey camo anyway!The exhaust collector ring was, i believe, made of a steel alloy but quickly turned a burnt dark brown colour with use. This can look a bit coppery in some pics but was usually several tones of dark heat stained brown. Try misting a bit of tamiya x19 smoke over the copper to tone it down and give a bit of variation. cheers tony
 

Vaughan

SMF Supporter
Joined
Apr 1, 2011
Messages
2,707
Points
113
First Name
Vaughan
Hi Tony

I don't have any Tamiya paints only Model Air. Any suggestion of an alternative way of doing it?

Vaughan
 

Ian M

Administrator
Staff member
Administrator
Moderator
SMF Supporter
Joined
Dec 14, 2008
Messages
19,721
Points
113
Location
Falster, Denmark
First Name
Ian
Hi Vaughan, that front end looks rather good.

As you say you have model Air paints, I am sure that you could use those to great effect due to their translucent properties. Just mist the collector very finely with browns and black, maybe a touch of dark blue at the join for the pipe. Just have a couple of practice runs first on some scrap.

I too could find my self buying one of these as soon as the stash is brought down a bit. (Like that's ever going to happen....)

Ian M
 

Vaughan

SMF Supporter
Joined
Apr 1, 2011
Messages
2,707
Points
113
First Name
Vaughan
Hi All

An update from yesterday. The fuselage halves are together now but the frame had to be packed with plastic card to stop it rattling around once in situ. There are some quite bad seam misalignment along the body of the fuselage and up the tail fin. Some advice on how to best tackle these would be helpful. Do you sand down one side to match the other ? or do you fill the lower side and then sand in? I'm never sure which way is best.

The wings have had a coat of klear and I have applied the roundels they seem to have taken well although you can see the carrier film around the edge but I don't think this is silvering.

I wasn't happy with the exhaust collector where the exhaust pipe connected to the ring so have filled the gap and will repaint with a more realistic colour as the photos I've looked at don't appear at all metallic.

Vaughan

View attachment 36207

View attachment 36208

View attachment 36209

View attachment 36210

View attachment 36211

View attachment 36212

View attachment 36213

View attachment 36214

ex1.jpg

f1.jpg

f2.jpg

s1.jpg

s2.jpg

s3.jpg

w1.jpg

w2.jpg
 
T

tecdes

Guest
Do you ever go to bed Vaughan ?

The speed you work & looks great.

Laurie
 

Vaughan

SMF Supporter
Joined
Apr 1, 2011
Messages
2,707
Points
113
First Name
Vaughan
Well Laurie

I'm a bit of a late bird don't normally go to bed before midnight so try to cram a few hours in here and there. I think once you get going on a model it's hard to stop although saying that I've a fair bit to do yet. I'm not looking forward to attaching the canopy as there's 6 parts and they have to line up with the wing roots and each other.

Vaughan
 

yak face

Wossupwidee?
Staff member
Moderator
SMF Supporter
Joined
Jun 13, 2009
Messages
12,400
Points
113
Location
sheffield
First Name
tony
Keep at it vaughan its coming along great. The decals look fine, i imagine the bit of carrier film will disappear when you give the model the final matt coat. cheers tony
 
T

treyzx10r

Guest
I'm with Tony the decals should be fine after a dull coat. The build is coming along nicely!
 

Vaughan

SMF Supporter
Joined
Apr 1, 2011
Messages
2,707
Points
113
First Name
Vaughan

Gern

'Stashitis' victim
SMF Supporter
Joined
May 17, 2009
Messages
9,696
Points
113
Location
Stourbridge
First Name
Dave
\ said:
Hi AllThere are some quite bad seam misalignment along the body of the fuselage and up the tail fin. Some advice on how to best tackle these would be helpful. Do you sand down one side to match the other ? or do you fill the lower side and then sand in? I'm never sure which way is best.

Vaughan
I always add filler and then sand so it's a bit of both. As I sand across the join I'm taking off some of the side that is standing 'proud' as well as sanding back the filler.

It's always worth checking locating pins before you join pieces. Sometimes it's the locating pins themselves which throw the joint out of alignment. If that is happening, just cut off the offending pins. Getting the joint as close as possible usually saves the problem of filling the seam.

Gern
 

Ian M

Administrator
Staff member
Administrator
Moderator
SMF Supporter
Joined
Dec 14, 2008
Messages
19,721
Points
113
Location
Falster, Denmark
First Name
Ian
Well I though that the collector look good before, but now it looks just great. Big improvement it looks used and more subtle.

Ian M
 

stona

SMF Supporter
Joined
Jul 22, 2008
Messages
11,472
Points
113
First Name
Steve
Here's the exhaust collecting ring on a Swordfish

Surely some kind of steel,like the plate behind the exhausts on a P-51.

Cheers

Steve
 

Vaughan

SMF Supporter
Joined
Apr 1, 2011
Messages
2,707
Points
113
First Name
Vaughan
Hi All

Here's an update from the last few days. The masking of the canopy is complete it was a bit of a mammoth task no wonder they called it a glasshouse. I have fitted the front section to the fuselage after completing a few dry runs so knew that there was going to be a bit of a fit issue. The forward most section needed to be mounted so that there was a gap otherwise it would not meet the side canopies. This resulted in needing to attach a strip of plastic card to fill the gap but this should be ok once sanded in. I altered the two rectangular inspection windows just forward of the tail fin after looking at several reference photos they will have circular portholes. The masks were made by using Tamiya tape firstly stuck to some 0.01" plastic card which I subsequently hold punched and peeled off and stuck to the inspection windows. I have also altered the under fuselage tank by adding two rings.

Vaughan

View attachment 36341

View attachment 36342

View attachment 36343

View attachment 36344

View attachment 36345

View attachment 36346

View attachment 36347

View attachment 36348

View attachment 36349

1cano.jpg

2.jpg

3.jpg

4.jpg

6.jpg

7.jpg

8.jpg

9.jpg

IMG_0385.jpg
 

colin m

Moderator
Staff member
Moderator
SMF Supporter
Joined
Dec 26, 2008
Messages
8,604
Points
113
Location
Stafford, UK
First Name
Colin
\ said:
Hi All More Progress. Fuselage filled and sanded. Under fuselage canister glued filled sanded and sprayed black.

I have toned down the exhaust collector and exhaust pipe and added a weld seam where the two meet. I ended up using a combination of dark earth, yellow, black, white and some metallic rust. I think that this is a bit more realistic although not perfect.

Vaughan
Love the welding..................
 
Top