Revell new U Boat type XXI

BattleshipBob

Bob, bob, bobing along!
SMF Supporter
Joined
Apr 28, 2018
Messages
6,212
Points
113
First Name
Bob
Finally in Mr surfacer black primer, as normal went on lovely!

20221018_152315.jpg
Did not do a good job on the bow seams, for some reason seams always cause me a problem
 

Attachments

  • 20221018_152338.jpg
    20221018_152338.jpg
    151.7 KB · Views: 6
  • 20221018_152331.jpg
    20221018_152331.jpg
    161 KB · Views: 6

Tim Marlow

Little blokes aficionado
SMF Supporter
Joined
Apr 27, 2018
Messages
16,779
Points
113
Location
Somerset
First Name
Tim
Looking good Bob. Black suits it :thumb2:
What is the issue with the seams? Are they sinking after preparation? If so, you aren’t leaving them to dry long enough before sanding down, especially if the filler is quite thick. As the trapped thinners gasses off the filler shrinks, so making the seam visible again. Try putting it on in thinner layers and allowing them to dry properly before sanding.
 

BattleshipBob

Bob, bob, bobing along!
SMF Supporter
Joined
Apr 28, 2018
Messages
6,212
Points
113
First Name
Bob
We'll,I for one,think that looks really good Bob :smiling3:
Very nice indeed ;)
Cheers, thanks sir!
Looking good Bob. Black suits it :thumb2:
What is the issue with the seams? Are they sinking after preparation? If so, you aren’t leaving them to dry long enough before sanding down, especially if the filler is quite thick. As the trapped thinners gasses off the filler shrinks, so making the seam visible again. Try putting it on in thinner layers and allowing them to dry properly before sanding.
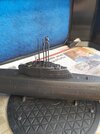
Hi Tim, does not matter what I do the seam stands out like the old sore thumb! In this case I have not used filler and its just the seam between the hull halves, especially at the bow.

I either sand too much and obliterate everything in the area or not enough as in this case!
 

Steve Jones

Steve Jones Scale Modelling Site
Joined
Apr 27, 2018
Messages
6,698
Points
113
Location
Plymouth
First Name
Steve
Must have been on another planet to have missed this one Bob. Ever so sorry my friend. Had a very nice read through. Will keep a closer eye from now on. Take care my friend and happy modelling
 

Tim Marlow

Little blokes aficionado
SMF Supporter
Joined
Apr 27, 2018
Messages
16,779
Points
113
Location
Somerset
First Name
Tim
Have you tried adding Mr Surfacer filler over the primer? You just blob it on where required using an old brush, let it dry overnight, then sand it off. Worked for me on the mosquito build…..
Another thing, how are you sanding the seams? Are you using a backing on the paper? I always find it better to mount the paper on a hard backing substrate so you don’t sand any hollows into the surface.
 

BattleshipBob

Bob, bob, bobing along!
SMF Supporter
Joined
Apr 28, 2018
Messages
6,212
Points
113
First Name
Bob
Have you tried adding Mr Surfacer filler over the primer? You just blob it on where required using an old brush, let it dry overnight, then sand it off. Worked for me on the mosquito build…..
Another thing, how are you sanding the seams? Are you using a backing on the paper? I always find it better to mount the paper on a hard backing substrate so you don’t sand any hollows into the surface.
Thanks Tim
I am using either the squadron sticks or the thin sticks from albino or ultimate, these have a backing?. Will apply Mr surfacer in the morning

Appreciate the help Tim
 

Jim R

SMF Supporter
Joined
Apr 27, 2018
Messages
13,729
Points
113
Location
Shropshire
First Name
Jim
Looking good Bob. Can't offer much help with your seam problem, sorry. The only suggestion is sometimes before sanding something like a seam I give the area a coat of paint, any colour that contrasts with the styrene. Then when you sand the area you know that any paint left shows a low area. So a seam will show a line of paint if it's still there.
 

BattleshipBob

Bob, bob, bobing along!
SMF Supporter
Joined
Apr 28, 2018
Messages
6,212
Points
113
First Name
Bob
Looking good Bob. Can't offer much help with your seam problem, sorry. The only suggestion is sometimes before sanding something like a seam I give the area a coat of paint, any colour that contrasts with the styrene. Then when you sand the area you know that any paint left shows a low area. So a seam will show a line of paint if it's still there.
Thanks Jim, appreciated
 
Joined
Mar 27, 2021
Messages
26
Points
13
First Name
ismet
The big beast looks great. Details are very good. I think it will be a very good finale.
ismet guralp.
 

BattleshipBob

Bob, bob, bobing along!
SMF Supporter
Joined
Apr 28, 2018
Messages
6,212
Points
113
First Name
Bob
Bob owm8ty i think you are bein to fussy just build the sub an dont worry an enjoy the hobby
The big beast looks great. Details are very good. I think it will be a very good finale.
ismet guralp.
Thanks Chris, have applied some Mr surfacer 500 to the seam, go to get to grips with seams!

Hi Ismet, many thanks
 

BattleshipBob

Bob, bob, bobing along!
SMF Supporter
Joined
Apr 28, 2018
Messages
6,212
Points
113
First Name
Bob
Well applied the hull upper grey, after the grateful advice from Tim, the seams are a lot better but room for improvement! But more confident now thanks Tim!

It's a pleasure to work in the new room, no drafts, dead insects, dust, cat hair etc, praise the Lord!! finally no dust or dirt in the paint.

Dare i say, really enjoyed spraying and in my opinion it looks good!
20221023_131901.jpg20221023_131839.jpg
Will leave for a day then mask and spray the dark grey on the lower hull, not using the correct colours but some spare Mr color.

Thanks to a idea from Mr Race I have ordered a ducting Y splitter, sounds painful lol, also found the vent end to put out of the window. So will shortly sort out the 2 into 1 vent pipes.
 
Top