Rye Field Model (RFM) 1/35 Pz. IV Ausf J kits 5033 (2 in1 ) & 5043 (full interior)

Panzerwrecker

SMF Supporter
Joined
Mar 2, 2022
Messages
362
Points
93
First Name
Los
Great report! Thanks! Not sure if you checked clear sprue? They have TCs chair and supports (I don’t have kits in front - stashed away. But here could be a plot twist….

Can you look at that missing ‘turret support-esque’ piece I kit 33? Vis;

View attachment 497639

Yes, I did check and include the clear sprue W x 1

The circled part on sprue V1 is not on any sprues in kit 5033
 

Panzerwrecker

SMF Supporter
Joined
Mar 2, 2022
Messages
362
Points
93
First Name
Los
I will now add any worthwhile turret interior parts that kit 5033 has available and might attempt to scratch build the three crucial missing brackets that connect the rotating turret floor (parts Z32 and X1 in kit 5043)
 
Last edited:

Magneto

Oberleutnant
SMF Supporter
Joined
Oct 25, 2023
Messages
290
Points
63
Location
Sky
First Name
Paul
Yes, I did check and include the clear sprue W x 1

The circled part on sprue V1 is not on any sprues in kit 5033
image.jpg

Yes it is! Lol

And here it is on the sprue map;

image.jpg

If it really isn’t in your kit (do you have ‘V’ on your map?). I’ll wait before reaching a conclusionimage.jpg
 
Last edited:

Panzerwrecker

SMF Supporter
Joined
Mar 2, 2022
Messages
362
Points
93
First Name
Los
Don't mix up the sprues for both kits or you'll be in need of a few paracetamol ;)
 

Panzerwrecker

SMF Supporter
Joined
Mar 2, 2022
Messages
362
Points
93
First Name
Los
These are the sprue contents I have on both kit's instruction sheets.

'S' denotes the same sprues in both kits and 'D' the difference to Sprue R in each kit **ignore the 'S' on the sprue labelled 'clear parts' on the kit 5043 sheet. They gave me an extra one which was nice but I'm confusing myself now:nerd: Sprue X would have been nicer:smiling3:


Kit 5033
20231215_205221.jpg

Interior kit 5043
20231215_205145.jpg
'
 
Last edited:

Magneto

Oberleutnant
SMF Supporter
Joined
Oct 25, 2023
Messages
290
Points
63
Location
Sky
First Name
Paul
Don't mix up the sprues for both kits or you'll be in need of a few paracetamol ;)
I’m in need of a sit down - shifting this lot to get to the kit (that was of course bottom box:smiling6:image.jpg

if you look at photo of my sprue map - I folded the cover so you wouldn’t think I was winding you up! I wouldn’t let it drag on like that any way:smiling5:

I don’t have the J interior - simply because I was happy with a turret insides I chose to get the G/H kit

Your sprue map is different to mine

So it seems that you literally have a slightly ‘nuanced’ kit compared to mine. I got both mine as soon as they hit the shelves.

What I think has happened is RFM realised their ‘error’ and cut the parts out AND reprinted the sprue map.

Seems entirely nonsensical to me :relieved:

to close the mystery I’ll take a couple of shots of the box and maybe you can spot a difference

IMG_3743.jpegIMG_3742.jpegIMG_3741.jpeg

Well, that wraps that up. That is a loss and waste of time that we can never get back lol
 

Panzerwrecker

SMF Supporter
Joined
Mar 2, 2022
Messages
362
Points
93
First Name
Los
I’m in need of a sit down - shifting this lot to get to the kit (that was of course bottom box:smiling6:View attachment 497647

if you look at photo of my sprue map - I folded the cover so you wouldn’t think I was winding you up! I wouldn’t let it drag on like that any way:smiling5:

I don’t have the J interior - simply because I was happy with a turret insides I chose to get the G/H kit

Your sprue map is different to mine

So it seems that you literally have a slightly ‘nuanced’ kit compared to mine. I got both mine as soon as they hit the shelves.

What I think has happened is RFM realised their ‘error’ and cut the parts out AND reprinted the sprue map.


to close the mystery I’ll take a couple of shots of the box and maybe you can spot a difference

View attachment 497649View attachment 497650View attachment 497651

Well, that wraps that up. That is a loss and waste of time that we can never get back lol
Wow! how weird.

Your sprue R is tiny so where are all the other parts that I have from my larger sprue R in your kit???

Looking at my kit 5033 sprue count pic above, how is yours different?

Just going to check my box :cool:
 
Last edited:

Panzerwrecker

SMF Supporter
Joined
Mar 2, 2022
Messages
362
Points
93
First Name
Los
Don't be tellin me you got a metal barrel too ;)

Maybe mines an AliExpress special :surprised:
 

Magneto

Oberleutnant
SMF Supporter
Joined
Oct 25, 2023
Messages
290
Points
63
Location
Sky
First Name
Paul
Finally, in order to get revenge on RFM for their duplicitous omissions, you could get this RFM kit as a very cheap interior-ish kit - I think it has a full turret interior (but please check - else we’ll be going through all this again :confounded:)

IMG_3745.jpegIMG_3747.jpegIMG_3746.jpegIMG_3748.jpeg
 

Panzerwrecker

SMF Supporter
Joined
Mar 2, 2022
Messages
362
Points
93
First Name
Los
Finally, in order to get revenge on RFM for their duplicitous omissions, you could get this RFM kit as a very cheap interior-ish kit - I think it has a full turret interior (but please check - else we’ll be going through all this again :confounded:)

View attachment 497652View attachment 497653View attachment 497654
I don't have that kit but on that basis it does look like there could be a few deliberate different editions of kit 5033. Either that or the factory packers packing both kits were smoking a fat one!

Maybe some other owners could chime in and we can put the matter to bed:smiling6:
 

Magneto

Oberleutnant
SMF Supporter
Joined
Oct 25, 2023
Messages
290
Points
63
Location
Sky
First Name
Paul
I don't have that kit but on that basis it does look like there could be a few deliberate different editions of kit 5033. Either that or the factory packers packing both kits were smoking a fat one!

Maybe some other owners could chime in and we can put the matter to bed:smiling6:
Lol - I note your kit is also 2019. Anyway I’ll leave you with my map just for chuckles…

IMG_3750.jpeg
IMG_3749.png
 

Panzerwrecker

SMF Supporter
Joined
Mar 2, 2022
Messages
362
Points
93
First Name
Los
Lol - I note your kit is also 2019. Anyway I’ll leave you with my map just for chuckles…

View attachment 497657
View attachment 497656
Cheers Paul

OK , so one of your pages is identical to one of mine but the other page contents is completely different to mine (see below) Mine has the larger sprue R whereas, your smaller sprue R contains parts mine doesn't have! That means parts called out on my sprue R must be spread across your sprues M, P, S, T, U, U1 & V. These smaller sprues are identical to those in my interior kit and obviously contain some interior parts that are not in my boxing.

Looking at my partly empty sprue R now I have used all the instructed parts, the remaining parts look to be for an Ausf H. So, maybe when they released their Ausf H kit in 2020 sprue content changed in the 5033 boxing ????

In the interior kit 5043 a large chunk of sprue X parts are used for the turret interior. As neither of our 5033 kits have a sprue X, for you to be able to build a decent interior turret floor assembly from your kits contents, means those parts are spead over the smaller sprues and I dont see them! If I'm going sprue blind and they are there, as these sprues all come in the interior kit, means the interior kit doubles up on turret interior parts.

If not we're back to where we started :thinking:

5033 page 2.jpg
 
Last edited:

Panzerwrecker

SMF Supporter
Joined
Mar 2, 2022
Messages
362
Points
93
First Name
Los
Moving on, we can definitely say there are at least two different sprue layouts offered with kit 5033. Whichever boxing you do end up with has absolutely no bearing on the ability to fully complete both variants offered. If you can add additional turret interior parts with what’s on the sprues, then that’s a bonus.

With kit 5033 built up as far as it will go without entering the paint booth, let’s have a look at the second Ausf J kit RFM released.


Rye Field Model Pz.IV Ausf J #RM-5043 w/full Interior

34525_rn.jpg
51rVfBzaTxL._AC_UF894,1000_QL80_.jpg

Released in the same year this kit allows you to build the same gun tank as in kit 5033 with the added bonus of a full interior. Many of the parts between these kits are shared, and along with all the additional interior parts it also comes with a clear hull top plate, glacis plate and upper turret in clear plastic, to show off all that lovely interior. Just like in kit 5033 this also has a small correction sheet which is applicable to this interior kit so it is worth marking the instruction sheet beforehand.

Unlike kit 5033 no running gear components are added until step 27, so we have a lot of interior components to add before we get to that stage. It is worth considering internal paint colour application before the hull tub is assembled. Most horizontal surfaces including the floor remained in red oxide primer. Vertical surfaces were then painted in German interior white (Elfenbein).

Painting both side, front, rear, and floor plates before any connections are made is an option worth considering. It would leave a nice clean demarcation of colours especially where the side plates meet the floor plates. Another worthwhile consideration, and one which David Parker employed on his 1/16 build is to leave the lower hull rear plate temporarily off until the engine bay is almost completed. This will allow much easier fixing of internal components such as the radiator to the engine. Brush painting of fine details like electrical hoses will also be far simpler.

Untithhled.jpgUntitlejd.jpg

The lower hull tub is engineered in almost the same way as in kit 5033. As the interior is now an integral part of the build the shallow pin holes that populate the interior plates will require filling. Whether all of them will be visible after adding all the interior is tricky to say but I filled the ones I deemed so. Before the lower hull tub assembly builds up, parts need to be added, and holes for the return roller mountings drilled out. The kit advises three, but just as in kit 5033 there are witness holes to drill out four. Before the lower hull is built up, the rear plate receives a few engine bay components and holes can be drilled in the outer bow plate moulding if you wish to fit the spare track brace. (steps A1 & A2 below) There are also a few parts to be added internally to the front of each side plate.

A precise fitting hull tub assembly is totally dependent on flush fitment of a few floor components which are instructed to be added in the very first step. Unfortunately, this wasn't helped by the fact the two plastic strips (parts Y56 & Y60) added into channels running either side of the length of the floor were oversized. These MUST sit flush with the floor to allow bracing panels to lie flat on the floor over them. These two panels (parts Xa2 & Xa3) brace the hull tub between the front and rear bogie mountings.

20231215_230917.jpg

In my kit these strips were oversized and would not fit flush into the channels. There was a lot of sanding and test fitting before they would sit completely flush. With the bracing panels added over them it was time to assemble the lower hull. In step 4 the towing eye extension parts need to be added first as the bow plate slots between them.

20231215_230932.jpg

With the floor mounted bracing panel outer profiles essentially giving an additional placement for the side plates to lock into, there really was only one position for them to locate. Unlike the slight gap I had running internally inbetween side plates and floor in kit 5033, this time there was no gap at all.:thumb2:

Lower hull assembly with additional fuel tank and turret floor riser dry fitted.
20231215_231219.jpg
20231215_231149.jpg


My main inspiration for this build is to replicate tank 432 photographed in Czechoslovakia just after wars end. This had a full complement of Drahtgeflechtschürzen and many images show it with the engine hatches open. This kit’s marking guide has this vehicle although it mistakenly shows it with three return rollers.

333.jpg

My main reference material for the interior will be David Parker’s incredible 1/16 Pz.IV Ausf H build in the AFV magazine. Although there are a few differences internally between the Ausf H & J, the majority of the interior components remains the same.

I’ve never built an interior kit before so this will need to be planned out well in advance. The engine is a complex assembly but builds up beautifully and sits precisely on its mounts in the engine bay. This will be painted separately, as will many components before final placement. The fact that so many items will need to be test fitted then painted separately will start to become quite challenging the more we progress through the build. As already mentioned above the interior floor along with many of the added components will remain in red oxide primer, and vertical surfaces will then need to be painted in Elfenbein. David Parker’s build pics will be invaluable at this stage. To avoid applying too many paint layers I plan to paint the interior of the hull tub in rattle can red oxide primer. The vertical areas will then be masked and airbrushed in Elfenbein.

Engine and radiator components.​

20231215_231310.jpg20231215_231325.jpg20231215_231412.jpg20231215_231421.jpg20231215_231751.jpg
 
Last edited:

Jakko

Way past the mad part
SMF Supporter
Joined
Apr 28, 2018
Messages
10,801
Points
113
First Name
Jakko
That looks like a lovely kit, though one that takes a long time to build with all those interior parts to consider — not to mention the difficulty in painting it because of the various colours used for large parts of the insides. At least MiniArt’s M3 medium tank with full interior was easy there: just spray most of it white :smiling3:
 

Panzerwrecker

SMF Supporter
Joined
Mar 2, 2022
Messages
362
Points
93
First Name
Los
That looks like a lovely kit, though one that takes a long time to build with all those interior parts to consider — not to mention the difficulty in painting it because of the various colours used for large parts of the insides. At least MiniArt’s M3 medium tank with full interior was easy there: just spray most of it white :smiling3:
Indeed Jakko. not too dissimilar to building a soft skin really. It looks daunting at first but once you’ve read through the sequencing a few times it can be broken down into smaller build and paint steps. The trickiest part will be keeping the fixing of parts over paint as clean as possible.

The two distinct colours in this interior certainly makes things more complecated than that M3!


TBH, the only interior parts you will see on this finished build will be the final drives through an opened transmission hatch, the engine bay and what is visible through the open hull and turret hatches. I'm not planning on utilising any of the clear parts that would display it all.
 

Jakko

Way past the mad part
SMF Supporter
Joined
Apr 28, 2018
Messages
10,801
Points
113
First Name
Jakko
I’ve found that quite a lot will actually be visible if you leave most or all the hatches open. You can always see a lot ore than you think through any given hatch, is my experience, and the Panzer IV is of course a fairly good one for this with those big hatches in the turret sides.
 

andy55

SMF Supporter
Joined
Sep 21, 2023
Messages
240
Points
63
Location
Near Selby
First Name
Andy
Will be watching this with interest. As had to put HMS Kent on hold.
Just received RFM Tiger mid production with full interior. Its already cut away so will be a bit easier. Famous last words. Will be out of the box build, though may get some different tracks.
 

Panzerwrecker

SMF Supporter
Joined
Mar 2, 2022
Messages
362
Points
93
First Name
Los
I've managed some more progress on the interior.

With the main lower hull tub plates assembled and a few smaller components already added internally, in step 5 you are instructed to add the track guards. This is because both the engine firewall wings and the dividing fighting to front compartment support, slot down and trap them in place as early as step 11. I will leave them off for now to aid test fitting of the interior. Many of the internal components can be built up into small assemblies. As the instructions can skip between different areas of the interior, keeping tabs on their fixing sequencing becomes increasingly important. To make this process simpler I decided to loosely follow the instruction break down and build from the engine bay forward. I will sometimes fix parts fitted in later steps as long as they do not impede other parts, and are to be painted in the same base colour.

The engine bay is separated by the firewall panel and was painted entirely in red oxide primer. Construction of the main components in this area run from step 6 to 12 so these parts were assembled into small sub-assemblies to be painted separately. To avoid connecting the engine assemby to the radiator assembly via the stepped pipework connection (shown below in the step 12 CAD image in pink and green) I would very much recommend fitting parts L23 and L58 from step 11 directly to parts L5, L6 and L56 shown in step 9, beforehand. Not only will this prevent a possible dodgy mid pipe join but will make for a far easier final connection when both assemblies are fixed together. The newly connected parts L28 and L53 now connected to the engine pipework (see second pic below) will easily slot into the holes in the radiator assembly (part X37) shown in Step 11 (A1)


Step 12 .jpg

Step 11a.jpg

Much later in step 34 both engine cooling louvres along with part Z17 will also need a covering of red oxide so I will ensure these areas are painted with the rest of the engine bay components. The engine firewall panel will need painting red oxide on the engine bay side and Elfenbein on the fighting compartment side.

My only area of concern in the engine bay area is that the horizontal bracing panel that is incorporated into radiator moulding X37 would not locate in between the two vertical ribs on the firewall panel. It clearly shows it should (see arrow) in the CAD drawing below, but test fitting the radiator assembly to the cut outs in the port side lower plate left it nowhere near close enough! The radiator assembly has to connect to both the port side plate and the engine when final fixing inside the engine bay is made, so a little jiggery pokery will be required. Lining it all up neatly after paint will most definately require patience and a steady hand.

Step 12 arrow .jpg

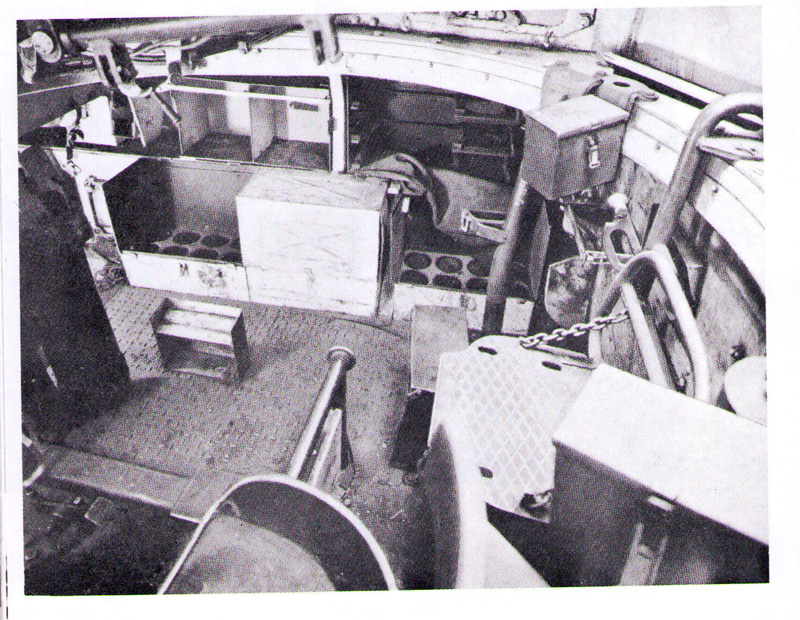
Lots of test fitting is required. Pin holes in the upper rear of the ammo boxes will require filling if visible

20231215_235045.jpgIMG_4861.JPG

Moving forward into the fighting compartment Steps 13 and 14 cover components underneath the rotating turret floor. This comprises of a large riser to clear the propshaft and I presume original fuel tanks, the chequered floor plate and battery. The ammo storage boxes then sit snugly down between the riser and the starboard side plate. The single piece riser part is painted in the same red oxide colour as the floor so it can be safely fixed in position. The chequered floor plate is to be fixed over it, but as the battery and propshaft are fixed underneath, this will also be painted separately along with the assembled ammo storage boxes. The front vertical panel part Xa18 will be painted in Elfenbein, so again will be kept separate until after painting.

After test fixing the Xa18 panel, I would definitely recommend fixing the small wiring conduit part Y5 after the gearbox floor supports, (parts Xa16 & 17) are added in step 19. This part basically bridges the wiring run and slots between both sides much easier, after the parts mentioned are added.

Engine firewall panel, chequered floor plate, battery and ammo storage bins, front panel Xa18 and port side brake assembly and pipework all getting a test fitting.

Lower turret floor.jpg

All horizontal surfaces in this area will be painted in red oxide primer and the vertical panels and ammo boxes in Elfenbein. Part Y54 in step 17 was also fixed in place as this is also painted the same colour as the side plate it is attached to. Part Y16 in step 25 will also need to be added in this area so was also cleaned up ready for paint.

Only the upper shell halves are offered for these three ammo boxes and are engineered to slot into a PE rack. In step 14 there is an option to leave the shells on shows or to simply fit the lid.

208069.jpg

As mentioned above there are solid lids for these ammo boxes provided, I am unsure if these are hinged and how you would display the ammo with the lids open. They look to hinge backwards but would interfere with components like the MG ammo pouches fixed above them (see step 33). Can anybody offer any advice for this conundrum?

David Parker's incredible 1/16 scale Ausf H fighting compartment floor with lower turret floor and vertically stored ammo does give us some clue in this area. There doesn't appear to be actual hinges on the boxes.

Screenshot_20231210_205104_Facebook.jpg

Moving on to the front compartment, this area has by far the most internal components. It includes the gearbox, final drives, brake assemblies and associated linkages, levers, electrical boxes, crew seating, radios, and more ammo storage. Taking reference from David Parkers build, my plan will be to assemble and fix as many parts as possible that were painted in red oxide primer, to the hull floor first. Parts such as the gearbox, the instrument panel that’s sits above it, and small electrical connection boxes will have wiring added and will be painted separately.

Starting in step 14 with the brake assemblies, these were both fully assembled and their pipework can also be safely added. The half shafts that connect to both the inner final drive mouldings Z12 and the front of the gearbox, both connect through the brake assemblies. Parts Z12 connect to the outside of the side plates so you have to figure out how best to assemble all these components if you plan to paint things separetely.

The instructions don’t make it very clear in step 14, but the brake assemblies are handed. The main circular components shown in the first sequence box of pic A4 can be assembled the same way but the starboard side levers (parts Q12 & 14) shown in the next box need to be assembled as a mirror image (see arrow below) The lower foot portion of parts Q11 and Q12 must be on the outer side of each brake assembly to locate onto the rear of the bow plate.

Step 14.jpg

Another little assembly conundrum is how to assemble the two gearbox drive shafts (assembly A3 in step 15 and parts Q24 and Q41 in step 16) when they are connected to parts fixed to both inside and outside of the lower hull. They are instructed to be fixed through the brake assemblies to the inner final drive mouldings (parts Z12) in steps 15 and 16. To paint the brake assemblies off the model, I came up with my own solution. The larger portside drive shaft (assembly A3) was test fitted through the lower hull into the slot in the inner sprocket (part Z12) and then fixed just to the final drive assembly. The drive shaft parts Q24 and Q41 on the starboard side were kept separate. Shaft part Q24 is narrow enough to fit through the brake assembly from the outside so I fixed it directly to part Z12. As both drive shafts will have to connect into holes on each side of the front of the gearbox, to avoid bending painted halfshafts when it was time to fix in the gearbox I figured part Q41 could be fixed directly to part Q35 (a separate front moulding of the gearbox). Part Q35 is painted in red oxide anyway so now the main gearbox moulding can be simply added without a fight. A win, win :smiling:

Step 15 & 16.jpg

As all the linkages and levers in steps 17 and 18 were painted in red oxide they were carefully cleaned up, assembled, and fixed to the floor. Helpful colour coded CAD drawings assist in confirming parts placement. In step 19 the gearbox floor supports are added and as confirmed in the CAD image, the pipework from the starboard side brake assembly fits under one (part Xa17). As my brake assemblies require painting off the model, part Xa17 will now have to be fixed in place after paint too. Test fitting shows that the other floor support (part Xa21) does not impede the port side brake assembly pipework so it can safely be fixed to the floor.

All the components for the front compartment from steps 17 to 19 that are painted in red oxide have now been fixed to the hull floor. In the pics below both the brake assemblies with pipework and the gearbox are just dry fitted.

Final Drives_4873.JPG

IMG_4868.JPG

IMG_4883z.JPG

The pic below also shows the front to fighting compartment bracing support from step 26 dry fitted to test spacing for the front compartment ammo bin yet to be assembled. There are quite a few visible pin marks on this part that will require filling.

IMG_4883.JPG

The tabs on the wings extending from both support and firewall can be seen clearly in the pic above and the reason both track gaurds are to be fitted before these two items are fixed in place. There are also some electrical components yet to be assembled from step 20 as these also require painting separately.
 
Last edited:

Jakko

Way past the mad part
SMF Supporter
Joined
Apr 28, 2018
Messages
10,801
Points
113
First Name
Jakko
I am unsure how you would display the ammo with the lids open. They look to hinge backwards but would interfere with components like the MG ammo pouches fixed above them (see step 33). Can anybody offer any advice for this conundrum?
It’s not my area of expertise, but I found this:

HvH1.jpg


… which doesn’t really help at all, really, because the lids aren’t on two of the three bins. But it makes me suspect they come off entirely: I suspect lips on the horizontal part of the lid go into the flat rings visible at the top, while the vertical part sits behind the lips on the front of the rack and the lid is secured by the clip in the middle. I suppose the whole thing hinged on those flat rings (and along the join between the two parts), but could be taken off entirely quite easily.

As I need to keep the final drive assembles separate to paint, I came up with my own solution. The larger portside shaft (assembly A3) was test fitted through the lower hull into the slot in the inner sprocket (part Z12)
Z12 looks like the inner part of the final drive housing to me, not the sprocket :smiling3: Anyway, if I understand it correctly, you kind of need to install the half-shafts from the outside? So why not leave the final drive housings on both sides loose until after the interior has been painted?
 
Top