Where do you have your instructions?

Andy T

SMF Supporter
Joined
Apr 26, 2021
Messages
1,982
Points
113
Location
Sheffield
First Name
Andy
Strange question I know but I'm looking for ideas. Where do you have your instructions whilst building?

I normally work like this (and I don't just mean in a mess lol) with them on the bench, building on top. It helps me when there are a lot of similar parts as I can lay them out in place, but obviously it's a pain when I need to flick back & forth, and more importantly the glare from my overhead lamp can be tiring on the eyes.
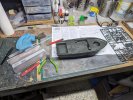
1000004545.jpg

I've tried propping them up at the back of the bench but I can't see them properly without swapping glasses all the time, and if I stand them in front of my drawers I'm even less likely to put tools away after I've finished with them so the desk soon gets swamped.
 

JR

Member of the Rabble and Pyromania Consultant
SMF Supporter
Joined
May 26, 2015
Messages
17,293
Points
113
Location
lincs
First Name
John
Always a problem Andy, I have a gap at the side of the raised build area , it end up in there with things on top of it . Think one of those cooks recipes stands is what we need.
 

Jim R

SMF Supporter
Joined
Apr 27, 2018
Messages
13,758
Points
113
Location
Shropshire
First Name
Jim
I have the sprues and the instructions on the bench to the left of the cutting mat I work on. As parts get taken off the sprue, cleaned up and assembled they go on the bench to the right of the cutting mat.

I write on the instructions. I use coloured high lighters to show parts removed, stages completed, things to watch out for etc.
 

JR

Member of the Rabble and Pyromania Consultant
SMF Supporter
Joined
May 26, 2015
Messages
17,293
Points
113
Location
lincs
First Name
John
I have the sprues and the instructions on the bench to the left of the cutting mat I work on. As parts get taken off the sprue, cleaned up and assembled they go on the bench to the right of the cutting mat.

I write on the instructions. I use coloured high lighters to show parts removed, stages completed, things to watch out for etc.
I have a cheap cork board on the wall, I pin the required page into it and same as Jim I am starting to highlight areas for pe etc
Jim and Bob.
I do the yellow marker high lighter as I go , write things to do later , those bit you know will get knocked off . Will find some way now of houlding the instructions so they don't get buried.
 

Andy T

SMF Supporter
Joined
Apr 26, 2021
Messages
1,982
Points
113
Location
Sheffield
First Name
Andy
Thank you so far. The more ideas the merrier and I might find something that works better than what I have now.

I'd thought about a music stand John. I'm sure Zoë still has one from her brass band days (French & Tenor horns) although I'd lose the desk space behind it.

And yes, highlighting and general scribbling comes in handy for me too.
 

therapy

SMF Supporter
Joined
Apr 21, 2019
Messages
886
Points
93
Location
East Anglia
First Name
Nick
When I created my little work area, I fixed a magnetic white board to the wall right in front of the bench with the intention of sticking the instructions to it. However, I soon found I spend so much time flipping back and forth that I don't use it for that. I tend to just keep them on the windowsill next to me....

The board is still handy for scribbling on though.

Nick
 

JR

Member of the Rabble and Pyromania Consultant
SMF Supporter
Joined
May 26, 2015
Messages
17,293
Points
113
Location
lincs
First Name
John
Thank you so far. The more ideas the merrier and I might find something that works better than what I have now.

I'd thought about a music stand John. I'm sure Zoë still has one from her brass band days (French & Tenor horns) although I'd lose the desk space behind it.

And yes, highlighting and general scribbling comes in handy for me too.
That sort of thing Andy. The only thing not to far away so you can't read it clearly .
 

Airborne01

SMF Supporter
Joined
Mar 30, 2021
Messages
3,188
Points
113
Location
Essex
First Name
Steve
An upright magnetic knitting plan holder to the right of the work area, hold instructions with small magnetic clips and use pencil to strike through removed parts or circle parts yet to be attached.
Steve
 

rtfoe

SMF Supporter
Joined
Apr 29, 2018
Messages
7,518
Points
113
Location
Malaysia
First Name
Richard
I have a shelf above the table and suspend two clips to hold the intended page of the instruction open. Now I basically study the instructions beforehand and cut out all the parts needed for that step of build, dry fit and seldom refer to it again until the next step.

Cheers,
Wabble
 

Ian M

Administrator
Staff member
Administrator
Moderator
SMF Supporter
Joined
Dec 14, 2008
Messages
19,744
Points
113
Location
Falster, Denmark
First Name
Ian
I normally put them wherever there is room. lol
As a bifocal user I have issues with how far away they are and if I can look right at them just by turning my neck. I have found an app for smartphones and pads that you can make a pdf by photographing the subjects then string them together, I might one day try that on my tablet... Hmm
 

Tim Marlow

Little blokes aficionado
SMF Supporter
Joined
Apr 27, 2018
Messages
16,801
Points
113
Location
Somerset
First Name
Tim
I keep mine on the right of the work area, being right handed. They are within easy reach and can be picked up and put down as required. I also keep a pen there and scrawl my own instructions and build tips all over them. When I got back into the hobby I did think about buying a copy holder (like secretaries use for transcription when typing on PCs)
but never got around to it. I’m so used to working this way that I probably never will now.

Copy holders are like this…..not cheap these days though.
 

Neil Merryweather

SMF Supporter
Joined
Dec 29, 2018
Messages
4,428
Points
113
Location
London
First Name
Neil
Yep I have one of those. No idea where I got it from, I certainly wouldn't have spent money on it -possibly being thrown out at work - ah yes I remember, it was broken so I rescued it and repaired it .
Very useful for reference images as I don't build many kits
 

Andy T

SMF Supporter
Joined
Apr 26, 2021
Messages
1,982
Points
113
Location
Sheffield
First Name
Andy
Copy holder - that's the kind of thing I had in my head but didn't know they existed! Pull it closer to study then move it away if I need more space.

Looks like the kind of thing I could knock up from a spare Ikea anglepoise lamp and a piece of board...
 

Jakko

Way past the mad part
SMF Supporter
Joined
Apr 28, 2018
Messages
10,846
Points
113
First Name
Jakko
Ooh, the Tamiya PBR! Liked that kit so much I built two, long ago :smiling3:

Anyway, I normally have the instructions to my right on my workbench, keeping them to the right of where I’m actually building the model and not normally placing things on them except occasionally when I need to put something down temporarily and there’s no other suitable place. They do, however, usually cover most of my tools that are also on my right, so when I need to find some tweezers, picks, etc. I often end up either lifting up the instructions or moving them further to the right, and then moving them back again.
 

Tim Marlow

Little blokes aficionado
SMF Supporter
Joined
Apr 27, 2018
Messages
16,801
Points
113
Location
Somerset
First Name
Tim
Yep I have one of those. No idea where I got it from, I certainly wouldn't have spent money on it -possibly being thrown out at work - ah yes I remember, it was broken so I rescued it and repaired it .
Very useful for reference images as I don't build many kits
I have a PC screen on a swivel that comes in from the left for reference pictures. That’s for the “build” desk…..the screen also swivels to the left to come in on the other side so I can use it for references when I’m working on the “painting” desk…..a bit elaborate perhaps, but I planned the room for a long time before I retired and moved to the countryside.
 

boatman

SMF Supporter
Joined
Nov 8, 2018
Messages
12,944
Points
113
Location
NORFOLK UK
First Name
christopher
well Andy i know my 10ft plans are a little bit different from what you are usein but i just have them flat on the work bench an a part i want to build like on my tiger i just take a pic of the part i want to build an scale it up off the camera an it saves tryin to move 10ft plans around alot as they tear very easy
so thats how i do it an ive built tiger so must be a reanonably workable good idea
chrisb
 

Andy T

SMF Supporter
Joined
Apr 26, 2021
Messages
1,982
Points
113
Location
Sheffield
First Name
Andy
Ooh, the Tamiya PBR! Liked that kit so much I built two, long ago :smiling3:
As long as you don't expect anything spectacular from mine lol

My research consists of one build video to check for any major fit issues, and a couple of real pictures to look at colours, so accurate it probably won't be :smiling5:
 

Jakko

Way past the mad part
SMF Supporter
Joined
Apr 28, 2018
Messages
10,846
Points
113
First Name
Jakko
Mine also aren’t anything spectacular, really :smiling3: I put one into a diorama and the other was going to go into a diorama that was never finished. Aha, here we are! I knew I had made a post about those here some years ago …
 
Top