IDF M109 'Doher'

Magneto

Oberleutnant
SMF Supporter
Joined
Oct 25, 2023
Messages
294
Points
63
Location
Sky
First Name
Paul
As the Warrior enters its final stages, the next item on my build list is the IDF M109 'Doher'.
I was going to base it on the Kinetic kit that I had just added to the stash BUT, after trying to get the twisted lower hull square in hot water, I gave it the elbow and plumped for the AFV Club M109. Later on I will return to the Kinetic one and revert this to either a British version or an American....
So.... out came the kit, the reference and the extras....

View attachment 494306
View attachment 494307
View attachment 494308
The extras include Black Dog resin interior, Voyager etch and AFV Club 'workable' tracks...
So the first job was to assemble the lower hull...

View attachment 494310
This consists of seven parts and needs to be square. I started with the rear panel and the floor, these were squared up on a sheet of thick glass rescued from someones discarded video/dvd recorder cupboard, Then came the sides, tops to the track sponsons and finally the sides and front of the hull.

View attachment 494311
As I am adding the interior I decided that all of the ejector pin marks and the holes that you have to drill out would all be filled, this prevents the rivet counters from their "Ooooohhhh!!! let's count the ejector pin holes (sniff)" factor...

View attachment 494312
First job was to add the floor and here because the hull sides are at a slight angle the floor has to be slid in from the front to the rear and then the front of the floor slightly bent to clear the final drive housing...

View attachment 494313
... As seen here, I also used the spare center torsion block to support the front of the floor. I decided to fit part of the drivers compartment which would then give me a reference for the other bulkheads to fit.
Now that beautiful clean bench that you saw earlier - well now they look like this....

View attachment 494314
View attachment 494315
The pliers are there to hold the resin blocks when sawing...
More later
Cheers
Mike.
Awesome! Modern armour is not on my list but this kit looks great. I am an interior freak so am greatly intrigued and will follow.

I have a few pertinent questions;

1.Would you consider using LEDS for the interior?

2.What do you use for the vision devices - do you use crystal paints for lens colour?

3.When cutting/sawing resin blocks do you use a face mask and do you use water on saw to keep dust down

4. I recently bought a 0.1 saw from Japan. What saw do you use? I just wanted to know tolerance for blade thickness

5. What does ‘Hil Hatotehim’ (?) mean?

6. Will you be buying the Borders Merkava with full interior?!
 

Scratchbuilder

SMF Supporter
Joined
Jul 2, 2022
Messages
1,973
Points
113
Location
Luton
First Name
Mike
Hi Magneto,
Welcome to the blog.
Now for the answers.
1. LED's - no I leave the electrics to those that know better than me.
2. I use either Blue/Black/Green on acetate sheet taken from those packages you get at the supermarket. The Blue and Green come from the AK clear colours 505/504 which I take a largish blob from the bottle and then use gravity to move it around the sheet. Then when it has spread I place it under a cover and leave it to both dry and level itself out. Then I cut to size and apply with pva. The black is either Black paint or my sadly depleting supply of exposed 35mm film which I collected when at Uni/College doing my degree in Graphic Design. With so much photography there was plenty of waste from failed project sessions.
3. I always use a face mask made by JSP, which I also use for spraying paint. One thing I learned if nothing else after a heart attack through bad diet, lack of rest, smoking and drinking was DBS - Don't Be Stupid....
4. I use what are commonly referred to as 'Zona' saws Fine, Medium and Coarse for general cutting both resin and plastic. For fine cutting I have a variety of ASK Razor Saw Blades 70/70 teeth or finer (available from John at The Scale Model Shop). Main working knife is a Stanley knife, not the retractible blade type. Also a variety of scalpel blades 10A, 10, 09, 11.
5. Move Away.
6. No, you cannot see very much, and the 'exploded' tank model has been done to death. I have a Panther with the full interior (did not read the description fully) so it will eventually be completed without it.

The Handwheel. This is a ring made from annealed copper wire wound around a drill bit of the diameter required (or nearest) it was then c/a'd at the joint, the centre was from punched out discs of plastic and the same with the handle.

Hope this has helped you out some.

Cheers

Mike.
 

Magneto

Oberleutnant
SMF Supporter
Joined
Oct 25, 2023
Messages
294
Points
63
Location
Sky
First Name
Paul
Hi Magneto,
Welcome to the blog.
Now for the answers.
1. LED's - no I leave the electrics to those that know better than me.
2. I use either Blue/Black/Green on acetate sheet taken from those packages you get at the supermarket. The Blue and Green come from the AK clear colours 505/504 which I take a largish blob from the bottle and then use gravity to move it around the sheet. Then when it has spread I place it under a cover and leave it to both dry and level itself out. Then I cut to size and apply with pva. The black is either Black paint or my sadly depleting supply of exposed 35mm film which I collected when at Uni/College doing my degree in Graphic Design. With so much photography there was plenty of waste from failed project sessions.
3. I always use a face mask made by JSP, which I also use for spraying paint. One thing I learned if nothing else after a heart attack through bad diet, lack of rest, smoking and drinking was DBS - Don't Be Stupid....
4. I use what are commonly referred to as 'Zona' saws Fine, Medium and Coarse for general cutting both resin and plastic. For fine cutting I have a variety of ASK Razor Saw Blades 70/70 teeth or finer (available from John at The Scale Model Shop). Main working knife is a Stanley knife, not the retractible blade type. Also a variety of scalpel blades 10A, 10, 09, 11.
5. Move Away.
6. No, you cannot see very much, and the 'exploded' tank model has been done to death. I have a Panther with the full interior (did not read the description fully) so it will eventually be completed without it.

The Handwheel. This is a ring made from annealed copper wire wound around a drill bit of the diameter required (or nearest) it was then c/a'd at the joint, the centre was from punched out discs of plastic and the same with the handle.

Hope this has helped you out some.

Cheers

Mike.
Thanks Mike! Very useful info from which I have taken notes. Will also check out the saws from John.
 

Scratchbuilder

SMF Supporter
Joined
Jul 2, 2022
Messages
1,973
Points
113
Location
Luton
First Name
Mike
Update,
Been working away on the interior still...
So a couple of pics to add..
20231215_140714_HDR.jpg
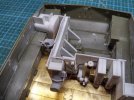
Work is advancing on the drivers/engine bulkhead...
20231215_140818_HDR.jpg
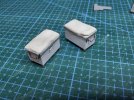
More detail on the boxes...
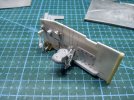
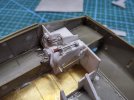
20231215_164049_HDR.jpg
Test fit on the drivers compartment - the gap between the engine bulkhead and the block on the left seemed a little tight, so this needs some work....
Addition.
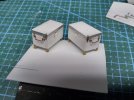
The storage boxes nowhave the seat cushions made up and drying.
The block on the left has been rectified and now looks correct.
There has been more work on the engine bulkhead....
Pics to follow.
Cheers
Mike.
 

Magneto

Oberleutnant
SMF Supporter
Joined
Oct 25, 2023
Messages
294
Points
63
Location
Sky
First Name
Paul
Great work - highly impressive and inspirational:thumb2:

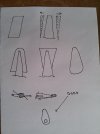
how did you make the tear shaped metal part?

IMG_3755.jpeg
 

Scratchbuilder

SMF Supporter
Joined
Jul 2, 2022
Messages
1,973
Points
113
Location
Luton
First Name
Mike
Paul (Magneto),
Below is a sheet with diagrams on describing the process.
The material is sheet aluminium in this case 2mm x 4mm. I then cut about half a mm from the top to zero at the bottom (wedge) from each side.
Then with a pointed pair of tweezers and some smooth wetndry I rounded off the tip, reversed the material and did the same to the bottom.
I then wound some thin copper wire around a 1mm drill shank (a dress pin would do or a sewing needle) to make a spring, removed it from the drill shank, placed it on a metal surface and inserted a sharp knife blade into the end and pressed down on the length and when the blade is removed you are left with small rings.
The metal shape is then c/a'd to a 1mm length of plastic rod to give it spacing and a smear of c/a is then wiped across the whole face and the ring picked up with the blade and positioned where you want it, in this case central to the axis.
Hope this helps
Mike.
20231218_114724_HDR.jpg
 

Si Benson

SMF Supporter
Joined
Apr 27, 2018
Messages
3,327
Points
113
First Name
Si
That’s some awesome work…..That linkage looks like it could work!
Top job Mike :cool:
 
  • Like
Reactions: JR

Scratchbuilder

SMF Supporter
Joined
Jul 2, 2022
Messages
1,973
Points
113
Location
Luton
First Name
Mike
Jim, Si, Many thanks for your comments, now on a break untill after xmas.
This is usually the time when the neighbours with kids come around wanting me to put things together for them, so the house gets full of bikes and dolls houses etc....
 

Scratchbuilder

SMF Supporter
Joined
Jul 2, 2022
Messages
1,973
Points
113
Location
Luton
First Name
Mike
OK it does not seem a lot but have been working away slowly on this and the Churchill weathering...
Drivers pit now as complete as I want to go on it...
20231229_165137_HDR.jpg
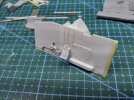
This is the side wall with brake and accelorator pedals now in place, it has been left seperate for painting.
20231229_165153_HDR.jpg
Te other side of the drivers pit... The small handle is part of the handbrake system. The rest like the steering mechanism will be left off as it will not be visible.
20231229_165214_HDR.jpg
These are the two stowage bins seen earlier, now ready for primer and paint...
More later
Mike
 
Top