- Home
- Forums
- Military Vehicles
- Military Vehicles Under Construction
- Armoured Vehicles Under Constuction
You are using an out of date browser. It may not display this or other websites correctly.
You should upgrade or use an alternative browser.
You should upgrade or use an alternative browser.
IDF M109 'Doher'
- Thread starter Scratchbuilder
- Start date
Scratchbuilder
SMF Supporter
Update,
Couple of pics to show that I am not sitting around doing nothing (I am really, Ooooohhhh! my knee hurts)....
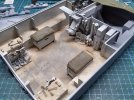
So after the 'sand' pigments had dried i went over it again with a stiff brush and tried to show a sweeping motion and the metal flooring.
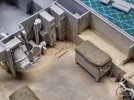
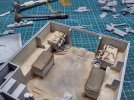
And once satisfied I turned my attention to the turret...
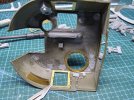
This is the start of adding the miles of electrical runs and also the fire extinguishers, of which there are many, at least ten.
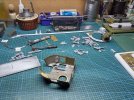
And the bench layout... At the top is the metal barrel assembled and waiting to be added once the build is almost complete. To the right of that is the turret base and part of the gun. There will be more added as you can see by the resin parts. The white primer is so that I can assemble the turret with masking tape and then using a pencil I can mark out where the electrical cables locate from the turret side walls, so that when you look inside there should not be any obvious gaps. The white tube assembly is a ready ammo rack which is a 4x4 tube and is located at the rear of the turret on the opposite side to the commanders hatch. To the left of the tub holding the barrel are two white objects. These will be scratched fire extinguishes that fit on the floor and will have pipes running from them up into the turret. Below the drills are some more resin parts that will be fitted into the turret side walls and roof.
And I think that is it for now.
Again, many thanks for the comments, that is what keeps the build going.
Cheers
Mike
Couple of pics to show that I am not sitting around doing nothing (I am really, Ooooohhhh! my knee hurts)....

So after the 'sand' pigments had dried i went over it again with a stiff brush and tried to show a sweeping motion and the metal flooring.


And once satisfied I turned my attention to the turret...

This is the start of adding the miles of electrical runs and also the fire extinguishers, of which there are many, at least ten.

And the bench layout... At the top is the metal barrel assembled and waiting to be added once the build is almost complete. To the right of that is the turret base and part of the gun. There will be more added as you can see by the resin parts. The white primer is so that I can assemble the turret with masking tape and then using a pencil I can mark out where the electrical cables locate from the turret side walls, so that when you look inside there should not be any obvious gaps. The white tube assembly is a ready ammo rack which is a 4x4 tube and is located at the rear of the turret on the opposite side to the commanders hatch. To the left of the tub holding the barrel are two white objects. These will be scratched fire extinguishes that fit on the floor and will have pipes running from them up into the turret. Below the drills are some more resin parts that will be fitted into the turret side walls and roof.
And I think that is it for now.
Again, many thanks for the comments, that is what keeps the build going.
Cheers
Mike
Waspie
SMF Supporter
Inspirational Mike. Just wish my skills were 10% as good. Amazing what you're doing. But do tell, why the 'electric iron' holder in the turret bulkhead. Do the IDF really take in washing when deployed?Update,
Couple of pics to show that I am not sitting around doing nothing (I am really, Ooooohhhh! my knee hurts)....
View attachment 500883
So after the 'sand' pigments had dried i went over it again with a stiff brush and tried to show a sweeping motion and the metal flooring.
View attachment 500884
View attachment 500885
And once satisfied I turned my attention to the turret...
View attachment 500886
This is the start of adding the miles of electrical runs and also the fire extinguishers, of which there are many, at least ten.
View attachment 500887
And the bench layout... At the top is the metal barrel assembled and waiting to be added once the build is almost complete. To the right of that is the turret base and part of the gun. There will be more added as you can see by the resin parts. The white primer is so that I can assemble the turret with masking tape and then using a pencil I can mark out where the electrical cables locate from the turret side walls, so that when you look inside there should not be any obvious gaps. The white tube assembly is a ready ammo rack which is a 4x4 tube and is located at the rear of the turret on the opposite side to the commanders hatch. To the left of the tub holding the barrel are two white objects. These will be scratched fire extinguishes that fit on the floor and will have pipes running from them up into the turret. Below the drills are some more resin parts that will be fitted into the turret side walls and roof.
And I think that is it for now.
Again, many thanks for the comments, that is what keeps the build going.
Cheers
Mike
scottie3158
SMF Supporter
Mike outs standing result in the hull and very neat cable runs in the turret.
Damn Olderthanme, even with a bum knee, you are making super progress on the Dough thang!!! Excellent scratchy as usual and attention to detail to boot. I do hope your knee gets better quickly Mike, but as we get older, they usually don't. Keep up the good work and I'll drink a few cold ones for your knee tonight to help it heal! Take care of yourself Buddy...
Prost
Youngerthanyou
Prost
Youngerthanyou
Jim R
SMF Supporter
Wonderful scratchery there Sir. Hope the knee gets better soon. Unless, of course, it's a fake bum knee to get an 'excused washing up and hoovering' chit. If that's the case then I hope you can keep it up a while longer.
Scratchbuilder
SMF Supporter
No! she strapped the broom to my 'arris and then made me hobble around claiming I was multi-tasking - exercise and sweeping....Wonderful scratchery there Sir. Hope the knee gets better soon. Unless, of course, it's a fake bum knee to get an 'excused washing up and hoovering' chit. If that's the case then I hope you can keep it up a while longer.
Scratchbuilder
SMF Supporter
Cheers Scottie, lot more to do yet..Mike outs standing result in the hull and very neat cable runs in the turret.
Scratchbuilder
SMF Supporter
Well they seem to be cleaning someones washing...Inspirational Mike. Just wish my skills were 10% as good. Amazing what you're doing. But do tell, why the 'electric iron' holder in the turret bulkhead. Do the IDF really take in washing when deployed?

Scratchbuilder
SMF Supporter
I know Youngerthanme,Damn Olderthanme, even with a bum knee, you are making super progress on the Dough thang!!! Excellent scratchy as usual and attention to detail to boot. I do hope your knee gets better quickly Mike, but as we get older, they usually don't. Keep up the good work and I'll drink a few cold ones for your knee tonight to help it heal! Take care of yourself Buddy...
Prost
Youngerthanyou
It certainly puts a stop to the ballet and gymnastics lessons... Went to guzzle down a beer for you - she came and took it off me claiming that with the pain killers etc I cannot drink... And then to add insult to torture, upped the bottle and guzzled it herself... How much pain do you have to go through

Prost
Olderthanyou.
Scratchbuilder
SMF Supporter
Update,
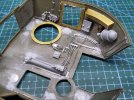
More work on the internal wiring and with parts being added at a slow pace....
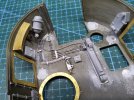
and from the other side...
Lining up the cable run...
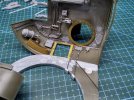
This will allow me to spray both the turntable and the inside of the turret without a fight....
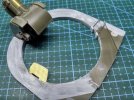
Work starting on the turntale...
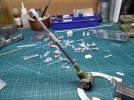
And the barrel (tube) added just for a dry run.
Cheers
Mike.
More work on the internal wiring and with parts being added at a slow pace....

and from the other side...

Lining up the cable run...

This will allow me to spray both the turntable and the inside of the turret without a fight....

Work starting on the turntale...

And the barrel (tube) added just for a dry run.
Cheers
Mike.
Waspie
SMF Supporter
Spectacular Mike, don't know if I'd have the ability to tackle anything like the wiring you've done. Definitely another level!!
boatman
SMF Supporter
WELL Mike i havnt said much yet but now lookin through your build this has got to be the most comprensive an detailed build ive ever seen on a AFV very well done sir
chrisb
chrisb
scottie3158
SMF Supporter
Mike, Superb work going on mate.
Scratchbuilder
SMF Supporter
Waspie, Boatman, scottie,
Many thanks for your comments.
Doug, Christopher, once you have a basic diagram or drawing to work from the rest after a while comes naturally.
I am lucky in that I have a friend from the IDF that works on one of these as part of the crew and it was his prodding that started me doing this. So once finished he will be having to find room for it.
Cheers
Mike.
Waspie
SMF Supporter
I'm regretting throwing/shredding all my Sea King notes. I have more information on the Yanks AQS18V dipping sonar than I do of the Sea King 195(M sonar)!!!Waspie, Boatman, scottie,
Many thanks for your comments.
Doug, Christopher, once you have a basic diagram or drawing to work from the rest after a while comes naturally.
I am lucky in that I have a friend from the IDF that works on one of these as part of the crew and it was his prodding that started me doing this. So once finished he will be having to find room for it.
Cheers
Mike.
Scratchbuilder
SMF Supporter
Same with me with the 432/wombat firtting - a whole set of sketches and drawings courtesy of MOD. Plus maintenance and driver handbooks, then the late mark Chieftains and early Challengers - Oh! to be able to wind back the clock and know what we knew then.I'm regretting throwing/shredding all my Sea King notes. I have more information on the Yanks AQS18V dipping sonar than I do of the Sea King 195(M sonar)!!!
