Kitty Hawk 1/48 Jaguar GR.1/ GR.3

boatman

SMF Supporter
Joined
Nov 8, 2018
Messages
12,963
Points
113
Location
NORFOLK UK
First Name
christopher
I know it's supposed to be a pinky colour but I used what I had for a gulf war challenger build so it was a Tamiya rattle can of their desert yellow.
HI Mick well thats the colours i see on the real plane sorta pinky colours very weird colours to me anyway an my mate as we both remarked on it
chris
 

Ian M

Administrator
Staff member
Administrator
Moderator
SMF Supporter
Joined
Dec 14, 2008
Messages
19,788
Points
113
Location
Falster, Denmark
First Name
Ian
Well...
I'll bung a few photos up in a bit but first some waffle.
Only joking, the photos will be in with the waffle.
So:
20220121_133008.jpg
The avionics bay in the nose is quite well detailed, a little soft maybe, How ever it will, due to two minor details be closed!

20220121_133030.jpg
The first is the inside of the panels each have ejector pin marks. Being a concave surface not the easiest to get an acceptable, for me result

20220121_133538.jpg
The second is that the subject has a nice nose art decal that covers the panels.
Unfortunately the panel sits just a fraction low and the splodge of super thin has marked the surface. It'll clean up.

20220121_133605.jpg
The nose wheel strut: A good fit and again a bit soft, The antic Airfix one was way sharper/crisp. hey ho.
20220121_134618.jpg
Not the best PE harness but it was in the box and it is what it is. Including to big by far. (looks like the seat cover needs a touch up though).
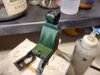
Not the best bang seat I have seen. The Oh Sh!t pull pinged off into the unknown universe on leaving the sprue, so a quick fix with a bit of wire. (and later paint!)
We will ignore the fact that this grab that fires you through the canopy when pulled is normally covered by a flap so no one else pulls it by mistake!
The cock pit is nothing to write home about. Small cramped and black. Very shallow PE for the side consoles and the IP up front.
To be honest, no one will ever look in side and say wow or eww! so good enough.
I can feel my days of tones of PE and resin are soon a thing of the past.

20220121_163412.jpg
So far the only parts that have given me grief- The fit was so tight and also impossible to get to stay put odd angles and all that. Lets hope the engines fit.
Talking of engines:
20220121_163405.jpg
Are they really so devoid of 'gubbins' on the out side?

20220121_163355.jpg
The PE on the inside of the nozzles was fun to get in. but it got there.
20220121_133633.jpg
Started to find bits that will be painted befor the glue up due to the placement of them..
A suitable colour needs to found The destructions call out is interior green, but should it not be yellow chromate?
Whilst on the subject of instructions....
I found out what happens to all the people that get turned down by Dragon- They got a job at Kitty Hawk. Lets just say they are not to clear at times AND they missed a page out the book, to that was a photocopy slipped in the book. together with a second page which was identical to the page it should replace!.
20220121_163436.jpg
The ever growing parts for painting tree. Oh and Boatman. my intake ducts went togehter like a dream. As to if they fit the fuselage remains to be seen.


Some conclusions thus far:
The detail is pretty good if a little soft and fuzzy.
The plastic is also good and takes sanding well.
The kit would probably had been a lot better and less scary, if they had dropped the open panels (there are loads) and concentrated on what can be seen.
So far the fit of the parts is pretty good The two bays on the long stick in the above photo held together with out glue! (they are glued though no need to panic.
The build order seems very odd. I dont recall the Airfix one being as bad. (I have one in the stash so I will find out one day).

Thanks for looking in and hope you are enjoying this little adventure.
Cheers
 

Attachments

  • 20220121_133745.jpg
    20220121_133745.jpg
    66.7 KB · Views: 5

boatman

SMF Supporter
Joined
Nov 8, 2018
Messages
12,963
Points
113
Location
NORFOLK UK
First Name
christopher
well ok Ian but wait till you get to the main undercart an trying to fit the engines an their covers they were mostly my stickin points an curseing unless i got a teabreak kit lol
chris
 
Last edited:

Ian M

Administrator
Staff member
Administrator
Moderator
SMF Supporter
Joined
Dec 14, 2008
Messages
19,788
Points
113
Location
Falster, Denmark
First Name
Ian
Ding ding; round two.
Now this sub title might give the impression that the build is a fight well actually not so much.
Yes there are parts that need careful dry fitting befor glue is applied but so far only very few real issues.
So first the problem parts.
20220125_115804.jpg
The intake ducts. width wise the fit was good but they did stand proud about 1mm, which is way off- I am sure the real thing did not have an almost two inch step at the joint area...
So first off the location tabs got the knife and then half a millimeter removed from the back face. Like wise the part on the fuselage where they meet, was also reduced by about the same.
This actually got them to sit how they should; flush on all three sides. On removing the clamp from the one on the right, the rather thin joint had opened and things have gone a bit out of line. Bugger. I will have to have a go at that later.
I primed the parts that are needing paint befor assembly, Alclad. was the weapon of choice. Seriously forgot how much that smells! And being to lazy to go to the shed for some cellulose thinners to clean up with, I used thier own cleaner... NEVER AGAIN. It really stinks most foul.
Any how:
20220125_103852.jpg

20220125_103925.jpg
I have added a few of the pipe details that are missing and obvious. The less 'in your face' ones being ignored.
A bit of tape over the well should give enough masking to paint the leg!
'20220125_103938.jpg
A wash or two and a bit of grime will break the emptiness here. A look in my reference album has a whole lot more in here.
20220125_104033.jpg
The main UC struts, although over complicated, went together well. As to if the wheels will sit flat on the ground when I am done remains to be seen.
Talking of flat, the tyres in this kit are very flat on the contact area, or tread if you like. Jags had quite a rounded tyre! with a tread pattern!
20220125_104140.jpg
While waiting for glue/paint to dry I made a start on the arms. Loads of them- Bit miffed there is only one BGL1000 in the box even though the instructions says to build two!!! Hmmm

A wing and a prayer.
20220125_104158.jpg
The first of some serious questions. Why on earth have they put a joint diagonally across a panel like that!
On the bottom ok not so easy to be seen but any how. Not good. Why the need to have that one part in PE. Did they cock it up and need to fix it? Madness!
20220125_115505.jpg
Both trailing and leading flaps have one option. Open...
At least they remembered the bumps for the actuators in the flaps...

20220125_115526.jpg
Just would be better if they where in the right place as can clearly be seen when held up to a light.

Tune in again for the next round...Fitting bits in the fuselage. :surprised:
 

adt70hk

I know its a bit sad but I like quickbuild kits!!!
SMF Supporter
Joined
Sep 4, 2019
Messages
9,517
Points
113
First Name
Andrew
Coming on nicely Ian, despite the issues. That join across the wing is a bit daft in particular....

ATB.

Andrew
 

colin m

Moderator
Staff member
Moderator
SMF Supporter
Joined
Dec 26, 2008
Messages
8,607
Points
113
Location
Stafford, UK
First Name
Colin
Well now, all seems to be going rather well. Sure, you've had to do some proper modelling, but hey, it's not a Tamiya.
 

Ian M

Administrator
Staff member
Administrator
Moderator
SMF Supporter
Joined
Dec 14, 2008
Messages
19,788
Points
113
Location
Falster, Denmark
First Name
Ian
That join across the wing is a bit daft in particular....
The one on the vertical stab is even dafter! A join between the panels and right through an inspection cover. Why not. lol
20220125_170806.jpg
A better place would have been to have had a nice locating tab in the radio gismo thingie (tech speak lol). No no- just a but join tween the two parts, Oh and the rudder..
The quick of eye will note that the rivets have been forgotten on this side of the panel as well. Grr.
 

Ian M

Administrator
Staff member
Administrator
Moderator
SMF Supporter
Joined
Dec 14, 2008
Messages
19,788
Points
113
Location
Falster, Denmark
First Name
Ian
Well now, all seems to be going rather well. Sure, you've had to do some proper modelling, but hey, it's not a Tamiya.
It sure aint a Tamiya! I kid you not the old Airfix one is a walk in the park compared to this.
I must admit that it's not fighting to hard. Also the issues I am finding are mostly because things are to tight or to big. An easy problem to solve. Worse if they where to small....

I have put the gubbins in the fuselage and zipped it up. Not photos today, sorry, They will come tomorrow, when the various clamps, tape, vice grips and sash cramps are removed.
 

Jim R

SMF Supporter
Joined
Apr 27, 2018
Messages
13,786
Points
113
Location
Shropshire
First Name
Jim
Hi Ian
Well so far so good. It hasn't found it's way into the bin - yet! Definitely a build that needs patience and experience. The instructions and the wing joins are ridiculous :sad: Despite everything you're making good progress.
Jim
 

boatman

SMF Supporter
Joined
Nov 8, 2018
Messages
12,963
Points
113
Location
NORFOLK UK
First Name
christopher
WELL Ian as far as im concerned you havnt hit the really bad bits yet they are still to come an why they dint make the vetical tail in one piece is beyond my understanding as its not that big is it ?
chris
 
Last edited:

Tim Marlow

Little blokes aficionado
SMF Supporter
Joined
Apr 27, 2018
Messages
16,831
Points
113
Location
Somerset
First Name
Tim
Coming along well, but the joints do make you scratch your head. It’s almost like the designer had never done one, or even built one, before.
 

boatman

SMF Supporter
Joined
Nov 8, 2018
Messages
12,963
Points
113
Location
NORFOLK UK
First Name
christopher
Coming along well, but the joints do make you scratch your head. It’s almost like the designer had never done one, or even built one, before.
AN You could well be right Tim as thats what i thought when i was building my kit
chris
 

Ian M

Administrator
Staff member
Administrator
Moderator
SMF Supporter
Joined
Dec 14, 2008
Messages
19,788
Points
113
Location
Falster, Denmark
First Name
Ian
Me thinks they had plans for another version. There are two top sections for the tail fin, and several of the openable covers have two versions....
We will never know.
 

Ian M

Administrator
Staff member
Administrator
Moderator
SMF Supporter
Joined
Dec 14, 2008
Messages
19,788
Points
113
Location
Falster, Denmark
First Name
Ian
WELL Ian as far as im concerned you havnt hit the really bad bits yet they are still to come an why they dint make the vetical tail in one piece is beyond my understanding as its not that big is it ?
chris
I thought you said the intakes was one of the bad ones... Prey tell.
 
Top