Kitty Hawk 1/48 Jaguar GR.1/ GR.3

boatman

SMF Supporter
Joined
Nov 8, 2018
Messages
12,962
Points
113
Location
NORFOLK UK
First Name
christopher
I thought you said the intakes was one of the bad ones... Prey tell.
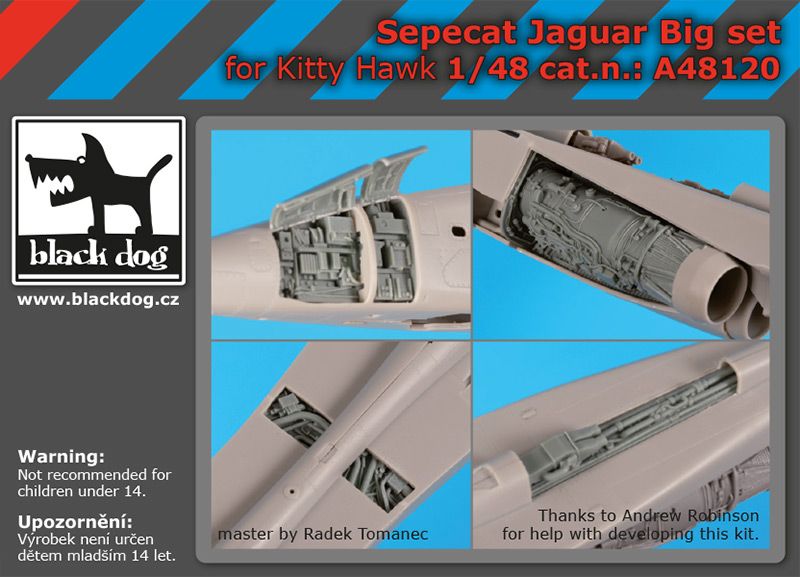
ok Ian my gripes were mostly with engine fitment an the covers that fit round them as on my kit they are about 3mm short of meeting up to the bottom fuaslage terrible in my opininon an the main undercart mounts are way out of place i had to get the dremel diamon cutter an cut about 4to 5 mm along the bottom fualage so the undercarts could be fitted in there slots an then i was left with a big hole which i filled up with 1 mm platicard but see how you get on as i found that the only things that really fit good was the two avionics covers well thats what happened too me when doin this kit as ive been building plastic kits for over 50 yrs or so but ive never had a kit that was so bad a fit hows that ?

ps when i first saw it to buy in hannant i asked if i could see inside the kit box an i was so impressed with the layout an illastations as it looked so well made as i wanted to build 54 sqr at coltishall as i was there to see the real planes up close an watch them bein refuled till the fuel came pourin out of the overflow pipe at the tail but i was really dissapointed with this kit an the decals just splinted when i put them in water
chris
 
Last edited:

Ian M

Administrator
Staff member
Administrator
Moderator
SMF Supporter
Joined
Dec 14, 2008
Messages
19,786
Points
113
Location
Falster, Denmark
First Name
Ian
The butcher shop is now open.
Right then.
20220127_102738.jpg
First we chop off the fan at the front.

20220127_103652.jpg
Then the jet nozzle off the back.
20220127_105753.jpg
Add a couple of tabs to give the covers something to sit against.
The Hope was that I would be able to just glue the exhaust one once all was buttoned down but no such luck. I'll figure that bit out when I get to it.

Even though the fit of the nose section was a bit iffy the canopies fitted perfect!
20220126_135526.jpg
Dont worry about the glue, this was pre clean up.
20220126_135620.jpg
The intakes are now flush on all three sides. Panel lines re scribed and even a few rivets re impressed! The nastiness just behind the cock pit is also not as bad now.


A few more thoughts and impressions about this kit:
All these panels that "dont fit" and are total :poop: Well I have to conclude that that the panels do not fit. They are not designed to fit in the closed position. They are designed to be open. The covers for the machine guns have detail on the inside that are just in the way and the interior 'frame' that they close against is in the way! Simple fix cut off most of the supporting frame, file the detail off the edges inside and they fit. Yes its a faff. but I guess that they (KH) did not think that anyone would want to close the covers.
In which case they should have used more time on detail inside the exposed bays.
 

rtfoe

SMF Supporter
Joined
Apr 29, 2018
Messages
7,527
Points
113
Location
Malaysia
First Name
Richard
Ian, it must have been head racking to get you to double post.
With the grinding of the panel insides means it actually fits. That's one way of solving the problem.

Cheers,
Richard
 

Ian M

Administrator
Staff member
Administrator
Moderator
SMF Supporter
Joined
Dec 14, 2008
Messages
19,786
Points
113
Location
Falster, Denmark
First Name
Ian
LOL my decrepit lap top had a hissy fit. I have 'tidied up' sorry about that. :flushed:

I really believe that the design criteria was only for an open panel build but they sort of forgot to add the detail.
IF and its a big if, I ever get hold of another one of these. (I must be chuffing mad), I will do it doors open...Having found this little gem:
 

rtfoe

SMF Supporter
Joined
Apr 29, 2018
Messages
7,527
Points
113
Location
Malaysia
First Name
Richard
I have a feeling they accidentally forgot to add a sprue of closed door panels. Because however bad a fitting is, there is always a way around it with lots of dry fitting, fettling and sanding or even thinking out of the box and approaching from another angle. That's what makes this hobby interesting for builders rather than assemblers.
Getting a hold of another kit can either be easy if many want to offload thinking it's a bad kit or difficult once they realise the same as you have :smiling2:...now that it is no more in production.

Cheers,
Richard
 

boatman

SMF Supporter
Joined
Nov 8, 2018
Messages
12,962
Points
113
Location
NORFOLK UK
First Name
christopher
WELL Ian i made mine with useing tiny dolls house hinges so the engine bay covers would open so the engines could be seen an nav lights in it or all buttoned up same with the avionincs bay covers but for me never again on this kit
chris
 

Jim R

SMF Supporter
Joined
Apr 27, 2018
Messages
13,786
Points
113
Location
Shropshire
First Name
Jim
Hi Ian
This build is more problem solving than actual building. Impressed that it is still on the bench and not in the bin.
Your are sorting it and I'm sure you'll end up with a nice model. Often even decent kits have canopies which are a poor fit and yet this one was ok! Strange :rolling:
Jim
 

Ian M

Administrator
Staff member
Administrator
Moderator
SMF Supporter
Joined
Dec 14, 2008
Messages
19,786
Points
113
Location
Falster, Denmark
First Name
Ian
Cheers chaps.
Once I have the 'house keeping' out the way I might have a go at the joint where the wings and fuselage meet up. We will see...
 

boatman

SMF Supporter
Joined
Nov 8, 2018
Messages
12,962
Points
113
Location
NORFOLK UK
First Name
christopher
Hi Ian
This build is more problem solving than actual building. Impressed that it is still on the bench and not in the bin.
Your are sorting it and I'm sure you'll end up with a nice model. Often even decent kits have canopies which are a poor fit and yet this one was ok! Strange :rolling:
Jim

HI Jim this is just my opinion of the kit havin built it but in my opinion this kit goes from one extreme to the other meaning that yes some parts fit very well on the good side eg' the canopy an the front avionics panels yes they fit great an a few other bits but then on the downside the rear part of the plane is terrible eg' the engines wont fit propberly

an nor will their covers an the main undercart is in my opinion way out of place so answer is cut the fusalarge so the ungercart can be fitted then there is a large hole to be filled as i did with plasticard but Ian is gonna make a nice job of this dog as he has already cut down the engines which i didnt want to do but each to his own

an i think he will turn this pigs ear into a silk purse now he knows the faults of this kits an well done to him but i only hope his decals turn out ok as mine spinterd in the water an i wonder if he will be able to get that weird colour right as it a sandy pinky colour well thats my take on this exspensive an dissapointing kit an yes it maybe my modeling skills are not up to the job but well see how this turns out
chris
 

Ian M

Administrator
Staff member
Administrator
Moderator
SMF Supporter
Joined
Dec 14, 2008
Messages
19,786
Points
113
Location
Falster, Denmark
First Name
Ian
HI Jim this is just my opinion of the kit havin built it but in my opinion this kit goes from one extreme to the other meaning that yes some parts fit very well on the good side eg' the canopy an the front avionics panels yes they fit great an a few other bits but then on the downside the rear part of the plane is terrible eg' the engines wont fit propberly

an nor will their covers an the main undercart is in my opinion way out of place so answer is cut the fusalarge so the ungercart can be fitted then there is a large hole to be filled as i did with plasticard but Ian is gonna make a nice job of this dog as he has already cut down the engines which i didnt want to do but each to his own

an i think he will turn this pigs ear into a silk purse now he knows the faults of this kits an well done to him but i only hope his decals turn out ok as mine spinterd in the water an i wonder if he will be able to get that weird colour right as it a sandy pinky colour well thats my take on this exspensive an dissapointing kit an yes it maybe my modeling skills are not up to the job but well see how this turns out
chris
As I wrote in an earlier post the kit was designed to be built with everything open and on show, hence the panels not fitting. Having seen how poor the engines are depicted I had no issue with cutting them up.

I got the main UC fitted this afternoon and kitty is sleeping on her back until tomorrow. Surprisingly it went in quite easy and I only had to trim a couple of mm off the mounting plate to enable me to put it in the opening and trist it into place.

As far as the decals, I found some for another. So no worries there.
 

Ian M

Administrator
Staff member
Administrator
Moderator
SMF Supporter
Joined
Dec 14, 2008
Messages
19,786
Points
113
Location
Falster, Denmark
First Name
Ian
Now in glorious Technicolor.
As the under title might suggest I have been playing with some paint.
While having a rummage around in the paint draws, I found a pot of Xtracrylix RAF Gulf desert pink paint.
20220202_190654.jpg
Like most of my painting exploits this one too started with Primer. Todays choice, Vallejo light gray.
20220202_190718.jpg
And no I have not painted the UC yet, I will do that right at the end.
20220202_190737.jpg
The rather annoying joint in the wing has all but gone. I even managed to replace most of the rivet detail that got scrubbed away.
A couple of days curing and a quick rub down with a fine sanding sponge to get the 'dry overspray' sorted, then...
20220202_195529.jpg
After a small play with the paint/thinners ratio I found one that worked.... Xtracrylix paint and Vallejo thinner works but is a bit hit and miss. To little thinner and it goes a bit gloopy, to much and its almost like a wash. I had a couple of places where the paint 'avoided'' the detail....
20220202_195541.jpg
I was just about to clean up when I remembered the air brakes and wheel bay doors.
20220202_195645.jpg
And the pylons and tail planes....
OK I admit its not the best paintjob I have done but its OK. I will now let it cure a day or so before I mask off for the leading edge black paint...Which I Might just mask and do with a hairy stick ! Gasp!
The trio is now one step closer to completion...watch this space.
 

boatman

SMF Supporter
Joined
Nov 8, 2018
Messages
12,962
Points
113
Location
NORFOLK UK
First Name
christopher
Now in glorious Technicolor.
As the under title might suggest I have been playing with some paint.
While having a rummage around in the paint draws, I found a pot of Xtracrylix RAF Gulf desert pink paint.
View attachment 444506
Like most of my painting exploits this one too started with Primer. Todays choice, Vallejo light gray.
View attachment 444507
And no I have not painted the UC yet, I will do that right at the end.
View attachment 444508
The rather annoying joint in the wing has all but gone. I even managed to replace most of the rivet detail that got scrubbed away.
A couple of days curing and a quick rub down with a fine sanding sponge to get the 'dry overspray' sorted, then...
View attachment 444509
After a small play with the paint/thinners ratio I found one that worked.... Xtracrylix paint and Vallejo thinner works but is a bit hit and miss. To little thinner and it goes a bit gloopy, to much and its almost like a wash. I had a couple of places where the paint 'avoided'' the detail....
View attachment 444510
I was just about to clean up when I remembered the air brakes and wheel bay doors.
View attachment 444511
And the pylons and tail planes....
OK I admit its not the best paintjob I have done but its OK. I will now let it cure a day or so before I mask off for the leading edge black paint...Which I Might just mask and do with a hairy stick ! Gasp!
The trio is now one step closer to completion...watch this space.
WELL Done Ian but yours must have been a better kit than mine as mine was way out of fitting so again well done
:thumb2:
chris
 

adt70hk

I know its a bit sad but I like quickbuild kits!!!
SMF Supporter
Joined
Sep 4, 2019
Messages
9,517
Points
113
First Name
Andrew
Coming on nicely!!

ATB.

Andrew
 
Last edited:

Ian M

Administrator
Staff member
Administrator
Moderator
SMF Supporter
Joined
Dec 14, 2008
Messages
19,786
Points
113
Location
Falster, Denmark
First Name
Ian
It wasn’t on the real planes either, so right on target there :smiling3:
I have heard rumours that Field painted equipment often involved brushes, rollers and even brooms. Though I doubt aircraft would have gotten the same treatment.
I read while researching this build, yes I do that sometimes, that even nose art, at least on modern jets, have to be approved. not due to any being to rude or the such. Because they have to fall within the weight tolerances as not to effect the CofG!
Right then off to paint some bombs!
 

Jim R

SMF Supporter
Joined
Apr 27, 2018
Messages
13,786
Points
113
Location
Shropshire
First Name
Jim
Hi Ian
The paint looks fine. It looks as if the fit issues are sorted.
Jim
 
Top