You are using an out of date browser. It may not display this or other websites correctly.
You should upgrade or use an alternative browser.
You should upgrade or use an alternative browser.
The HobbyBoss 1/32 B24D Liberator.
- Thread starter BarryW
- Start date
Jim R
SMF Supporter
That is very impressive indeed.
scottie3158
SMF Supporter
Very nice.
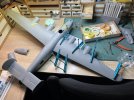
I had some back trouble so I was not at the bench for a week. However, the wings are on and seams sanded but my main progress has been on the remaining sub assemblies, engines, main landing gear and so on. There is still a fair bit of work to do on these, see the picture, when done I will be masking up the main airframe and priming it.
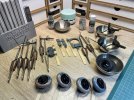
This has been a long build, partly due to my back issues, but I feel that I am getting to the home straight now and I should be able to get this done in another two to three weeks.

This has been a long build, partly due to my back issues, but I feel that I am getting to the home straight now and I should be able to get this done in another two to three weeks.
Jim R
SMF Supporter
Hope the back improves Barry. Glad the wings are on OK. Big job on a model this size.
scottie3158
SMF Supporter
Barry
Hope the back improves mate.
Hope the back improves mate.
I have been getting on with those sub-assemblies, weathering and detailing.
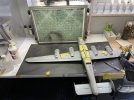
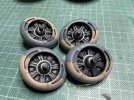
With the engines I used steel effect Uschi Metal Powders. Having matted the black painted engine I rubbed the metal powder into the centre boss of the engine with a cotton bud to give it an oily steel look. I then dry brushed the powder over the rest of the engine to highlight detail. It’s a very simple but effective way to depict engines.
The undercarriage painted, matted with a wash applied and dry brushed with the chrome effect Uschi Metal Powder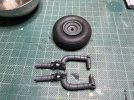
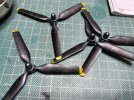
The props, for these used a semi-matt varnish then i dry brushed Chrome Uschi Metal Powder over detail, along the edges of the props and a little to depict chips. These metal powder are so versatile for depicting painted metal.
Tomorrow, all being well, I will be doing some masking of the main airframe and spraying black primer.
With the engines I used steel effect Uschi Metal Powders. Having matted the black painted engine I rubbed the metal powder into the centre boss of the engine with a cotton bud to give it an oily steel look. I then dry brushed the powder over the rest of the engine to highlight detail. It’s a very simple but effective way to depict engines.

The undercarriage painted, matted with a wash applied and dry brushed with the chrome effect Uschi Metal Powder

The props, for these used a semi-matt varnish then i dry brushed Chrome Uschi Metal Powder over detail, along the edges of the props and a little to depict chips. These metal powder are so versatile for depicting painted metal.

Tomorrow, all being well, I will be doing some masking of the main airframe and spraying black primer.
- Joined
- Sep 4, 2019
- Messages
- 9,492
- Points
- 113
- First Name
- Andrew
I have been getting on with those sub-assemblies, weathering and detailing.
With the engines I used steel effect Uschi Metal Powders. Having matted the black painted engine I rubbed the metal powder into the centre boss of the engine with a cotton bud to give it an oily steel look. I then dry brushed the powder over the rest of the engine to highlight detail. It’s a very simple but effective way to depict engines.
View attachment 496122
The undercarriage painted, matted with a wash applied and dry brushed with the chrome effect Uschi Metal Powder View attachment 496123
The props, for these used a semi-matt varnish then i dry brushed Chrome Uschi Metal Powder over detail, along the edges of the props and a little to depict chips. These metal powder are so versatile for depicting painted metal.
View attachment 496124
Tomorrow, all being well, I will be doing some masking of the main airframe and spraying black primer.
Love that effect Barry. That really does look the business.
Andrew
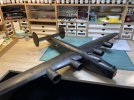
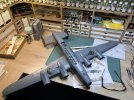
Well this shot of the airframe in front of my spray booth is another illustration of its size.
This is my first use of the large 15ml spray cup with the Colani.
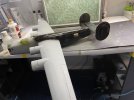
The usual larger spray cups I had, the standard size are 5ml. Two full cups and the top of the airframe has been sprayed.
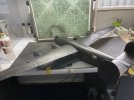
I will leave it 10 minutes to dry then spray the underside. I can see a fair bit of work is needed on the seams already.
This is my first use of the large 15ml spray cup with the Colani.

The usual larger spray cups I had, the standard size are 5ml. Two full cups and the top of the airframe has been sprayed.

I will leave it 10 minutes to dry then spray the underside. I can see a fair bit of work is needed on the seams already.
Richard48
SMF Supporter
My good Lord Barry.Thats one hell of a model.Real labour of love with this one.Ive always liked the Liberator that Shep paine did in one of his books.Crashed in the Libyan desert after getting lost on a mission return.Cant think of the name of the bird.
Cracking build pal.
Rich
Cracking build pal.
Rich
Steve Brodie
SMF Supporter
she looks huge now she is in black
Jim R
SMF Supporter
Looks great Barry and really shocks when you realise the size.
rickoshea52
SMF Supporter
What a beast.
- Joined
- Apr 28, 2018
- Messages
- 10,793
- Points
- 113
- First Name
- Jakko
Maybe take it over to @Andy T and have him use full-size equipment on it?This model is certainly taking a lot of spraying!!!


