Tamiya 1/35 Churchill Mk VII Tank

Andy T

SMF Supporter
Joined
Apr 26, 2021
Messages
2,017
Points
113
Location
Sheffield
First Name
Andy
Personal preference with the painting vs building. I prefer to paint the wheels and tracks separately whenever possible as they may want different colours, finishes or weathering effects.

As for the mould line, scraping along it usually removes the majority, if not all. You can get dedicated mould line removers, or scrapers, but I find the back of a hobby blade, or even the sharp side, works well enough.

If there is a tiny bit left that you just can't reach to sand, some carful brushing with an extra thin cement will melt it and blend it in.
 

Tim Marlow

Little blokes aficionado
SMF Supporter
Joined
Apr 27, 2018
Messages
16,829
Points
113
Location
Somerset
First Name
Tim
Personal preference with the painting vs building. I prefer to paint the wheels and tracks separately whenever possible as they may want different colours, finishes or weathering effects.

As for the mould line, scraping along it usually removes the majority, if not all. You can get dedicated mould line removers, or scrapers, but I find the back of a hobby blade, or even the sharp side, works well enough.

If there is a tiny bit left that you just can't reach to sand, some carful brushing with an extra thin cement will melt it and blend it in.
Agree with Andy. My weapon of choice for scraping the join is the sharp side of a 15a scalpel blade used at about ninety degrees to the surface. I find the curved shape doesn’t dig in as much as the tip of a straight blade. The tip of a number 11 fine straight bKade is useful for getting into closed areas though, and tools like a small fold of 600 wet and dry Emery paper also work for getting between some areas. In the end it just takes time, but it’s one of the things that makes a good build stand out.
 

Tim Marlow

Little blokes aficionado
SMF Supporter
Joined
Apr 27, 2018
Messages
16,829
Points
113
Location
Somerset
First Name
Tim
Forgot to say, some fine parts are best cleaned up while still on the sprue, just leaving the scar to clean up when they are cut off, and some smaller bits may even be easier to clean up after they are glued on. It’s just one of those things that gets easier with practice. Doesn’t get any faster though :crying:
 

Dave Ward

Still Trying New Things
SMF Supporter
Joined
Apr 27, 2018
Messages
8,682
Points
113
Location
South Gloucestershire
First Name
David
Thanks, that's sorted now.

The next phase is the wheels/tracks. Now I'm not sure about this. Do I prime all the parts separately and then build, or build it and then prime it.
or does it not matter about the order you do it?

also, any tips for getting rid of moulding (molding?) lines in curved and weird shaped parts? this is proving to be very tricky indeed!
View attachment 503869
Steve,
if you dry fit the road wheels & offer up the tracks, then you can see which mould lines will be visible after assembly - no point in spending time on something that won't be seen. Scraping with a knife blade should remove the worst, finished with a sanding stick. ( or a half round miniature file )
I would assemble the major part of the model first, then prime - the overall base colour is olive drab, so nothing's gained by priming the individual parts. Small detail parts ie exhaust pipes, primed off the model & painted before adding. Often the sequence of priming.painting doesn't matter, just whichever is convenient to you
Dave
 

SteveT

SMF Supporter
Joined
Jan 18, 2024
Messages
305
Points
93
Location
Lancashire
First Name
Steve
Steve,
if you dry fit the road wheels & offer up the tracks, then you can see which mould lines will be visible after assembly - no point in spending time on something that won't be seen. Scraping with a knife blade should remove the worst, finished with a sanding stick. ( or a half round miniature file )
I would assemble the major part of the model first, then prime - the overall base colour is olive drab, so nothing's gained by priming the individual parts. Small detail parts ie exhaust pipes, primed off the model & painted before adding. Often the sequence of priming.painting doesn't matter, just whichever is convenient to you
Dave
Thank you!
 

Jakko

Way past the mad part
SMF Supporter
Joined
Apr 28, 2018
Messages
10,888
Points
113
First Name
Jakko
I’ll agree with the above: I just scrape most mould lines away with the sharp side of my modelling knife. If the surface really needs to be flat, I’ll use a diamond file (a set like this costs you next to nothing and should last forever if you just file plastic kit parts with them), but usually, the knife will be enough.

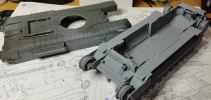
For the parts you showed, though, you likely won’t even need to remove the mould lines. They’re on the underside and will be invisible, or almost so, with the tank on its wheels.

As for fitting the wheels before or after painting, again, as above: that depends on preference — and therefore, experience :smiling3: However, my take on it is that, if something gets in the way for painting, it’s probably best to leave it off until afterward. On a Churchill, I would put the drive sprockets and idler wheels in already, but leave them loose (so you can rotate them to paint them all over), but only fit the roadwheels after painting both the suspension and the wheels themselves.
 
Last edited:

Waspie

SMF Supporter
Joined
Mar 13, 2023
Messages
2,561
Points
113
Location
Portland - Dorset
First Name
Doug
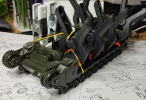
It's looking good Steve. You must be feeling better about the construction of this one. If not - you should be. :thumb2: Elastic band AND clamps, now that's just showing off!!!
 

Scratchbuilder

SMF Supporter
Joined
Jul 2, 2022
Messages
1,987
Points
113
Location
Luton
First Name
Mike
Steve, adding thinner to the Tamiya paint... This can work, but you my need to add more thinner to the paint. I have tried it and it does work up to a point. Best way is to pour what you need into a pill cup and add the same amount of thinners, 50/50 mix.
 

SteveT

SMF Supporter
Joined
Jan 18, 2024
Messages
305
Points
93
Location
Lancashire
First Name
Steve
Started priming the hull bottom and top last night, got the bottom done and as soon as I started on the top.. my damn primer ran out.
I use humbrol rattlecan primer but jeez it's so very expensive. Just ordered some cheaper primer (rustoleum) it's coming tomorrow.

(Note: I've not glued on the fuel can, shovels, extra track segments or tow cable(is it?) as I figured it would be better to paint them and then glue them on.)

tank_3.png
 

Dave Ward

Still Trying New Things
SMF Supporter
Joined
Apr 27, 2018
Messages
8,682
Points
113
Location
South Gloucestershire
First Name
David
Steve,
it's been said already - but wash the rubber band tracks in warm water & washing up liquid - realy swish them around - rinse in clean water & air dry ( overnight! ). This will allow paint to stick - it'll never be as strong as paint on ordinary polystyrene, but gives you a fighting chance! I normally prime my tracks with a mix of earth brown, with just a touch of gunmetal & allow a day or so to really dry before further work. I suspect every modeller has his own technique, you just have to choose the one that works for you!
Dave
 

SteveT

SMF Supporter
Joined
Jan 18, 2024
Messages
305
Points
93
Location
Lancashire
First Name
Steve
Steve,
it's been said already - but wash the rubber band tracks in warm water & washing up liquid - realy swish them around - rinse in clean water & air dry ( overnight! ). This will allow paint to stick - it'll never be as strong as paint on ordinary polystyrene, but gives you a fighting chance! I normally prime my tracks with a mix of earth brown, with just a touch of gunmetal & allow a day or so to really dry before further work. I suspect every modeller has his own technique, you just have to choose the one that works for you!
Dave
Thanks, I'll do that today!
 

Gern

'Stashitis' victim
SMF Supporter
Joined
May 17, 2009
Messages
9,706
Points
113
Location
Stourbridge
First Name
Dave
Started priming the hull bottom and top last night, got the bottom done and as soon as I started on the top.. my damn primer ran out.
I use humbrol rattlecan primer but jeez it's so very expensive. Just ordered some cheaper primer (rustoleum) it's coming tomorrow.

(Note: I've not glued on the fuel can, shovels, extra track segments or tow cable(is it?) as I figured it would be better to paint them and then glue them on.)

View attachment 503943
It always amazes me when modellers add all those bits then paint them on the model. Surely it has to be easier to paint them first then add them? Each to their own though.
 

Jakko

Way past the mad part
SMF Supporter
Joined
Apr 28, 2018
Messages
10,888
Points
113
First Name
Jakko
I use humbrol rattlecan primer but jeez it's so very expensive.
For most modelling purposes, good aerosol primer from a car paint shop will work fine too.

It always amazes me when modellers add all those bits then paint them on the model. Surely it has to be easier to paint them first then add them?
I usually add them first if they’ll end up painted the same colour as the rest of the model (like American tools, they were olive drab much of the time) or if there are things to be added to the tools but which need to sit right on the vehicle, like straps.
 

Gern

'Stashitis' victim
SMF Supporter
Joined
May 17, 2009
Messages
9,706
Points
113
Location
Stourbridge
First Name
Dave
For most modelling purposes, good aerosol primer from a car paint shop will work fine too.


I usually add them first if they’ll end up painted the same colour as the rest of the model (like American tools, they were olive drab much of the time) or if there are things to be added to the tools but which need to sit right on the vehicle, like straps.

I should have said, I meant it would be easier to paint them separately if they're a different colour. Am I right thinking the tools etc could be added to the vehicle before it was painted and therefore they'd end up the same?
 
  • Like
Reactions: JR

Jakko

Way past the mad part
SMF Supporter
Joined
Apr 28, 2018
Messages
10,888
Points
113
First Name
Jakko
On the real thing, you mean? That depends. American tools generally got dip-painted olive drab at the factory, either the tool factory or the vehicle factory (I’m not sure), and only then added to the already-painted vehicle. The Germans, when they camouflage-painted their tanks, tended to leave the tools on so those would just be painted along, and the Americans did much the same in those units that applied (usually black) patches to their vehicles. This helps the camouflage, of course, because now the tools will stand out less than if they’re a different colour than the vehicle they’re on.
 
  • Like
Reactions: JR
Top