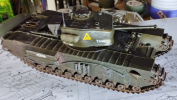
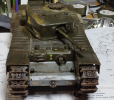
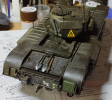
Tamiya 1/35 Churchill Mk VII Tank

Gern

'Stashitis' victim
SMF Supporter
Joined
May 17, 2009
Messages
9,694
Points
113
Location
Stourbridge
First Name
Dave
I'm lucky I can use the worktop next to my kitchen sink for my A/B and extractor fan so rinsing and flushing away is simples. One VITAL tip if you have the same set up:

Put the plug in the sink BEFORE you dismantle your A/B and leave it there until your A/B is reassembled!

You don't really need to ask how I learned how important this is.
 

Jakko

Way past the mad part
SMF Supporter
Joined
Apr 28, 2018
Messages
10,793
Points
113
First Name
Jakko
Put the plug in the sink BEFORE you dismantle your A/B and leave it there until your A/B is reassembled!
QFT. Luckily all I’ve ever lost by neglecting to do that have been a couple of blanking plugs for my Aztek, of which you get a bunch of spares, but I still didn’t like losing them.
 

SteveT

SMF Supporter
Joined
Jan 18, 2024
Messages
275
Points
93
Location
Lancashire
First Name
Steve
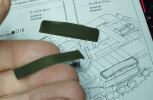
Okay, I'm after opinions here.

I have all the decals done and I'm now adding parts and accessories that I didn't add earlier on (such as track sections, tow cables, fuel tank etc)
but I am looking at these two side pieces (I'll be honest I don't know what they are, a wild guess would be radiator covers but I could be miles off.

Now.. I've been looking at these and quite frankly I don't like the look when they are fitted, I much prefer the look without them. So you can say
"Hey Steve, it's your model you fool, do what you like". fair enough, but honestly would you leave them off because you prefer the look or add them because
it should be as accurate as possible?

Here's a pic showing the parts and the instructions where they go.
tank_8.png
 

Dave Ward

Still Trying New Things
SMF Supporter
Joined
Apr 27, 2018
Messages
8,644
Points
113
Location
South Gloucestershire
First Name
David
They're guards for the air intakes - they stop any hobnailed booted tankie from crushing the grilles _ I've seen pictures of tanks with and without them - so it's your choice!
Dave
 

Mark1

SMF Supporter
Joined
Apr 17, 2021
Messages
3,554
Points
113
Location
South london
First Name
Mark
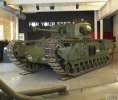
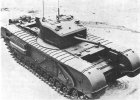
Leave em off if you prefer, have a google youll see plenty of pictures with them on and also without them. This is the example at the imperial war museum.1000003052.jpg
 

The Smythe Meister

Born to be WILD....... until about 9pm
SMF Supporter
Joined
Jan 30, 2019
Messages
5,719
Points
113
Location
Devon
First Name
Andy
Personally Steve?..... I wouldn't bother with putting stuff on a model that I didn't like.
Of course, that's just me,there will be many who would put things on because it makes for a more accurate rendition,which is fine, there's no right or wrong, it's just personal preference.
I'd imagine,also,that if you looked deep enough into it, you'd find an example of just about any scenario regarding bits left off, missing or just destroyed! :thinking: ;):thumb2:
 

Jakko

Way past the mad part
SMF Supporter
Joined
Apr 28, 2018
Messages
10,793
Points
113
First Name
Jakko
Like Dave says, they could be present or not, so it’s entirely up to you whether or not to fit them.
 

Steve-the-Duck

SMF Supporter
Joined
Jul 3, 2020
Messages
1,128
Points
113
Location
Medway Towns
First Name
Chris
Many kits, in different scales (including one of my 28mm ones) have them as separate parts, so that makes them entirely optional. All depends on whether you're doing an actual and/or specific vehicle.
 

SteveT

SMF Supporter
Joined
Jan 18, 2024
Messages
275
Points
93
Location
Lancashire
First Name
Steve
Personally Steve?..... I wouldn't bother with putting stuff on a model that I didn't like.
Of course, that's just me,there will be many who would put things on because it makes for a more accurate rendition,which is fine, there's no right or wrong, it's just personal preference.
I'd imagine,also,that if you looked deep enough into it, you'd find an example of just about any scenario regarding bits left off, missing or just destroyed! :thinking: ;):thumb2:
Yeah! to be honest there's also these two large mudguard type of thing that go over the exposed end of the tracks but I'm not sure I'll add those either and looking at the tank image above, that doesn't have them either.
 

Gern

'Stashitis' victim
SMF Supporter
Joined
May 17, 2009
Messages
9,694
Points
113
Location
Stourbridge
First Name
Dave
Those covers at the front of the tracks are highly vulnerable to damage as the tank travels through bushes, hedges, trees and sometimes even walls. Some modellers leave them in new/weathered condition, some show them damaged and some omit them completely. Your tank - your choice.

I would say though that it would be more realistic for them to be damaged or missing on a heavily weathered tank rather than one that's fresh off the boat if you see what I mean.
 

Jakko

Way past the mad part
SMF Supporter
Joined
Apr 28, 2018
Messages
10,793
Points
113
First Name
Jakko
Yeah! to be honest there's also these two large mudguard type of thing that go over the exposed end of the tracks but I'm not sure I'll add those either and looking at the tank image above, that doesn't have them either.
The tank in the photo from the museum is not typical for a Mk. VII, though. Very early Churchills had no mudguards at all, then they added a small curved bit over the drive sprocket (at the rear), then came covers at the rear alongside the engine deck, and finally full-length covers over the entire track. By the time time Mk. VII was produced, those had long been standard and it’s rare to see a Mk. VII without them.

Here are photos of two Churchill Mk. IIs with only the rear curved bit:

Churchill II curved rear mudguards only.jpgChurchill III curved rear mudguards only.jpeg

This is a Mk. IV with a mudguard along the engine deck only:

Churchill IV rear mudguards only.jpg

And a Mk. III with the full set of mudguards:

Churchill III full trackguards.jpg

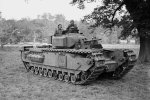
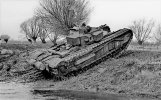
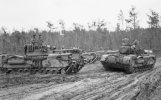
What was fairly common, was to remove the centre section. The mudguards came in three long pieces (plus a short bit at the back, and curved parts front and rear to cover the drive sprocket and idler), and the middle piece was sometimes removed in muddy conditions, as on the Mk. VII on the left here:

Churchill VII centre mudguard missing.jpg

This was done because the mud that built up under the mudguards, eventually started pushing up against them. In itself this wasn’t a problem, but the centre section would hit the bottom edge of the turret and possibly jam it.

The tank on the right is a Mk. IV, as far as I can tell (it has a pistol port in the turret, so it’s not a Mk. VII), and it only has the rear section of the mudguard on the right. It’s unlikely it never had the centre and front parts, though, because this is clearly a photo from late in the war, winter 1944–45 or spring 1945, so I’m guessing either the crew removed both sections to combat the mud, or the front one was damaged and was either ripped off or discarded by the crew.
 

Scratchbuilder

SMF Supporter
Joined
Jul 2, 2022
Messages
1,938
Points
113
First Name
Mike
I'm lucky I can use the worktop next to my kitchen sink for my A/B and extractor fan so rinsing and flushing away is simples. One VITAL tip if you have the same set up:

Put the plug in the sink BEFORE you dismantle your A/B and leave it there until your A/B is reassembled!

You don't really need to ask how I learned how important this is.
It's when it flies out of your wet hand and after an hour crawling all over the bathroom floor your eye catches a slight glint in the tiolet bowl, was that a bubble???? no it was the bit you were looking for.....
 

Scratchbuilder

SMF Supporter
Joined
Jul 2, 2022
Messages
1,938
Points
113
First Name
Mike
Okay, I'm after opinions here.

I have all the decals done and I'm now adding parts and accessories that I didn't add earlier on (such as track sections, tow cables, fuel tank etc)
but I am looking at these two side pieces (I'll be honest I don't know what they are, a wild guess would be radiator covers but I could be miles off.

Now.. I've been looking at these and quite frankly I don't like the look when they are fitted, I much prefer the look without them. So you can say
"Hey Steve, it's your model you fool, do what you like". fair enough, but honestly would you leave them off because you prefer the look or add them because
it should be as accurate as possible?

Here's a pic showing the parts and the instructions where they go.
View attachment 504470
"Hey Steve, it's your model you fool, do what you like"....
Seriously they are for the air intakes and fit so that the open side is to the outside of the tank as it is in your fingers in the pic. The closed side was to stop the squaddies kicking dirt and tools over the air intake.
 

Scratchbuilder

SMF Supporter
Joined
Jul 2, 2022
Messages
1,938
Points
113
First Name
Mike
Take the last photo of those Jakko put up as your example to work from. I for one would not like to get caught up in the tracks if I had to abandon the tank in a hurry. Leave off the front and rear mud guards, although I always add the rear ones by choice.
And dismounting from the front when you have not only the main armament but also the ranging and BESA to avoid can be hazardous to the health, as one of my late serving members could testify to if he was here, he moved a 120mm WOMBAT a/t gun but failed to check the .5 spotting rifle was safe, caught the trigger, the gun went off and the end result was fatal.
 

SteveT

SMF Supporter
Joined
Jan 18, 2024
Messages
275
Points
93
Location
Lancashire
First Name
Steve
Cock up #373 (or it seems like it)
I just despair, I just looked at my tank and.. what the hell! would you believe one of the tracks is on the wrong way around, I'm just amazed I didn't realise.
I will be honest and I've had the tracks on/off a couple of times and one of them broke so I used the staple trick, however I mustn't have taken enough
care to realise the orientation of it. Unfortunately it's too late to fix, so it'll stay as another obvious cock up.

..facepalm..
 

Jakko

Way past the mad part
SMF Supporter
Joined
Apr 28, 2018
Messages
10,793
Points
113
First Name
Jakko
I bet if you look hard enough you’ll find a contemporary picture with the tracks on like yours…..
As requested:

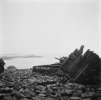
AVRE G42 voorkant.jpg

This is a Mk. IV AVRE fascine-carrier that got stuck on the side of a bridge in the Westkapelle landing on 1 November 1944. The left-hand track (on the right in the picture) is on correctly, but the right-hand track is on in reverse. Since you can’t reverse individual links (as you can on, for example, a Sherman) this means the whole track is on backwards.

Steve, if you want to correct your model, then the Churchill’s long mudguards can come to your rescue: just cut the track, pull it out, put it back in the right way around, staple or sew the ends together, and turn it so the join is hidden under the mudguard.
 

SteveT

SMF Supporter
Joined
Jan 18, 2024
Messages
275
Points
93
Location
Lancashire
First Name
Steve
Thanks for the tip but I think I'm going to leave it as-is as a reminder to not take things for granted when refitting parts.

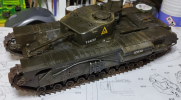
Okay so today I've been trying to do some weathering, this was always going to be difficult as I know there's a fine line between enough and too much and I'm rather
clueless about doing it. So here we have my first ever tank pretty much complete. (I am aware of seam here and there, I did try to remove them but obviously I need to try harder next time.

Right, images below and thank you all so very very much for helping me along the way, without your help it wouldn't have got this far.

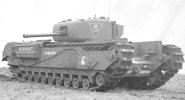
tankd_2.pngtankd_2b.pngtankd_3.pngtankd_4.png
 
Top