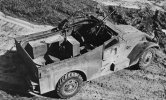
Scotties Airfix M3A1 Scout car.

scottie3158

SMF Supporter
Joined
Apr 27, 2018
Messages
12,781
Points
113
Location
Spalding
First Name
Paul
The springs look superb Paul, Shim steel may be a bit difficult to work with, I use it at work. The brass you have used looks just right, why use something else?
Hi mate I used to use it as well and thinking about it your probably right it should cut ok but maybe difficult to join them together.
Never fail to amaze all here at Race Towers Paul.

You could always do a Steve" Rivet " Jones, remember the mirror he had underneath a model ?
Thanks John, no mirror this time will be making a base for this one.
He’ll need one for his latest model, as he’s trying to convert a K2 ambulance into the exact one from that Ice Cold Whatever movie with it that all you Brits seem to love, but most of the conversions needed are underneath.
Jakko, Steve has the skills to do it.
He’s obviously doing the dodge based one rather than the “stock” version then……I believe there were five different ambulances used, but the dodge one was better off road so was used for the most difficult off road scenes.
Tim, I didn't know that, everyday is a school day ;)
Paul, in answer to your query. No, I am NOT building one of these scout cars in 1/9th. I am still slowly plodding on with the Manx. It is unbelievable how much is wrong or simply missing.
John.
John, I will have to have a look.
I didn’t really follow the research thread but I gather it’s some kind of odd hybrid from different chassis/driveline parts. Also see here for the build.
Cheers Jakko, I haven't been on that site for ages.
 

Tim Marlow

Little blokes aficionado
SMF Supporter
Joined
Apr 27, 2018
Messages
16,898
Points
113
Location
Somerset
First Name
Tim
Hi mate I used to use it as well and thinking about it your probably right it should cut ok but maybe difficult to join them together.

Thanks John, no mirror this time will be making a base for this one.

Jakko, Steve has the skills to do it.

Tim, I didn't know that, everyday is a school day ;)

John, I will have to have a look.

Cheers Jakko, I haven't been on that site for ages.
My bad, not a Dodge, it was based on a Chevy CMP chassis.
 

scottie3158

SMF Supporter
Joined
Apr 27, 2018
Messages
12,781
Points
113
Location
Spalding
First Name
Paul
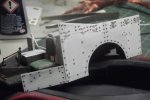
I am finding this quite relaxing at the moment but slow going. I have added the next panel under the drivers door.
DSCF4154.JPG

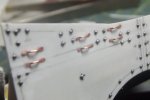
The tie downs have been made and added.

DSCF4155.JPG

and a little bit more added to the interior.

DSCF4156.JPG

A lot of the interior detail will have to be added when I have all the sides on so I can measure accurately the dimensions to scratch the gun rail.

I have some quinto rivets on order and depending on how they look and how easy they are to use I may remove the punched rivets as they do look a bit big or is it me?

cheers
Scottie
 

Jakko

Way past the mad part
SMF Supporter
Joined
Apr 28, 2018
Messages
10,971
Points
113
First Name
Jakko
IMHO, the rivets and tie-downs do look a bit large compared to the real thing:

M3A1_Scout_Car_interior.jpg

No idea how big they were on the real thing, but if I measure a little in this picture using the ruler tool in Photoshop, then the whole side panel you scratchbuilt is 663 pixels long front edge to back edge (measured over the double row of rivets near the top, along the line formed by the sets of rivets at the rear before they start rising to conform to the sloping front part), and one rivet is about 4 pixels across. So measure up your panel’s length, divide by 663 and multiply by 4 to get a reasonable rivet diameter?

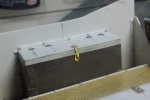
Also, you’ve fitted the stowage box inside but forgot the reinforcing plate on the inside that it sits against, which you can see in the photo above.
 

scottie3158

SMF Supporter
Joined
Apr 27, 2018
Messages
12,781
Points
113
Location
Spalding
First Name
Paul
IMHO, the rivets and tie-downs do look a bit large compared to the real thing:

View attachment 500860

No idea how big they were on the real thing, but if I measure a little in this picture using the ruler tool in Photoshop, then the whole side panel you scratchbuilt is 663 pixels long front edge to back edge (measured over the double row of rivets near the top, along the line formed by the sets of rivets at the rear before they start rising to conform to the sloping front part), and one rivet is about 4 pixels across. So measure up your panel’s length, divide by 663 and multiply by 4 to get a reasonable rivet diameter?

Also, you’ve fitted the stowage box inside but forgot the reinforcing plate on the inside that it sits against, which you can see in the photo above.
Thanks Jakko, not sure what reinforcing plate you mean is it the one that runs vertically from the centre of the box if it I still have to add it.
 

Mini Me

SMF Supporter
Joined
Jun 1, 2018
Messages
10,162
Points
113
First Name
Rick
The actual diameter of the rivet head differs from its bore diameter, usually two times the diameter of the bore. Example, if you have a 1/4 inch dia. rivet...the exposed head will be 1/2 inch in dia. They really show up well in photos. Yours look fine Scottie....even if just a tad over scale, they will blend in beautifully and virtually disappear once you get the CITB....as to the exterior, all the better to see them once painted weathered and judiciously muddied up! Where's "Rivet Jones" when you need him??? ;) :tears-of-joy::tears-of-joy::thumb2:
 

Jakko

Way past the mad part
SMF Supporter
Joined
Apr 28, 2018
Messages
10,971
Points
113
First Name
Jakko
not sure what reinforcing plate you mean is it the one that runs vertically from the centre of the box if it I still have to add it.
That one, yes. It’s actually behind the box, the two vertical lines of rivets you can see running up from the centre of the wheel arch are what hold it to the side plates.
 

scottie3158

SMF Supporter
Joined
Apr 27, 2018
Messages
12,781
Points
113
Location
Spalding
First Name
Paul
That one, yes. It’s actually behind the box, the two vertical lines of rivets you can see running up from the centre of the wheel arch are what hold it to the side plates.
Yes that has still to be fitted as are other details. Thank s for keeping me on my toes I may have missed it.
 

Jakko

Way past the mad part
SMF Supporter
Joined
Apr 28, 2018
Messages
10,971
Points
113
First Name
Jakko
Have you got (and/or any interest in? :smiling3: ) Steve Zaloga’s article in an old Military Modelling, in which he basically does what you are doing here too, namely replacing the whole rear body of this kit by plastic card?
 
  • Like
Reactions: JR

Allen Dewire

Proud Rabble Member
SMF Supporter
Joined
Apr 27, 2018
Messages
4,122
Points
113
Location
Bamberg
First Name
Allen
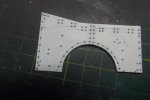
Using 0.6mm punched rivets I have come up with this.

View attachment 500683

Next to make and fit the tie downs before detailing the inside.


cheers
Scottie

Great stuff Bro!!! I've been following from the cheap seats and loving every minute of it. Those springs were incredible and now this. At the rate you're going, you'll put Rosie the Riveter out of a job Buddy!!! Do you ever have a prob with them falling off while handling the parts? Just wondering...

Prost
Allen
 

scottie3158

SMF Supporter
Joined
Apr 27, 2018
Messages
12,781
Points
113
Location
Spalding
First Name
Paul
Have you got (and/or any interest in? :smiling3: ) Steve Zaloga’s article in an old Military Modelling, in which he basically does what you are doing here too, namely replacing the whole rear body of this kit by plastic card?
Yes mate it will good to see how a good modeller went about it.
 

scottie3158

SMF Supporter
Joined
Apr 27, 2018
Messages
12,781
Points
113
Location
Spalding
First Name
Paul
Great stuff Bro!!! I've been following from the cheap seats and loving every minute of it. Those springs were incredible and now this. At the rate you're going, you'll put Rosie the Riveter out of a job Buddy!!! Do you ever have a prob with them falling off while handling the parts? Just wondering...

Prost
Allen
Thank you mate it's always good to have you looking in. They do come off sometimes but normally I am lucky. I have some Quinta rivets on order to see how I get on with them and see how they look.
 
  • Like
Reactions: JR
Top